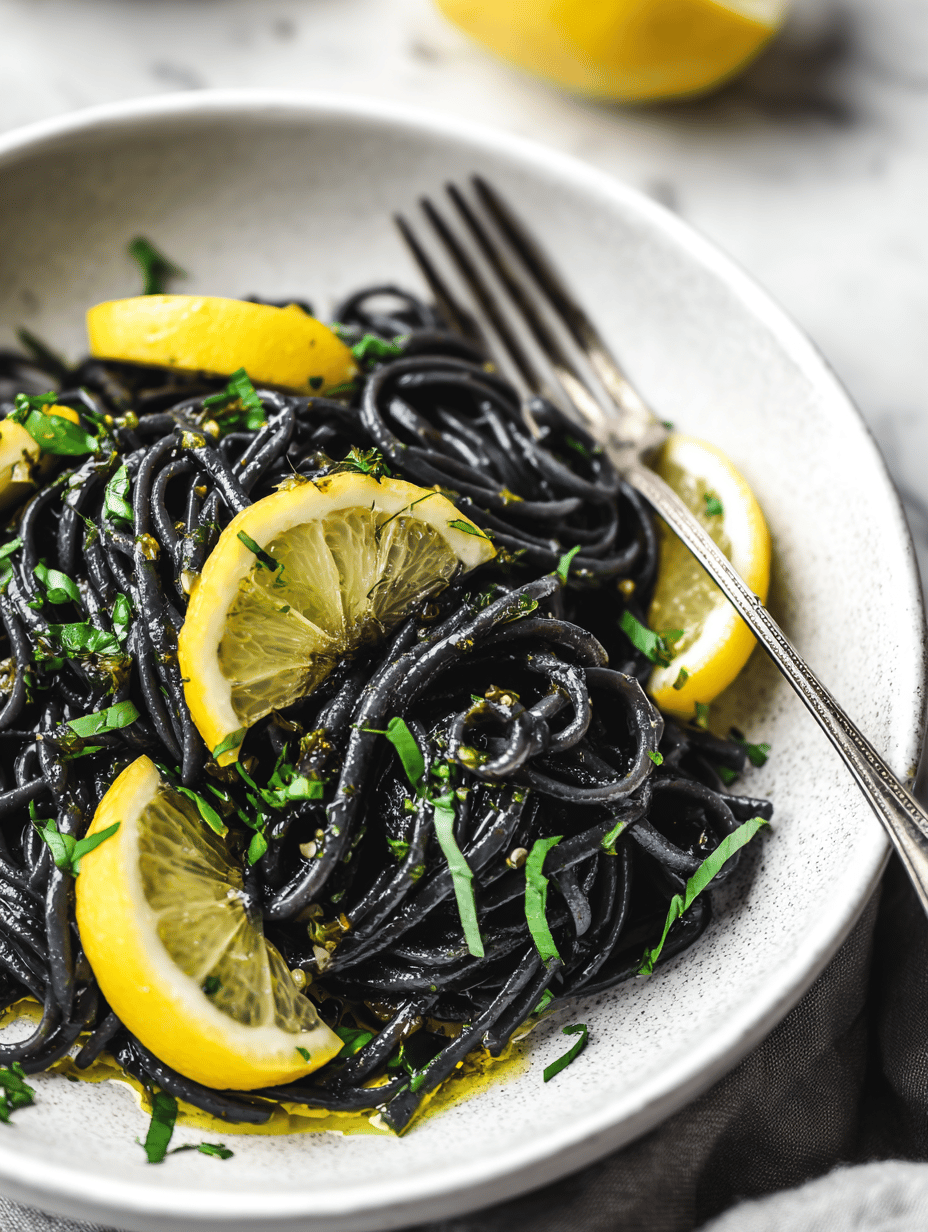
Blog

  • Halloween Jack-o’-Lantern Stuffed Bell Peppers: A Spooky Feast

    Halloween Jack-o’-Lantern Stuffed Bell Peppers: A Spooky Feast

    Every October, I dive into creative ways to celebrate Halloween with my favorite seasonally quirky twist. This year, I decided to craft a dish that combines the whimsy of carved pumpkins with a cozy, savory stuffing—entered the realm of Halloween stuffed bell pepper Jack-o’-Lanterns. They look adorable on the table, but what really excites me is the surprise inside each “carved” pepper.

    Fresh bell peppers are transformed into tiny pumpkins with playful facial cuts, then filled with a spicy, cheesy mixture that melts beautifully. The scent of roasted peppers mingling with garlic and herbs fills the kitchen with fall charm. It’s a visual treat and a flavor explosion all in one bite, perfect for celebrating the spooky season with friends and family.

    Halloween Stuffed Bell Pepper Jack-o’-Lanterns

    This dish features colorful bell peppers carved into pumpkin faces, filled with a spicy, cheesy stuffing, and roasted until tender and bubbling. The peppers take on a carved, jack-o’-lantern appearance with a savory, melty interior, making for a festive and flavorful presentation.
    Prep Time 20 minutes
    Cook Time 30 minutes
    Total Time 50 minutes
    Servings: 4
    Course: Main Course
    Cuisine: American
    Calories: 250

    Ingredients
      

    • 4 large bell peppers preferably orange or yellow for a pumpkin-like appearance
    • 1 cup cooked quinoa or rice for the stuffing base
    • 1 cup shredded cheddar cheese or any melting cheese
    • 1/2 cup cooked black beans rinsed and drained
    • 2 cloves garlic minced
    • 1 tsp cumin ground
    • 1 tsp paprika smoked or sweet
    • to taste salt and pepper
    • 2 tbsp olive oil for roasting

    Equipment

    • Chef’s knife
    • Cutting board
    • Mixing bowl
    • Baking sheet
    • Spoon
    • Small paring knife

    Method
     

    1. Preheat your oven to 375°F (190°C).
    2. Wash the bell peppers thoroughly and slice off the tops. Carefully carve small facial features into each pepper using a paring knife to resemble tiny jack-o’-lanterns. Remove the seeds and membranes to create hollow, pumpkin-like shapes.
    3. Brush the outside of each carved pepper with a little olive oil to help them roast evenly and develop a nice color.
    4. Place the carved peppers on a baking sheet lined with parchment paper and roast in the oven for about 15 minutes, until they start to soften and the faces look a little more carved and slightly shriveled.
    5. Meanwhile, in a mixing bowl, combine cooked quinoa, shredded cheese, black beans, minced garlic, cumin, paprika, salt, and pepper. Stir until well mixed and the cheese begins to melt slightly.
    6. Carefully spoon the spicy cheese mixture into each roasted pepper, pressing gently to fill them completely and create a rounded, overflowing look.
    7. Return the stuffed peppers to the oven and bake for an additional 15 minutes, until the filling is hot, bubbly, and slightly golden on top.
    8. Remove the peppers from the oven and let them cool slightly. Serve warm, with their carved faces and cheesy filling on display.

    Notes

    For extra festive effect, you can use a small fork to create additional facial details or add a light drizzle of salsa or sour cream for flavor contrast.

    Whipping up these stuffed peppers offers a fun, interactive touch to your Halloween spread. Each bite balances festive flavors with comforting textures, making it more than just a decoration—it’s a delightful meal. As the last pepper disappears, your table will echo with satisfied smiles and curious questions about how you made your own edible pumpkins.

    Seasonal, playful, and surprisingly simple to make, these Jack-o’-Lantern peppers are a wonderful way to add charm and flavor to any October gathering. They remind us that festive eats can be both adorable and delicious, perfect for creating memories around the dinner table. Let the spooky spirit inspire your kitchen adventures this season.

  • Chill Out with the Wild Flavors of Mint & Chocolate Milkshake Slushie

    Chill Out with the Wild Flavors of Mint & Chocolate Milkshake Slushie

    Once you start blending ice with rich milk, a world of icy adventures opens up. But imagine taking that creamy coolness and adding a punch of unexpected flavor—like crisp mint or bittersweet chocolate. That9;s how the milkshake slushie became my secret weapon for hot days and lazy weekends.

    This recipe is about breaking free from plain old vanilla and embracing chaos in the freezer. The blend of fresh mint leaves or chocolate chunks transforms a simple drink into a sensory celebration. It9;s more than a treat; it9;s a rebellion against boring desserts.

    Mint Chocolate Milkshake Slushie

    This milkshake slushie combines blended ice and creamy milk with bursts of fresh mint or chunks of bittersweet chocolate, creating a refreshingly rich frozen drink. The texture is thick and smooth, with a visually appealing icy appearance topped with optional garnishes. It’s perfect for hot days or relaxed weekends, offering a cool, flavorful treat.
    Prep Time 10 minutes
    Total Time 10 minutes
    Servings: 2
    Course: Main Course
    Cuisine: Generic
    Calories: 180

    Ingredients
      

    • 2 cups ice cubes
    • 1 cup milk dairy or non-dairy
    • 2 Tbsp sugar optional, adjust to taste
    • 1/2 tsp vanilla extract optional
    • 1 oz bittersweet chocolate chunks optional for chocolate flavor
    • 4 fresh mint leaves optional, for a fresh mint flavor

    Equipment

    • Blender
    • Measuring cups and spoons

    Method
     

    1. Add the ice cubes, milk, sugar, and vanilla extract to your blender, then secure the lid.
    2. Blend on high until the mixture is thick, icy, and smoothly blended, about 30-40 seconds. You should see a frosty texture forming.
    3. Add the bittersweet chocolate chunks and mint leaves (if using) into the blender.
    4. Pulse a few times to evenly distribute the chocolate and mint without fully breaking down the ingredients, preserving some chunks for texture.
    5. Check the consistency—if it’s too thick, add a splash more milk and blend briefly until smooth but still icy.
    6. Pour the slushie into glasses, revealing its thick, icy, and slightly creamy appearance with bits of chocolate and fresh mint visible.
    7. Optional: Garnish with additional mint leaves or chocolate shavings for an attractive finish.
    8. Serve immediately with a straw or spoon, enjoying the cool, crunchy texture and burst of flavors.

    As the summer heat drifts away, this milkshake slushie keeps my kitchen cool and my spirit even cooler. It9;s a reminder that sometimes, all it takes is a quirky flavor combo to turn a regular pour into a party.

    Treasure those moments of chaos—because in the end, it9;s the unexpected twists that remind us of life9;s sweet unpredictability.

  • Hidden Spice Twist in Roasted Butternut Squash Soup

    Hidden Spice Twist in Roasted Butternut Squash Soup

    If you’ve ever roasted butternut squash and noticed its caramelized aroma filling your kitchen, you know it has an almost hypnotic effect. This soup takes that comforting scent and elevates it with a whisper of unexpected spices that linger on the tongue. I discovered this small twist while experimenting in my fall kitchen, and now it’s a fall favorite.

    The secret lies in a pinch of smoked paprika and a dash of cinnamon, which deepen the natural sweetness while adding layers of warmth. Blending the roasted vegetables creates a velvety texture that feels like a gentle hug in a bowl. It’s perfect for cozy nights or when you want a bowl of something both familiar and subtly surprising.

    Roasted Butternut Squash Soup with Spiced Warmth

    This soup features roasted butternut squash blended into a smooth, velvety puree. The addition of smoked paprika and cinnamon gives it a warming, subtly spicy flavor profile, while the roasting process enhances its natural sweetness and caramelized aroma. The final dish has a vibrant orange color and a creamy, comforting texture.
    Prep Time 15 minutes
    Cook Time 45 minutes
    Total Time 1 hour
    Servings: 4
    Course: Main Course
    Cuisine: North American
    Calories: 180

    Ingredients
      

    • 1 large butternut squash peeled, seeded, roughly chopped
    • 2 tablespoons olive oil for roasting
    • 1 small onion diced
    • 3 cloves garlic minced
    • 4 cups vegetable broth
    • 1 teaspoon smoked paprika adds depth and warmth
    • 0.5 teaspoon cinnamon provides warmth and aroma
    • to taste salt and pepper

    Equipment

    • Baking sheet
    • Blender or immersion blender
    • Large pot
    • Chef’s knife
    • Peeler

    Method
     

    1. Preheat your oven to 400°F (200°C). Place the peeled, seeded, and chopped butternut squash on a baking sheet. Drizzle with olive oil and toss to coat evenly. Roast for about 25-30 minutes until the squash is tender and caramelized around the edges.
    2. While the squash is roasting, dice the onion and mince the garlic. Heat a large pot over medium heat and add a splash of olive oil. Sauté the onion until it becomes translucent and starts to soften, about 5 minutes.
    3. Add the minced garlic to the onions in the pot and cook for another minute until fragrant, making sure it doesn’t burn.
    4. Once the roasted butternut squash is ready, add it to the pot along with the vegetable broth, smoked paprika, and cinnamon. Bring the mixture to a gentle simmer.
    5. Use an immersion blender or transfer the soup in batches to a regular blender and puree until smooth and velvety. Be careful when blending hot liquids.
    6. Return the pureed soup to the pot if using a blender, and gently reheat to combine flavors. Season with salt and pepper to taste. Adjust the seasoning as desired.
    7. Serve the soup hot, garnished with a drizzle of olive oil or a sprinkle of fresh herbs if desired. The vibrant orange color and smooth texture make it inviting and perfect for cozy evenings.

    This roasted butternut squash soup isn’t just about warming up; it’s about transforming simple ingredients into something memorable. The smoky undertone and touch of spice turn a simple fall classic into a dish that sparks curiosity and conversation at the table.

    Besides, it’s incredibly easy to make—perfect for busy weeknights or lazy weekends. As the seasons change, this soup reminds us to slow down and enjoy the small flavors that make autumn special. Now, it’s waiting patiently in your kitchen for its moment to shine.

  • Chill Out with the Unexpectedly Elegant Frozen Margarita Slushie

    Chill Out with the Unexpectedly Elegant Frozen Margarita Slushie

    On the days when the heat makes you forget all other plans, a frozen margarita slushie becomes more than just a drink. It’s a canvas for surprises—think swirls of fruity jams and a sprinkle of sea salt to heighten the citrus zing. You might start blending with a casual shrug, but suddenly, this icy treat becomes your new summer obsession.

    What sets this recipe apart is its adaptability. It’s like a frozen cocktail sketch pad—ready to accept whatever berries, liqueurs, or even a splash of soda you fancy. No fancy equipment needed, just a freezer stash, a blender, and a craving for something chilly and bright.

    Frozen Margarita Slushie

    A frozen margarita slushie is a refreshing icy beverage made by blending tequila, citrus juice, and ice until smooth. Swirls of fruit jam and a sprinkle of sea salt add extra flavor and texture, resulting in a colorful, slushy drink with a bright, tangy taste and snowy appearance.
    Prep Time 10 minutes
    Total Time 10 minutes
    Servings: 2
    Course: Main Course
    Cuisine: American
    Calories: 150

    Ingredients
      

    • 1 cup ice cubes preferably crushed for smoother blending
    • 1/2 cup lime juice freshly squeezed for best flavor
    • 1/4 cup triple sec or orange liqueur optional for added sweetness
    • 3 tablespoons fruit jam or fruit preserve for swirling into the slushie
    • 1/4 teaspoon sea salt to sprinkle on top

    Equipment

    • Blender
    • Measuring cups and spoons

    Method
     

    1. Add the ice cubes, lime juice, and triple sec to the blender. Blend on high until the mixture is smooth, icy, and slightly frosty around the edges, about 30-40 seconds.
    2. Pour the blended mixture into glasses, filling them almost to the top. It should have a thick, icy consistency that holds its shape.
    3. Using a spoon or knife, swirl a tablespoon of fruit jam into each glass, creating pretty ribbons of color and flavor throughout the drink.
    4. Sprinkle a pinch of sea salt on top of each slushie to heighten the citrus flavor and add a touch of savory contrast.
    5. Serve immediately with a straw or small spoon, enjoying the icy, tangy, and slightly salty flavor profile.

    Notes

    For a fruitier flavor, add fresh berries before blending. Adjust the amount of jam for sweetness or swirl less for a more subtle fruit influence.

    This frozen margarita slushie isn’t just refreshing; it’s a small act of rebellion against the ordinary. With just a handful of ingredients, it turns a simple drink into a moment of joy. Whether for a spontaneous gathering or a solo indulgence, it hits just the right note of cool sweetness.

    As the season demands more chilled adventures, this slushie offers an easy escape. It’s proof that sometimes, all you need is a good blender and a little zest to make your day better. Cheers to the simple pleasure of a perfectly frosty sip that keeps you coming back for more.

  • Hidden Twist: A Deconstructed Eggplant Parmesan Adventure

    Hidden Twist: A Deconstructed Eggplant Parmesan Adventure

    Eggplant Parmesan often gets a bad rap for being too greasy or too heavy. But what if I told you there’s a way to reimagine this classic using a deconstructed approach? By breaking it apart, you focus on each flavor and texture, creating a vibrant, fresh experience with every bite.

    This recipe was born out of a desire to let eggplant’s natural earthiness shine through, complemented by a bright tomato sauce and crispy bites. It’s perfect for those who want comfort food with a modern twist, or for anyone seeking a lighter, more colorful take on a familiar dish.

    With layers of textures and bursts of flavor, this version makes traditional eggplant Parmesan feel like a whole new culinary adventure. Plus, it’s a fun way to impress guests with something familiar yet unexpectedly exciting.

    Deconstructed Eggplant Parmesan

    This dish reimagines traditional eggplant Parmesan by breaking it into separate components, highlighting each ingredient’s natural flavors. It features roasted eggplant, a vibrant tomato sauce, and crispy elements, resulting in a colorful plate with varied textures and fresh appeal.
    Prep Time 20 minutes
    Cook Time 30 minutes
    Total Time 50 minutes
    Servings: 4
    Course: Main Course
    Cuisine: Italian
    Calories: 320

    Ingredients
      

    • 2 medium eggplants sliced into 1/2 inch thick rounds
    • 2 cups tomato sauce fresh or store-bought
    • 1 cup panko breadcrumbs for crumbling and crisping
    • 1/4 cup grated Parmesan cheese optional, for added flavor
    • 2 large eggs beaten
    • 1/2 cup all-purpose flour for dredging
    • 2 tablespoons olive oil for roasting and frying
    • to taste salt and pepper for seasoning
    • fresh basil leaves basil for garnish

    Equipment

    • Baking sheet
    • Skillet
    • Spatula

    Method
     

    1. Preheat your oven to 400°F (200°C). Arrange the eggplant slices on a baking sheet, brush with olive oil, and season with salt and pepper. Roast for about 20-25 minutes until they are golden brown and slightly crispy around the edges.
    2. While the eggplant roasts, prepare your dredging stations: place flour in a shallow bowl, beaten eggs in another, and mix panko breadcrumbs with Parmesan cheese in a third bowl.
    3. Once the eggplant slices are cooled slightly, lightly dredge each piece first in the flour, then dip in the beaten eggs, and finally coat well in the breadcrumb-Parmesan mixture, pressing gently to adhere.
    4. Heat a tablespoon of olive oil in a skillet over medium heat. Fry the breaded eggplant slices for 2-3 minutes on each side until crispy and golden brown. Remove to a paper-towel-lined plate to drain excess oil.
    5. Warm the tomato sauce in a saucepan over low heat until steaming and fragrant. Adjust seasoning with salt and pepper as needed.
    6. To assemble, spread a spoonful of tomato sauce on each plate, arrange the crispy eggplant slices on top, and drizzle more sauce over the crisp components. Garnish with fresh basil leaves.
    7. Serve immediately to enjoy the crispy textures combined with the vibrant tomato sauce and fresh herbs.

    Reinventing classic dishes can be a delightful challenge, and this deconstructed eggplant Parmesan hits all the right notes. Its vibrant presentation and balanced flavors make it a centerpiece that’s as inviting as it is eye-catching.

    Perfect for seasonal gatherings or a cozy night in, this recipe is a reminder that sometimes, breaking the rules leads to the best meals. Enjoy experimenting with each element—crispy, tender, tangy, and fresh—on your own terms.

  • The Surprising Art of Watermelon Slushie Mastery

    The Surprising Art of Watermelon Slushie Mastery

    Every summer, I hunt for that one refreshment that captures the spirit of the season and satisfies my craving for something chilled. This watermelon slushie does just that with its vibrant color and bursting flavor — but I approach it with a twist you might not expect. It’s not just about blending fruit; it’s about elevating it to a cooling experience that ignites childhood memories and sparkly sunny afternoons.

    Imagine the scent of freshly cut watermelon, its juicy aroma filling the kitchen. I’ve learned that the secret to an irresistibly smooth texture isn’t just the ingredients but how you prepare and serve it. This recipe is a symphony of sweet, icy delight, a perfect answer to the scorching heat while still feeling special enough for a weekend treat.

    Watermelon Slushie

    This watermelon slushie is a frozen beverage made by blending ripe watermelon with sweeteners and a splash of citrus juice to create a smooth, icy drink. It has a vibrant red color and a refreshing, juicy texture that is perfect for hot summer days. The consistency is thick yet sip-friendly, resembling a frozen treat or thick juice.
    Prep Time 10 minutes
    Total Time 10 minutes
    Servings: 2
    Course: Main Course
    Cuisine: Fusion
    Calories: 85

    Ingredients
      

    • 4 cups fresh watermelon cubes seedless or de-seeded for easier blending
    • 1 tablespoon honey or agave syrup adjust based on sweetness preference
    • 1 tablespoon fresh lemon or lime juice adds brightness and tang
    • 1 cup ice cubes to chill and thicken the slushie

    Equipment

    • Blender
    • Knife

    Method
     

    1. Place the watermelon cubes into your blender, ensuring they fill it about halfway.
    2. Add the honey or agave syrup and the lemon or lime juice to the blender.
    3. Toss in the ice cubes to help create a thick, icy texture once blended.
    4. Secure the lid on the blender and blend on high speed for about 30 seconds, until the mixture is smooth and frosty, with no large fruit chunks visible.
    5. Stop the blender and check the texture; if it’s too thick, add a splash of water or more lemon juice and blend briefly to loosen it up.
    6. Pour the chilled watermelon slushie into glasses, ensuring it’s icy and visually appealing with a vibrant red hue.
    7. Optionally, garnish with a small wedge of lime or a sprig of mint for extra color and aroma.

    Notes

    For a smoother texture, chill the ingredients beforehand or add more ice. Adjust sweetness to taste. Best enjoyed immediately while icy and cold.

    In a world where smoothies can often feel predictable, this watermelon slushie stands out with its simplicity and bold, refreshing taste. It’s the sort of recipe that invites experimentation—try adding a splash of lime or a sprinkle of mint for extra dimension. As the season shifts and fresh watermelons flood markets, this slushie will become your go-to for spontaneous cooling fun.

    Whether you’re lounging with friends or just need a moment of cooling serenity alone, this drink keeps things light, bright, and beautifully effortless. Savor each sip, let the cold wash over you, and enjoy the pure, uncomplicated joy that the best summer treats bring.

  • Spooky Fun: Halloween Dirt Cake with Gummy Worms

    Spooky Fun: Halloween Dirt Cake with Gummy Worms

    Every Halloween, I hunt for a dessert that combines creepy charm with childhood nostalgia. This year, I found the perfect twist—a dirt cake that’s both haunting and irresistibly fun. It’s not just about the sweet treat, but about recreating those sticky, giggle-filled kitchen moments with my kids.

    Imagine layers of chocolatey richness topped with squirming gummy worms peeking out. The smell of fresh chocolate cookies mixed with vanilla pudding creates an intoxicating aroma of mischief and comfort. It’s the chaos of Halloween, captured in a single delicious bite.

    Halloween Dirt Cake

    A layered chocolate dessert made with crushed cookies, creamy pudding, and topped with gummy worms, resembling a spooky, muddy landscape. The dish combines crunchy, creamy, and chewy textures, with a dark, chocolatey appearance accented by colorful candy decorations.
    Prep Time 20 minutes
    Cook Time 10 minutes
    Total Time 30 minutes
    Servings: 8
    Course: Main Course
    Cuisine: Halloween
    Calories: 350

    Ingredients
      

    • 24 cookies chocolate sandwich cookies crushed into fine crumbs
    • 3 cups milk for pudding
    • 1 package vanilla instant pudding mix
    • 2 cups heavy cream for whipped topping
    • 1/2 cup granulated sugar to sweeten the whipped cream
    • Gummy worms gummy worms for decoration and fun poking out of the dirt

    Equipment

    • Mixing bowls
    • Electric mixer or whisk
    • 9×13 inch serving dish
    • Spatula
    • Serving spoon

    Method
     

    1. Place the chocolate cookies in a zip-top bag and crush them into fine crumbs using a rolling pin or the bottom of a glass.
      24 cookies chocolate sandwich cookies
    2. In a large mixing bowl, whisk together the vanilla pudding mix and milk until smooth and slightly thickened, about 2 minutes.
      3 cups milk, 1 package vanilla instant pudding mix
    3. In a separate bowl, whip the heavy cream with sugar until soft peaks form and the mixture is fluffy.
      2 cups heavy cream, 1/2 cup granulated sugar
    4. Gently fold the whipped cream into the pudding mixture until well combined, creating a creamy filling.
      1 package vanilla instant pudding mix, 2 cups heavy cream
    5. Spread a layer of crushed cookies evenly across the bottom of your serving dish to resemble dirt.
      24 cookies chocolate sandwich cookies
    6. Pour half of the creamy pudding mixture over the cookie layer, spreading smoothly with a spatula.
      1 package vanilla instant pudding mix
    7. Add another layer of crushed cookies on top of the pudding layer for added texture.
      24 cookies chocolate sandwich cookies
    8. Top with the remaining pudding mixture, smoothing the surface for a uniform appearance.
      1 package vanilla instant pudding mix
    9. Decorate the top with gummy worms, poking them into the pudding so they appear to be wriggling through the dirt.
      Gummy worms gummy worms
    10. Chill the dirt cake in the refrigerator for at least 2 hours before serving, allowing flavors to meld and the pudding to set.
    11. Serve cold, scooping out portions that reveal the layers of cookie crumbs, pudding, and playful gummy worms.

    This dirt cake is more than just a dessert; it’s a mini celebration of childhood wonder. Each spoonful brings a flash of those spooky season memories we secretly cherish. And as the kids eagerly hunt for their hidden gummy worms, I’m reminded how simple joy can be so effective.

    Making this creepy-crawly treat is quick, fun, and perfect for any Halloween gathering. It adds a splash of ghoulish delight to the table without demanding hours in the kitchen. Watching everyone’s eyes light up when they see the squiggly worms creeping out makes all the effort worthwhile.

  • Pumpkin Bread with a Twist: A Cozy Fall Favorite

    Pumpkin Bread with a Twist: A Cozy Fall Favorite

    Whether you’re making this for brunch, a cozy afternoon snack, or to gift to friends, it’s sure to spark joy. Every slice offers a tender crumb deeply infused with pumpkin’s earthiness and the lively zest—an irresistible combo. Baking this bread feels like a seasonal ritual that reminds me why I cherish fall.

    Pumpkin Zest Bread

    This bread features a tender, moist crumb infused with the earthy flavor of pumpkin and accented by lively citrus zest. The dough is mixed and kneaded until soft and elastic, then baked until golden and fragrant, resulting in a visually appealing loaf with a slightly dense but airy texture. It showcases a rustic appearance with a warm, inviting color and a cracked, golden crust.
    Prep Time 20 minutes
    Cook Time 40 minutes
    Total Time 1 hour
    Servings: 8
    Course: Main Course
    Cuisine: American
    Calories: 210

    Ingredients
      

    • 1 cup pumpkin puree unsweetened
    • 4 cups all-purpose flour
    • 1 packet active dry yeast about 2 1/4 teaspoons
    • 1 cup warm water around 110°F/45°C
    • 1/4 cup granulated sugar
    • 1/4 cup unsalted butter melted
    • 2 teaspoons salt
    • 1 tablespoon orange zest from about 1 orange

    Equipment

    • Mixing bowls
    • Loaf pan
    • Wooden spoon or dough scraper
    • Kitchen towel or plastic wrap
    • Oven

    Method
     

    1. In a small bowl, combine warm water, sugar, and yeast. Stir gently and let sit until foamy, about 5 minutes, to activate the yeast.
    2. In a large mixing bowl, whisk together the flour and salt to evenly distribute.
    3. Add the pumpkin puree, melted butter, activated yeast mixture, and orange zest to the dry ingredients.
    4. Mix everything together with a wooden spoon or dough scraper until a shaggy dough forms.
    5. Transfer the dough onto a lightly floured surface and knead for about 8-10 minutes until smooth, elastic, and slightly tacky.
    6. Shape the dough into a ball and place it in a greased bowl. Cover it with a kitchen towel or plastic wrap and let rise in a warm spot until doubled in size, approximately 1 to 1.5 hours.
    7. Once doubled, punch down the dough gently to release excess gas, then transfer it onto a floured surface and shape it into a loaf.
    8. Place the shaped dough into a greased loaf pan. Cover again and let it rise for another 30-45 minutes until puffed and nearly doubled.
    9. Preheat your oven to 350°F (175°C).
    10. Bake the bread for about 40 minutes, until the crust is golden brown and the loaf sounds hollow when tapped.
    11. Remove the bread from the oven, transfer to a wire rack, and let cool for at least 15 minutes before slicing to allow the crumb to set.
    12. Slice and enjoy this warm, moist pumpkin citrus bread with butter or your favorite spread.
    Baking pumpkin bread with a citrus twist turns a simple loaf into a seasonal treasure. The combination of earthiness and bright citrus resonates with everything fall embodies — warmth, nostalgia, and a touch of unexpected sparkle. It’s a humble pleasure that feels just right for the season’s fleeting moments.

    In a world rushing toward the holidays, this bread offers a moment of calm and simple joy. The act of baking, smelling, and sharing it anchors the season in warmth and familiarity. Truly, it’s the kind of treat that makes you look forward to crisp mornings and cozy get-togethers.

  • The Cozy Charm of Pumpkin Oatmeal with a Twist

    The Cozy Charm of Pumpkin Oatmeal with a Twist

    Ever wonder how to make a breakfast that feels like a warm hug but is also packed with seasonal flair? Pumpkin oatmeal offers just that, combining creamy oats with the rich, earthy aroma of roasted pumpkin. This recipe transforms your usual morning into a velvety, fragrant experience that comforts and satisfies.

    What makes this pumpkin oatmeal truly distinctive is a dash of spice and a sprinkle of crunchy toppings that elevate the plain to extraordinary. It’s the perfect blend of nostalgia and innovation, appealing to both the pumpkin lovers and those seeking a cozy morning ritual. Plus, it’s incredibly adaptable, ready to tweak to your favorite flavors and textures.

    Pumpkin Oatmeal

    Pumpkin oatmeal combines creamy rolled oats with roasted pumpkin puree, creating a velvety and fragrant breakfast dish. It is finished with warm spices and crunchy toppings, resulting in a cozy and textured meal with a vibrant appearance. The preparation involves simmering, mashing, and topping to achieve a homestyle, comforting bowl.
    Prep Time 5 minutes
    Cook Time 15 minutes
    Total Time 20 minutes
    Servings: 2
    Course: Main Course
    Cuisine: American
    Calories: 250

    Ingredients
      

    • 1 cup rolled oats preferably old-fashioned
    • 2 cups water or milk for creamier texture, use milk
    • 1/2 cup roasted pumpkin puree fresh or canned
    • 1 teaspoon cinnamon ground
    • 1/4 teaspoon nutmeg ground
    • 1/4 teaspoon cloves ground
    • 1 tablespoon maple syrup optional for sweetness
    • 2 tablespoons pumpkin seeds for crunch
    • to taste honey or additional maple syrup for drizzling

    Equipment

    • Medium saucepan
    • Wooden spoon
    • Measuring cups and spoons
    • Knife
    • Cutting board

    Method
     

    1. Measure out the rolled oats and pour them into a medium saucepan.
    2. Add water or milk to the oats, then place the saucepan on the stove over medium heat. Bring to a gentle simmer, stirring occasionally so the oats don’t stick.
    3. Once the mixture begins to thicken and the oats are partially cooked, stir in the roasted pumpkin puree. Mix thoroughly until fully incorporated, creating a vibrant orange hue and smooth texture.
    4. Add ground cinnamon, nutmeg, and cloves to the simmering oats, stirring to evenly distribute the spices. The mixture will become fragrant and slightly thicker.
    5. After about 10 minutes of simmering, when the oats are tender and the mixture is creamy, stir in maple syrup for sweetness. Continue to cook for another 2-3 minutes.
    6. Remove the saucepan from heat. Scoop the pumpkin oatmeal into bowls, and sprinkle pumpkin seeds on top for added crunch.
    7. Finish by drizzling honey or extra maple syrup over the top, then serve warm and enjoy the comforting aroma and delightful textures.

    Notes

    Feel free to customize with your favorite toppings like sliced bananas, toasted nuts, or dried cranberries.

    This pumpkin oatmeal isn’t just a breakfast; it’s a celebration of autumn’s best. The warm spices and soft, sweet pumpkin make each spoonful a little moment of warmth, especially on chilly mornings. It’s straightforward yet decadent enough to start your day with a bit of joy.

    In a season full of new routines, this recipe provides a comforting anchor. Whether you serve it solo or topped with nuts, seeds, or a drizzle of honey, it’s a versatile choice for nourishing mornings. Embrace the simplicity and let each bite remind you of fall’s cozy embrace.

  • Morning Magic: Pumpkin Spice Overnight Oats with a Surprising Twist

    Morning Magic: Pumpkin Spice Overnight Oats with a Surprising Twist

    Imagine waking up on a brisk autumn morning. The air carries a hint of cinnamon and nutmeg, and your kitchen smells faintly of roasted pumpkin seeds. Instead of reaching for your usual breakfast, you find a jar of creamy oats infused with seasonal spices and a secret ingredient that adds unexpected crunch.

    This recipe isn’t just about comforting flavors; it’s about transforming a simple overnight oats dish into a mini celebration of fall’s bounty. It’s perfect for those mornings when you crave something familiar but crave a little extra cheer to start your day.

    Autumn-Spiced Overnight Oats with Crunch

    This dish consists of rolled oats soaked overnight in a mixture of milk and seasonal spices, resulting in a creamy and flavorful breakfast. The oats are infused with cinnamon and nutmeg, and topped with toasted pumpkin seeds for added crunch and texture, creating a visually appealing and satisfying meal.
    Prep Time 10 minutes
    Total Time 10 minutes
    Servings: 2
    Course: Main Course
    Cuisine: American
    Calories: 280

    Ingredients
      

    • 1/2 cup rolled oats preferably old-fashioned
    • 3/4 cup milk dairy or plant-based
    • 1 teaspoon cinnamon ground
    • 1/4 teaspoon nutmeg ground
    • 1 tablespoon maple syrup optional for sweetness
    • 2 tablespoons pumpkin seeds toasted for extra crunch

    Equipment

    • Mixing bowl
    • Spoon
    • Measuring cups and spoons
    • Toaster or skillet

    Method
     

    1. Combine the rolled oats, milk, cinnamon, nutmeg, and maple syrup in a mixing bowl, stirring until well blended and the oats are fully coated with the spices and liquid.
    2. Cover the bowl with plastic wrap or a lid and place it in the refrigerator overnight, allowing the oats to soak and absorb the flavors until creamy and tender.
    3. The next morning, preheat a toaster or skillet and toast the pumpkin seeds until they are golden brown, emitting a nutty aroma and giving a satisfying crunch.
    4. Remove the soaked oats from the refrigerator and give them a quick stir to loosen the mixture, which should be thick and creamy with visible flecks of spice.
    5. Scoop the creamy oats into serving bowls, smoothing the tops for an even presentation.
    6. Sprinkle the toasted pumpkin seeds generously over the top for added texture and a burst of nutty flavor.
    7. Enjoy immediately with a drizzle of extra maple syrup or fresh fruit if desired for added sweetness and visual appeal.

    Notes

    For extra flavor, add a dollop of yogurt or a sprinkle of chopped nuts on top before serving.
    As the mornings grow cooler and the leaves turn vibrant, this Pumpkin Spice Overnight Oats become a staple for busy weekdays and lazy weekends alike. They bring the cozy essence of fall into each spoonful and keep your mornings stress-free.

    With its layers of warm spices and creamy texture, it’s a bowl that makes waking up a little sweeter. No matter how hectic the day, this dish ensures a comforting reminder that simple pleasures are often just a refrigerator away.