Halloween is my favorite excuse to go all out with chocolate and sugar. But this year, I wanted to skip the usual candy bowl and go for something more playful and a little spooky—like this bark that’s as fun to make as it is to eat. It’s a no-fuss project, perfect for getting kids involved or just indulging your own sweet tooth without the fuss.
Why I keep making this spooky treat
It’s endlessly customizable, easy to whip up last minute, and always a crowd-pleaser. Plus, it’s a chaos-friendly project with a sweet payoff. Watching the toppings melt into glossy, colorful patches makes me smile every time. It’s become my go-to for quick, festive happiness.
What’s in your spooky stash?
- Dark chocolate: It’s my go-to for rich, deep flavor, but milk or white can be swapped in if you prefer a milder taste.: Smooth, shiny, with a slight bitter edge that balances sweet toppings.
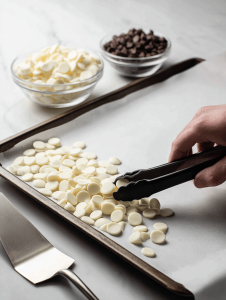
- Candy toppings: Think crushed Oreos or gummy worms—add crunch and color, or keep it simple with sea salt for a salty contrast.: Crunchy, chewy, or sparkly—whatever makes your spooky heart happy.
- Nuts: Toasted pecans or almonds add a smoky crunch, but skip if allergies are a concern.: Oozy in flavor and texture, they bring a little sophistication.
- Edible glitter: Because sometimes, you want your treats to shimmer in the dim light.: Sparkling, shimmering, and totally festive.
- Flavor extracts: A dash of peppermint or orange can turn this into a more personalized treat.: Oozy and fragrant, a little goes a long way.
Tools of the trade for spooky chocolate
- Double boiler or microwave: To melt chocolate gently, avoiding burning.
- Spatula: To spread melted chocolate evenly.
- Parchment paper: To prevent sticking and make cleanup easy.
- Knife or breaker: To break the bark into rustic pieces.
Step-by-step: Making Halloween Bark
Step 1: Line a baking sheet with parchment paper.
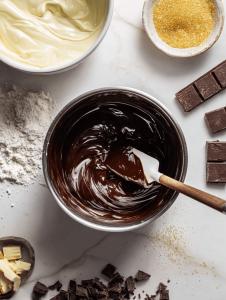
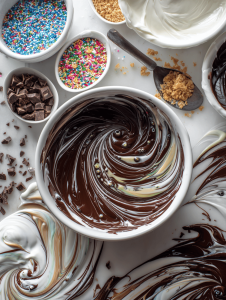
Step 2: Melt the dark chocolate in a double boiler or microwave, stirring every 30 seconds until smooth.
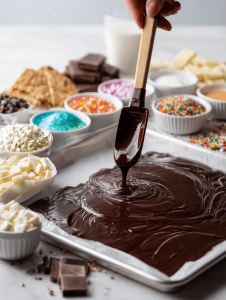
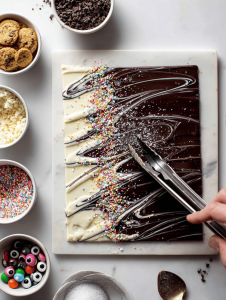
Step 3: Pour the melted chocolate onto the prepared sheet, spreading it evenly with a spatula.
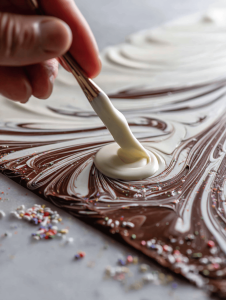
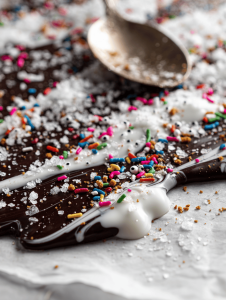
Step 4: Sprinkle on your chosen toppings — think crushed candy, nuts, or edible glitter — while the chocolate is still warm.
Step 5: Let the chocolate set at room temperature for at least 2 hours, or refrigerate for 30 minutes for quicker results.
Step 6: Once firm, break into irregular shards with your hands or a knife for that rustic look.
Key checkpoints: How to tell if your bark is perfect
- Chocolate is fully melted and smooth, with no lumps.
- Toppings are well distributed and adhered to the surface.
- Chocolate has set and snapped cleanly when broken.
- The finished bark has a glossy sheen and no sticky patches.
Common Halloween bark slip-ups and how to fix them
- Overheated chocolate.? Use a gentle heat, or chocolate can seize and turn grainy.
- Toppings falling off.? Sprinkle toppings while chocolate is still warm for better adherence.
- Bark sweating or developing condensation.? Refrigerate if quick setting is needed, but keep an eye on condensation.
- Crumbly or jagged pieces.? Ensure chocolate is fully cooled before breaking for clean edges.

Halloween Chocolate Bark
Ingredients
Equipment
Method
- Line a baking sheet with parchment paper to prepare for the chocolate.
- Gently melt the dark chocolate using a double boiler or in a microwave, heating in 30-second intervals and stirring until smooth and glossy.
- Pour the melted chocolate onto the prepared parchment, spreading it evenly with a spatula to create a thin, smooth layer.
- Sprinkle crushed Oreos, gummy worms, toasted pecans, and edible glitter over the warm chocolate, distributing toppings evenly for a playful look.
- If using, add a few drops of peppermint extract onto the toppings for a fragrant, festive touch.
- Allow the chocolate to set at room temperature for about 2 hours, or refrigerate for 30 minutes for quicker firming.

- Once firm, break the chocolate into rustic shards using your hands or a knife, revealing the colorful toppings embedded in glossy chocolate.
- Enjoy your spooky, shiny Halloween bark—perfect for sharing or indulging all on your own!

Hi, I’m Harper Evans. Welcome to Crushing These Flavors, my home on the internet where curiosity, comfort, and a deep love for food come together. I’m a passionate food blogger who believes great meals are built through attention, practice, and a willingness to experiment.