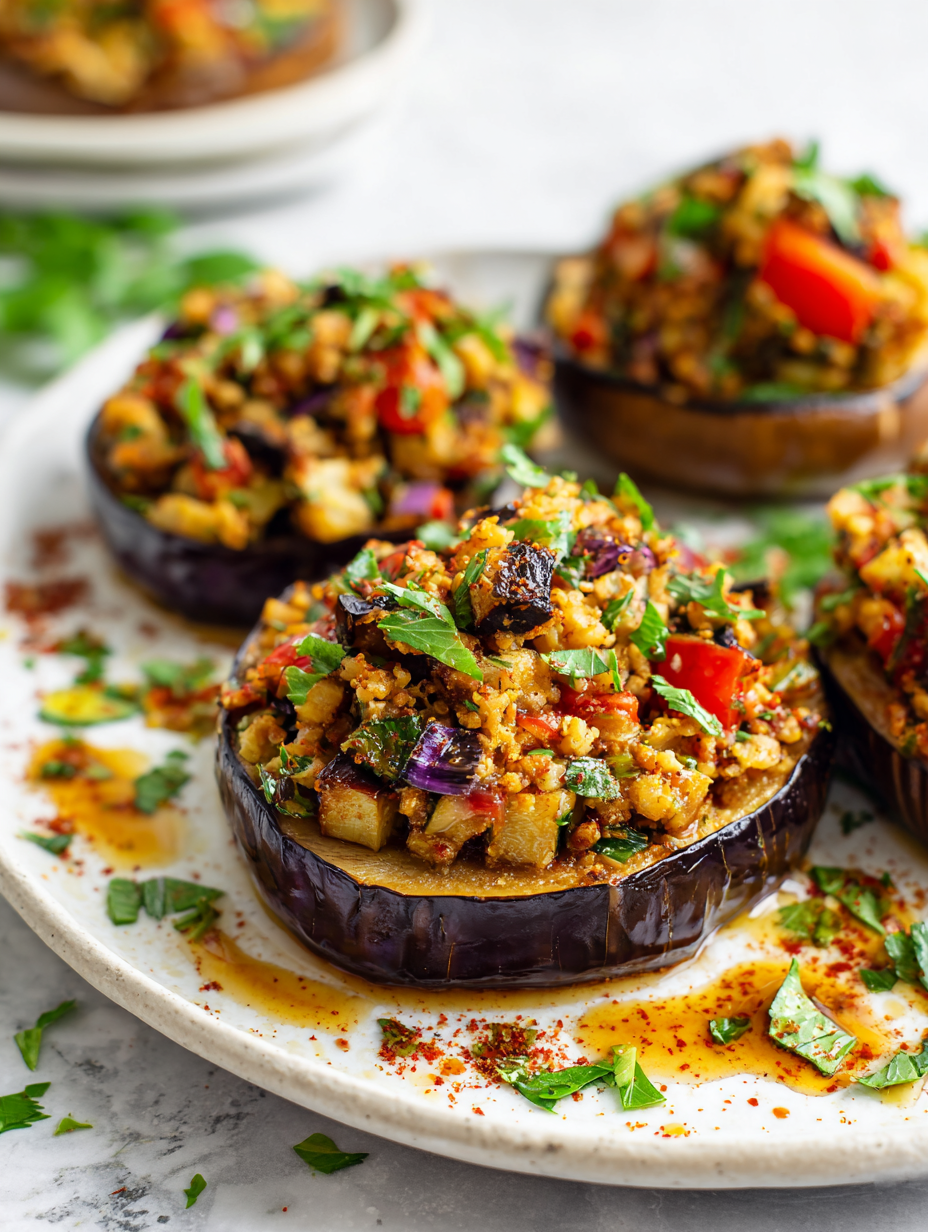
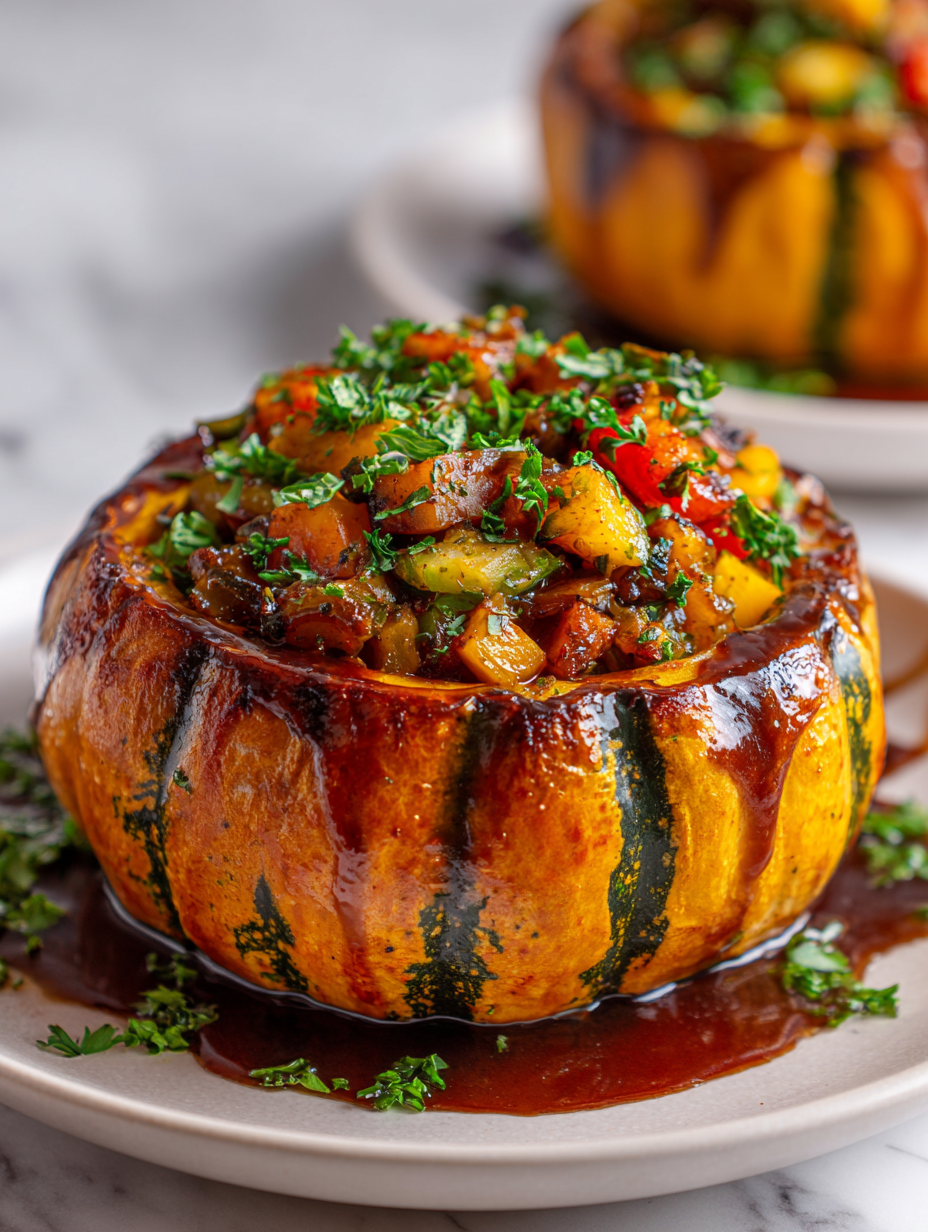
Category: Main Course

  • The Cozy Twist: Turning Lasagna into a Soup Sensation

    The Cozy Twist: Turning Lasagna into a Soup Sensation

    Imagine the richest, most layered lasagna now transformed into a bubbling bowl of soup. This isn’t just a way to clear out the leftover noodles; it’s a completely new way to experience comfort food. As the chilly seasons approach, I find myself craving warm, hearty dishes that fill my soul and my kitchen with the smell of garlic, herbs, and melted cheese.

    This dish offers the nostalgia of traditional lasagna with an easy, quick soup twist. It’s perfect for busy weeknights or unexpected guests, transforming ingredients you already have into something extraordinary. The best part? It’s a cozy, messy bowl you’ll want to slurp—and it’ll make your house smell like Italy on a rainy day.

    WHY I LOVE THIS RECIPE?

    • The chaos of layering lasagna is fun but cleaning it up? Less so. Soup keeps everything simple.
    • I get that nostalgic taste of cheese, tomato, and herbs all in one spoonful, but in a new way.
    • It’s a bit rebellious—who says lasagna can’t be a soup? I love flipping traditions on their heads.
    • The quick simmer makes the flavors explode faster and makes my kitchen smell amazing.
    • This recipe is like wrapping myself in a savory blanket—cozy, familiar, and satisfying.

    AVOID MY DISASTER (You’re Welcome)

    • FORGOT to add enough broth? The soup turns out thick and gloopy. Just splash in more stock and stir.
    • DUMPED too much cheese? It curdles and clumps. Keep stirring and add a splash of milk for smoothness.
    • OVER-TORCHED the garlic? It turns bitter. Quickly add a bit of water to dilute flavor.
    • FAILED to simmer long enough? The flavors won’t meld. Just cover and simmer a little longer.

    QUICK FIXES THAT SAVE YOUR DAY

    • When the soup is too bland, Splash in a dash of soy sauce for umami richness.
    • If you want more tomato flavor, Patch with a spoonful of tomato paste.
    • Shield the cheese from burning by stirring often during the final melting.
    • If it’s too thick, Add a splash of hot water until it shimmers.
    • For a burst of aroma, Sprinkle fresh basil just before serving—let it crackle with freshness.

    This lasagna soup is a reminder that comfort can be quick, inventive, and deeply satisfying. It’s a dish that brings the whole family to the table, especially when time isn’t on your side but flavor still is.

    In a season where easy, hearty meals take center stage, this soup becomes more than just a recipe—it’s a small act of culinary defiance. It celebrates the joy of turning everyday ingredients into something that feels special, even if it’s just a weeknight.

    Lasagna Soup

    Lasagna Soup is a hearty dish that combines the rich flavors of traditional lasagna into a comforting, tomato-based soup. It features cooked pasta, melted cheese, and herbs in a brothy, layered texture, creating a cozy meal with a satisfying appearance. The dish is made by simmering ingredients together to meld flavors, then finishing with cheese and fresh herbs before serving.
    Prep Time 15 minutes
    Cook Time 30 minutes
    Total Time 45 minutes
    Servings: 4
    Course: Main Course
    Cuisine: Italian
    Calories: 350

    Ingredients
      

    • 1 tablespoon olive oil for sautéing
    • 3 cloves garlic minced
    • 1 can (28 oz) crushed tomatoes undrained
    • 4 cups chicken broth
    • 8 oz pasta shells or rotini uncooked
    • 1 cup shredded mozzarella cheese
    • 1/4 cup grated Parmesan cheese
    • 1 teaspoon dried basil or Italian seasoning
    • to taste salt and pepper for seasoning

    Equipment

    • Large soup pot
    • Wooden spoon

    Method
     

    1. Heat a large soup pot over medium heat and add olive oil. Once shimmering and fragrant, add the minced garlic and cook until it becomes aromatic and slightly golden—about 30 seconds to 1 minute.
      1 tablespoon olive oil
    2. Pour in the crushed tomatoes along with their juices, stirring to combine with the garlic. Bring the mixture to a gentle simmer and let it cook for 5 minutes to develop a richer tomato flavor.
      1 tablespoon olive oil
    3. Stir in the chicken broth and dried basil, then season with salt and pepper to taste. Increase the heat slightly and bring the broth to a gentle boil.
      1 tablespoon olive oil
    4. Add the uncooked pasta to the bubbling broth, stirring gently to prevent sticking. Cook until the pasta is just al dente—usually about 8-10 minutes—until tender and slightly swollen.
      1 tablespoon olive oil
    5. Once the pasta is cooked through, stir in the shredded mozzarella cheese and grated Parmesan. Wait a few minutes until the cheese melts into the hot soup, creating a gooey, cheesy layer on top.
      1 tablespoon olive oil
    6. Taste the soup and adjust the seasoning with more salt, pepper, or basil if desired. Serve the hot lasagna soup in bowls, garnished with additional fresh herbs if you like.

    Notes

    For extra flavor, consider topping each serving with a splash of extra virgin olive oil or fresh basil. This soup can be made ahead and reheats well—perfect for busy nights or cozy weekends.

    As the last spoonful disappears, I find myself already craving the next bowl. There’s something about this soup that makes even the simplest ingredients feel like a celebration. It’s the kind of dish that makes you appreciate the beauty of turning tradition into something new and comforting.

    In these busy days, I love having a recipe that’s as forgiving as it is delicious. It reminds me that sometimes, the best meals are the ones you can whip up in less than thirty minutes—without sacrificing flavor or warmth.

  • The Cozy Charm of Taco Soup: A Flavorful Escape

    The Cozy Charm of Taco Soup: A Flavorful Escape

    Ever notice how some recipes whisper comfort even before you scoop the first spoon? Taco soup is that kind of dish. Its aroma of seasoned ground meat, bright tomatoes, and warm spices can fill your kitchen with a nostalgic hug, especially on chilly evenings. Today, I want to peel back the layers of this humble bowl and explore why it perfectly captures the essence of home cooking.

    While it might seem just another soup, the magic lies in the little chaos of toppings and the quick assembly that makes it so dependable. Imagine simmering beans, corn, and beef with cumin and chili powder, then garnishing it with crispy tortilla chips and sharp cheese. It’s an effortless meal with a big personality—comforting, easy, and endlessly adaptable.

    Taco Soup

    Taco soup is a hearty and comforting dish made by simmering seasoned ground meat with beans, corn, and tomatoes. It develops a thick, flavorful broth with a variety of toppings such as cheese and crispy tortilla chips, resulting in a bowl with vibrant colors and tasty textures. The soup combines the richness of meat and beans with fresh, crunchy garnishes, creating a satisfying meal with a balance of soft and crispy elements.
    Prep Time 10 minutes
    Cook Time 25 minutes
    Total Time 35 minutes
    Servings: 4
    Course: Main Course
    Cuisine: American
    Calories: 350

    Ingredients
      

    • 1 lb ground beef or ground turkey
    • 1 can (15 oz) diced tomatoes undrained
    • 1 can (15 oz) black beans drained and rinsed
    • 1 cup frozen corn
    • 1 tablespoon chili powder
    • 1/2 teaspoon cumin
    • 1 pinch salt
    • to taste shredded cheese for serving
    • for topping tortilla chips crushed, for garnish

    Equipment

    • Large pot
    • Wooden spoon

    Method
     

    1. Heat a large pot over medium heat and add the ground beef. Cook, breaking it apart with a wooden spoon, until browned and cooked through, about 5-7 minutes. Drain excess fat if desired.
    2. Add the diced tomatoes (with juices), black beans, corn, chili powder, cumin, and a pinch of salt to the pot. Stir everything together to combine and bring to a simmer.
    3. Reduce the heat to low and let the soup simmer uncovered for about 15-20 minutes, stirring occasionally. The flavors will meld, and the soup will thicken slightly.
    4. While the soup simmers, prepare your toppings: shred the cheese and crush the tortilla chips for garnish.
    5. Once the soup has thickened slightly and the flavors taste balanced, ladle it into bowls. Top each with shredded cheese and crushed tortilla chips.
    6. Serve hot and enjoy the hearty, flavorful bowl of taco soup with your favorite side or additional garnishes.

    This recipe is a testament to how a few pantry staples can transform into something richer and more satisfying than the sum of its parts. It’s the kind of dish that welcomes everyone to gather around the table, spilling stories over bowls of spicy, hearty goodness. No matter the season, Taco Soup makes an appearance when I crave ease combined with bold flavor.

    As the days grow shorter, I find myself leaning into flavors that warm both the body and spirit. Taco soup offers that perfect blend of nostalgia and novelty, reminding me that some of the best meals come from familiar ingredients dressed up with just a little love. It’s truly a crowd-pleaser, adaptable and straightforward—ready to become a staple in your weekly rhythm.

  • Monster Burgers: A Spooky Halloween Feast

    Monster Burgers: A Spooky Halloween Feast

    Halloween is the perfect time to let your creativity run wild in the kitchen. This year, I wanted to craft something that combines the chaos of the holiday with the comfort of a classic burger. Enter the Halloween Monster Burgers—an irresistibly playful and slightly spooky meal that kids and adults will love alike.

    The secret? Using simple ingredients transformed into monstrous faces, with oozing cheese, googly eyes, and creepy toppings. Its a fantastic way to serve up dinner that sparks conversation and giggles at your haunted house party. Plus, it’s easy enough for last-minute assembly, yet impressive enough to steal the show.

    Halloween Monster Burgers

    Halloween Monster Burgers feature juicy beef patties topped with melted cheese, googly eyes, and spooky toppings to create playful, monstrous faces. The burgers are assembled with toasted buns and colorful garnishes, resulting in a fun, visually striking meal with tender meat and crispy edges. The final presentation combines crispy, melty, and gooey textures that appeal to both kids and adults alike.
    Prep Time 15 minutes
    Cook Time 15 minutes
    Total Time 30 minutes
    Servings: 4
    Course: Main Course
    Cuisine: American
    Calories: 600

    Ingredients
      

    • 1.5 pounds ground beef 80% lean for juicy burgers
    • 4 slices cheddar cheese cut into fun shapes or squares
    • 4 buns burger buns preferably toasted lightly
    • 1 cup mixed chopped toppings such as sliced bell peppers, olives, cherry tomatoes
    • 8 googly eyes plastic or edible googly eyes for spooky eyes
    • 1 ketchup ketchup optional for spooky mouths
    • 1 mustard mustard optional for additional facial features

    Equipment

    • Grill or stovetop skillet
    • Spatula
    • Baking sheet
    • Small Bowls
    • Knife
    • Cutting board

    Method
     

    1. Preheat your grill or skillet over medium-high heat. Shape the ground beef into four evenly sized patties, pressing slightly to create a gentle indentation in the center of each to prevent curling. Season with salt and pepper if desired.
    2. Place the patties on the hot grill or skillet. Cook for about 4-5 minutes per side, until the edges are golden brown and the patties are cooked through, with juices running clear. During the last minute, top each patty with a slice of cheddar cheese to melt.
    3. While the patties cook, split the burger buns and lightly toast the insides, either on the grill or in a toaster, until they’re just golden. This adds a slight crunch and prevents sogginess.
    4. Arrange your spooky toppings in small bowls to make adding features easier. Prepare the googly eyes, sliced peppers, olives, and tomatoes to create facial details for each burger.
    5. Once the patties are cooked and cheese is melted, transfer them to a plate to rest briefly. Carefully place a burger patty onto the bottom half of each toasted bun.
    6. Use slices of cheddar or other toppings to craft fun monster faces—add googly eyes, slices of peppers for mouths, or olives for spooky accents—pressing them gently into the cheese and burger to stay in place.
    7. Decorate your monsters further with condiments, like small dabs of ketchup or mustard for fiendish mouths or scars. Top your creations with the upper halves of the buns, pressing down lightly to secure the toppings.
    8. Arrange each assembled Monster Burger on a serving plate. Add extra toppings, such as cherry tomatoes or sliced peppers, around for a creepy effect or colorful garnish.
    9. Serve immediately, allowing everyone to enjoy the playful, monster-faced burgers with their crispy edges and gooey melted cheese. Encourage fun storytelling as part of the meal!

    These Halloween Monster Burgers turn a regular mealtime into a creative event. They bring a sense of fun to your table and make the meal part of the celebration. Whether youre hosting friends or a family movie night, theyll put everyone in the spooky spirit.

    Making these monsters is a delight at the start of October, and they get even better with each iteration. When the candles flicker and shadows grow long, these burgers make a perfect, playful centerpiece — a little chaos on a plate your guests will remember long after the night is over.

  • Spooky Charm: Halloween Jack-o’-Lantern Stuffed Peppers with a Twist

    Spooky Charm: Halloween Jack-o’-Lantern Stuffed Peppers with a Twist

    Every October, kitchens turn into playful laboratories where the spooky and savory collide. This year, I decided to break away from traditional pumpkin treats and craft something both whimsical and surprisingly satisfying: Jack-o’-Lantern stuffed peppers. These peppers don't just look festive—they bring a burst of roasted goodness that's perfect for Halloween gatherings.

    The idea was to mimic the classic pumpkin face but in bite-sized, edible form. I experimented with bright orange bell peppers, carving mischievous faces into their skins—think crooked smiles and spooky eyes—before filling them with a hearty mixture of grains, cheese, and herbs. The result is a delightful surprise that’s as fun to prepare as it is to eat.

    **WHY I LOVE THIS RECIPE?**

    • I get to combine my love for Halloween decor with comfort food.
    • The vibrant colors make it impossible to ignore on any plate.
    • Carving faces sparks childhood nostalgia and a bit of chaos in the kitchen.
    • Stuffed peppers bake into tender, flavorful bites—no dull moments here.
    • It’s a guaranteed conversation starter for festive tables.

    **AVOID MY DISASTER (You’re Welcome)**

    • FORGOT to remove the seeds—caused a spicy explosion in the oven. Swept up and reseeded the peppers.
    • DUMPED too much cheese—pepper bloated and leaks. Cut back for perfect stuffing fit.
    • OVER-TORCHED the peppers—smoky flavor overwhelmed faces. Covered with foil early next time.
    • SLID the peppers while carving—made a mess, but blade was sharp and cleanup quick.

    **QUICK FIXES THAT SAVE YOUR DAY**

    • When spices burn, splash a splash of water—smoke subsides, smell sweet again.
    • When peppers are soft, shield with foil—keeps edges from burning while finishing.
    • When cheese isn’t melting, shred finer—melts faster and spreads evenly.
    • When face carving gets tricky, patch with extra skin—minimal tears, maximum fun.
    • Stuck with plain rice? Swap in quinoa—adds a nutty crunch and boosts fiber.

    Finally, as the days grow cooler, this dish feels especially timely. It’s a small burst of joy amidst the chaos of October. The crispy edges, the tender center, and the playful faces all come together in an imperfect but charming way. No matter how spooky your kitchen looks, these peppers make everything a little brighter.

    With the season at its peak, I find joy in crafting recipes that celebrate the harvest and the haunting. These stuffed peppers are more than just Halloween decor—they’re a reminder that food can be fun, chaotic, and a bit spooky all at once. And that’s a flavor worth celebrating.

    Jack-o’-Lantern Stuffed Peppers

    This dish features orange bell peppers carved with spooky faces, filled with a hearty mixture of grains, cheese, and herbs. The peppers are baked until tender and slightly caramelized, resulting in a colorful and playful presentation with a flavorful, chewy interior and roasted exterior.
    Prep Time 20 minutes
    Cook Time 30 minutes
    Total Time 50 minutes
    Servings: 4
    Course: Main Course
    Cuisine: Fusion
    Calories: 180

    Ingredients
      

    • 4 large orange bell peppers preferably with thick walls for carving
    • 1 cup cooked rice or quinoa for the stuffing base
    • 1 cup shredded cheese cheddar, Monterey Jack, or mozzarella
    • 2 tablespoons olive oil for cooking and roasting
    • 1 teaspoon dried herbs such as thyme or oregano
    • to taste salt and pepper for seasoning
    • 2 cloves garlic minced

    Equipment

    • Sharp Knife
    • Baking sheet
    • Spoon
    • Mixing bowl
    • Oven

    Method
     

    1. Preheat the oven to 375°F (190°C). Line a baking sheet with parchment paper or lightly oil it.
    2. Using a sharp knife, carefully cut out faces or spooky designs on the skin of each bell pepper—such as crooked smiles, triangle eyes, or jagged mouths—creating a jack-o’-lantern face. Gently remove the seeds and membranes from inside, leaving the peppers intact with their carved faces.
    3. In a mixing bowl, combine the cooked rice, shredded cheese, minced garlic, dried herbs, a pinch of salt and pepper, and a tablespoon of olive oil. Mix until well combined and the ingredients are evenly distributed.
    4. Spoon the stuffing mixture into each carved pepper, pressing down gently to fill the cavity without overflowing. Leave a small gap at the top for easy carving and to prevent spillage during baking.
    5. Place the filled peppers on the prepared baking sheet, standing upright. Drizzle a little olive oil over the tops for extra caramelization.
    6. Bake in the preheated oven for about 25-30 minutes, until the peppers are tender, the skins blister slightly, and the cheese is melted and bubbly. The carved faces should look roasty and slightly charred for a fun effect.
    7. Remove from the oven and let cool slightly. Carefully transfer the stuffed peppers to a serving plate.
    8. Enjoy these vibrant, playful stuffed peppers as a festive main dish or centerpiece for Halloween celebrations, with the faces giving a spooky but tasty twist.

    Notes

    Feel free to get creative with the carved faces—smile, spooky, or silly! Use a smaller knife for detailed carving, and ensure peppers are well-seeded for less spiciness. You can swap rice for quinoa or add cooked sausage for extra flavor.

    Hope your kitchen is filled with giggles and the comforting aroma of roasted peppers. Sometimes, the messiest ideas turn out the most memorable, especially surrounded by friends or family sharing in the fun. This recipe invites a little chaos and a lot of cheer with every bite.

    As the night settles in and the glow of pumpkins flickers, remember that food with personality brings people closer. These Jack-o’-Lantern stuffed peppers are perfect for that—delicious, playful, and just a little bit wild. Enjoy every smoky, cheesy, carved moment—truly a treat for all the senses.

  • The Hidden Art of a Perfect Chili: A Quiet Food Revolution

    The Hidden Art of a Perfect Chili: A Quiet Food Revolution

    Many chili recipes boast of spice levels and hearty textures, but I believe the real magic lies in the subtle balance of flavors that often go unnoticed. As someone who’s spent endless afternoons trying to perfect that comforting yet complex bowl, I’ve discovered that the devil is in the details. This recipe is not just about filling but about respecting each ingredient’s voice in the symphony.

    Cooking chili is akin to conducting a slow dance—each step needs patience and appreciation for the layers, from smoky paprika to the gentle warmth of cumin. I’ve crafted this version over countless kitchens and my favorite old cast-iron pot always demands respect. It’s a recipe that whispers stories of lazy Sundays and lively family gatherings alike.

    Classic Hearty Chili

    This chili recipe combines ground meat, beans, and tomatoes simmered with spices to create a thick, flavorful stew. The dish features a balanced mix of smoky, spicy, and savory elements, resulting in a comforting, rustic texture with a rich sauce coating each ingredient. It’s ideal for slow cooking to develop deep flavors and tender textures.
    Prep Time 15 minutes
    Cook Time 45 minutes
    Total Time 1 hour
    Servings: 4
    Course: Main Course
    Cuisine: American
    Calories: 350

    Ingredients
      

    • 1 lb ground beef or turkey or any preferred ground meat
    • 1 large yellow onion diced
    • 3 cloves garlic minced
    • 1 tbsp smoked paprika
    • 1 tsp cumin
    • 1 can (14 oz) diced tomatoes
    • 1 can (15 oz) black beans drained and rinsed
    • 1 cup vegetable broth
    • 1 tbsp olive oil
    • to taste salt and black pepper

    Equipment

    • Large Dutch oven or heavy-bottomed pot
    • Wooden spoon or heatproof spatula

    Method
     

    1. Heat the olive oil in a large heavy-bottomed pot over medium heat until shimmering. Add the diced onion and cook, stirring occasionally, until softened and translucent, about 5 minutes.
    2. Add the minced garlic and cook for another 30 seconds until fragrant, stirring constantly to prevent burning.
    3. Stir in the ground meat, breaking it apart with a spoon, and cook until browned all over, about 8 minutes. Drain any excess fat if necessary.
    4. Sprinkle in the smoked paprika and cumin, stirring well to coat the meat and aromatics evenly. Let them cook for a minute until fragrant and coated with spices.
    5. Add the diced tomatoes with their juices and stir to combine, letting the mixture simmer gently and develop flavor for about 5 minutes.
    6. Pour in the vegetable broth and bring the mixture to a gentle boil, then reduce the heat to low and cover partially. Let it simmer for 20 minutes to deepen the flavors.
    7. Stir in the drained black beans and cook uncovered for an additional 5 minutes, allowing the chili to thicken slightly and the flavors to meld.
    8. Taste the chili and season with salt and black pepper as needed, stirring well to distribute the seasonings evenly.
    9. Remove from heat once the chili has thickened to your liking and is bubbling with rich aromas.
    10. Serve the chili hot in bowls, garnished with your favorite toppings if desired, and enjoy its hearty, layered textures.
    This chili isn’t just a dish; it’s an experience that invites cherished moments and nostalgic aromas to fill your home. It’s perfect for cozy evenings when a bowl can warm your hands and your heart. Sometimes, the simplest recipes hold the greatest stories, simmered slowly, tasted thoughtfully.

    As the flavors meld and the scent of spices fills your space, you’ll realize this isn’t just about eating. It’s about rediscovering the joy in slow cooking and the comfort of something truly homemade. Whatever your week has lacked, this dish will bring a bit of warmth and a pinch of joy.

  • Revive Your Winter Days with a Classic Chicken Noodle Soup Twist

    Revive Your Winter Days with a Classic Chicken Noodle Soup Twist

    As the chilly days settle in, I find myself craving something familiar yet new—something that warms both stomach and soul. Chicken noodle soup is a timeless comfort, but today I add a twist: a hint of toasted garlic and fresh herbs that elevate the simple broth. It’s the aroma of garlic sizzling that pulls everyone to the kitchen, ready for a bowl.

    This recipe isn’t just for cold nights; it’s a celebration of homey chaos. I love how gooey the noodles get when they soak up all that savory broth, a little messy but absolutely worth it. It’s my go-to when I want to fuss less but still serve something hearty and satisfying.

    Chicken Noodle Soup with Toasted Garlic and Fresh Herbs

    This chicken noodle soup is made by simmering chicken, vegetables, and herbs in a savory broth, then adding cooked noodles and toasted garlic for extra flavor. The dish has a comforting, hearty texture with tender chicken and slightly chewy noodles, finished with aromatic herbs and crispy garlic topping.
    Prep Time 15 minutes
    Cook Time 30 minutes
    Total Time 45 minutes
    Servings: 4
    Course: Main Course
    Cuisine: comfort food
    Calories: 320

    Ingredients
      

    • 1 lb boneless, skinless chicken breasts cut into bite-sized pieces
    • 2 carrots carrots peeled and sliced
    • 2 celery stalks celery stalks sliced
    • 4 cloves garlic minced
    • 1 large onion chopped
    • 8 cups chicken broth
    • 2 cups egg noodles uncooked
    • 2 tablespoons olive oil
    • 1 teaspoon dried thyme
    • 1/4 cup fresh parsley chopped
    • 3 cloves garlic sliced thin for toasting

    Equipment

    • Large pot
    • Skillet
    • Knife
    • Cutting board
    • Ladle

    Method
     

    1. Heat olive oil in a large pot over medium heat. Add the chopped onion, carrots, and celery, and cook until vegetables are tender and the onion is translucent, about 5 minutes.
    2. Add the minced garlic and dried thyme to the pot, cooking for another minute until fragrant. Stir constantly to prevent burning.
    3. Pour in the chicken broth and bring the mixture to a boil. Once boiling, add the chicken pieces and reduce heat to a gentle simmer. Cook until chicken is cooked through, about 10 minutes.
    4. Add the uncooked egg noodles to the broth and cook until tender, about 8 minutes. Stir occasionally to prevent sticking.
    5. Meanwhile, heat a small skillet over medium-low heat. Add sliced garlic and toast until golden brown and crispy, about 2-3 minutes. Remove from heat to prevent burning.
    6. Once the noodles are cooked and the chicken is tender, stir in chopped parsley and check the seasoning. Adjust salt and pepper if needed.
    7. Serve the soup hot, garnished with the crispy toasted garlic on top for extra flavor and texture.

    Notes

    For extra flavor, sauté vegetables longer or add a squeeze of lemon before serving.

    In the end, this chicken noodle soup reminds me that comfort food doesn’t have to be boring. It’s a dish that embraces imperfections and celebrates flavors that tell a story. Each spoonful brings a wave of warmth that’s perfect for sharing or savoring quietly on a busy day.

    As the season shifts, I find myself returning to this recipe more often. It’s a reminder that some classics gain new life when you bring your own favorite twists to the table. And honestly, it’s the little smells—garlic, chicken, fresh herbs—that make every pot feel like a cozy retreat.

  • Spooky Glee: Halloween Eyeball Pasta with Meatball “Eyeballs”

    Spooky Glee: Halloween Eyeball Pasta with Meatball “Eyeballs”

    Halloween is the one night when chaos and creativity blend into the perfect excuse for some culinary mischief. This Eyeball Pasta isn’t just a feast for the taste buds, but a visual nightmare (in the best way). Combining savory meatballs with a grotesque, eyeball-like appearance makes dinner both a conversation starter and a journey into fun.

    As a food blogger with a soft spot for the spooky season, I sought a dish that satisfies my love for theatrical eats and nostalgic flavors. The mix of familiar spaghetti or pasta and the chilling twist of ‘eyeball’ meatballs turns a simple meal into an event. Plus, the smell of bubbling marinara coupled with the sight of googly eyes always sparks joy at the dinner table.

    WHY I LOVE THIS RECIPE?

    • The chaotic charm turns any dinner into a party, especially for kids or the Halloween host.
    • Crafting tiny meatballs as eyeballs adds a playful, hands-on element to cooking.
    • The mixture of tangy tomato sauce and savory meat is addictive and comforting.
    • The visual gore makes spooky storytelling more immersive while eating.
    • It’s a delightful way to indulge in seasonal fun without too much fuss.

    AVOID MY DISASTER (You’re Welcome)

    • FORGOT to chill the meatball mixture—ended with sticky hands and misshapen eyeballs. Chill for 30 minutes!
    • DUMPED too much mozzarella—ended with a greasy mess that overwhelmed the dish. Use sparingly!
    • OVER‑TORCHED the eye centers—got burnt edges; bake at 375°F instead of broiling.
    • MISSED the googly eye mount—meatball slipped off. Use a toothpick to stabilize.

    QUICK FIXES THAT SAVE YOUR DAY

    • When eyes fall apart, splash on extra sauce and hit with fresh basil for extra flavor.
    • Patch a cracked meatball by gently pressing the sides with a damp spoon.
    • Shield the eyeballs from over-browning by tenting with foil midway through baking.
    • If spaghetti is too dry, stir in a splash of pasta water for a silky coat.
    • When in doubt, add a pinch of smoked paprika for depth and a spooky shimmer.

    Eyeball Pasta

    Eyeball Pasta features small, meatball-like spheres with a creepy, eyeball appearance nestled in a bed of tomato sauce and pasta. The dish combines baked or pan-fried meatballs with a vibrant marinara, topped with googly eyes for a spooky effect, resulting in a fun and visually striking meal with a tender, saucy texture.
    Prep Time 20 minutes
    Cook Time 30 minutes
    Total Time 50 minutes
    Servings: 4
    Course: Main Course
    Cuisine: Halloween
    Calories: 450

    Ingredients
      

    • 1 pound ground beef or turkey or chicken
    • 1 cup breadcrumbs plain or Italian seasoned
    • 1 egg egg
    • 2 cloves garlic minced
    • 1 cup marinara sauce preferably homemade or high-quality jarred
    • 1 cup mozzarella cheese shredded, use sparingly
    • 24 pieces googly eyes food-safe, small-sized
    • to taste salt and pepper
    • 1 tablespoon olive oil for browning

    Equipment

    • Mixing bowl
    • Baking sheet
    • Large pot
    • Skillet
    • Spoon

    Method
     

    1. Preheat your oven to 375°F (190°C). In a large mixing bowl, combine ground beef, breadcrumbs, egg, minced garlic, salt, and pepper. Mix everything together until well incorporated, then chill the mixture for about 10-15 minutes to make shaping easier.
    2. Once chilled, shape the meat mixture into small, round balls about the size of a golf ball—these will be your eyeballs. Place them on a baking sheet lined with parchment paper.
    3. Bake the meatballs in the preheated oven for 15-20 minutes, or until they are cooked through and lightly golden on the outside. While they bake, heat a tablespoon of olive oil in a skillet over medium heat and lightly brown the meatballs for added flavor, if desired.
    4. Meanwhile, warm the marinara sauce in a large pot until bubbling gently. Once ready, add the cooked (browned or baked) meatballs to the sauce, spooning some sauce over them to infuse flavor.
    5. Cook the pasta of your choice in boiling salted water according to package instructions. Drain and set aside. Toss the pasta with a bit of the warm marinara sauce to coat evenly.
    6. Arrange the sauced pasta on a serving plate or bowl. Place each meatball on top of the pasta, spacing them out evenly. This creates a spooky, eyeball-like effect.
    7. Top each meatball with a small amount of shredded mozzarella, and carefully press a googly eye into the center of each meatball to mimic an eyeball. If needed, stabilize the eyes with a toothpick.
    8. Optional: Tuck some fresh basil or sprinkle extra herbs around the dish for added contrast and flavor. Serve immediately so the eyes stay in place and the dish remains warm.

    Notes

    Chill the meat mixture before shaping to prevent sticking. Be careful not to overuse mozzarella to avoid greasiness. Use a toothpick to secure googly eyes for a more stable presentation.

    There’s something wildly satisfying about creating a dish that is both playful and tasty, especially when it honors the festive spirit of Halloween. This eyeball pasta isn’t just a meal—it’s a mini horror show turned culinary delight, perfect for seasonal gatherings.

    Every time I make it, I’m reminded how food can transform an ordinary night into a memorable event. The mix of a little chaos, a pinch of nostalgia, and a lot of fun makes this dish a seasonal staple. As the scent of marinara and roasted meatballs fills the air, I know that Halloween has officially arrived at the dinner table.

  • Hidden Twist: A Deconstructed Eggplant Parmesan Adventure

    Hidden Twist: A Deconstructed Eggplant Parmesan Adventure

    Eggplant Parmesan often gets a bad rap for being too greasy or too heavy. But what if I told you there’s a way to reimagine this classic using a deconstructed approach? By breaking it apart, you focus on each flavor and texture, creating a vibrant, fresh experience with every bite.

    This recipe was born out of a desire to let eggplant’s natural earthiness shine through, complemented by a bright tomato sauce and crispy bites. It’s perfect for those who want comfort food with a modern twist, or for anyone seeking a lighter, more colorful take on a familiar dish.

    With layers of textures and bursts of flavor, this version makes traditional eggplant Parmesan feel like a whole new culinary adventure. Plus, it’s a fun way to impress guests with something familiar yet unexpectedly exciting.

    Deconstructed Eggplant Parmesan

    This dish reimagines traditional eggplant Parmesan by breaking it into separate components, highlighting each ingredient’s natural flavors. It features roasted eggplant, a vibrant tomato sauce, and crispy elements, resulting in a colorful plate with varied textures and fresh appeal.
    Prep Time 20 minutes
    Cook Time 30 minutes
    Total Time 50 minutes
    Servings: 4
    Course: Main Course
    Cuisine: Italian
    Calories: 320

    Ingredients
      

    • 2 medium eggplants sliced into 1/2 inch thick rounds
    • 2 cups tomato sauce fresh or store-bought
    • 1 cup panko breadcrumbs for crumbling and crisping
    • 1/4 cup grated Parmesan cheese optional, for added flavor
    • 2 large eggs beaten
    • 1/2 cup all-purpose flour for dredging
    • 2 tablespoons olive oil for roasting and frying
    • to taste salt and pepper for seasoning
    • fresh basil leaves basil for garnish

    Equipment

    • Baking sheet
    • Skillet
    • Spatula

    Method
     

    1. Preheat your oven to 400°F (200°C). Arrange the eggplant slices on a baking sheet, brush with olive oil, and season with salt and pepper. Roast for about 20-25 minutes until they are golden brown and slightly crispy around the edges.
    2. While the eggplant roasts, prepare your dredging stations: place flour in a shallow bowl, beaten eggs in another, and mix panko breadcrumbs with Parmesan cheese in a third bowl.
    3. Once the eggplant slices are cooled slightly, lightly dredge each piece first in the flour, then dip in the beaten eggs, and finally coat well in the breadcrumb-Parmesan mixture, pressing gently to adhere.
    4. Heat a tablespoon of olive oil in a skillet over medium heat. Fry the breaded eggplant slices for 2-3 minutes on each side until crispy and golden brown. Remove to a paper-towel-lined plate to drain excess oil.
    5. Warm the tomato sauce in a saucepan over low heat until steaming and fragrant. Adjust seasoning with salt and pepper as needed.
    6. To assemble, spread a spoonful of tomato sauce on each plate, arrange the crispy eggplant slices on top, and drizzle more sauce over the crisp components. Garnish with fresh basil leaves.
    7. Serve immediately to enjoy the crispy textures combined with the vibrant tomato sauce and fresh herbs.

    Reinventing classic dishes can be a delightful challenge, and this deconstructed eggplant Parmesan hits all the right notes. Its vibrant presentation and balanced flavors make it a centerpiece that’s as inviting as it is eye-catching.

    Perfect for seasonal gatherings or a cozy night in, this recipe is a reminder that sometimes, breaking the rules leads to the best meals. Enjoy experimenting with each element—crispy, tender, tangy, and fresh—on your own terms.

  • Haunted Kitchen: Bloody Spaghetti & Sausage Fingers for a Spooky Feast

    Haunted Kitchen: Bloody Spaghetti & Sausage Fingers for a Spooky Feast

    As the air turns crisp and the nights grow longer, I find myself drawn to the playful chaos of Halloween cooking. This year, I wanted to craft a dish that sparks both giggles and shivers—something eerily fun and surprisingly easy. The scent of savory sausage and spiced tomato sauce fills my kitchen, turning it into a mini haunted house of flavors.

    The best part? Watching the kids’ eyes light up when they see the gruesome ‘fingers’ and the blood-red pasta. It’s not just a meal; it’s a messy, joyful event that invites everyone to join in the spooky spirit. Plus, it’s perfect for parties where you want your food to be as wild as your costumes.

    Spooky Blood-Red Pasta with Sausage and ‘Fingers’

    This dish features pasta coated in a vibrant red sauce made from spiced tomato and savory sausage, shaped to resemble grotesque fingers for a Halloween-themed presentation. The process includes cooking the pasta and sausage together, shaping the pasta into finger-like structures, and creating a gruesome, blood-red appearance for a fun, spooky meal. The final dish has a saucy, slightly chewy texture with playful, finger-like pasta shapes that are perfect for festive parties.
    Prep Time 15 minutes
    Cook Time 20 minutes
    Total Time 35 minutes
    Servings: 4
    Course: Main Course
    Cuisine: Halloween
    Calories: 480

    Ingredients
      

    • 12 oz pasta (penne or spaghetti)
    • 1 lb Italian sausage casings removed
    • 2 cups tomato sauce spiced for flavor
    • 2 cloves garlic minced
    • 1 teaspoon chili powder adds depth and spice
    • to taste salt and pepper
    • 1 cup blood-red marinara for extra spooky color
    • optional olive oil for frying sausage

    Equipment

    • Large pot
    • Slotted spoon
    • Baking sheet
    • Cooking utensils

    Method
     

    1. Bring a large pot of salted water to a boil and cook the pasta until al dente, following package instructions. Drain and set aside.
    2. In a skillet, cook the sausage over medium heat, breaking it apart with a spatula until browned and cooked through, about 8 minutes.
    3. Add the minced garlic and chili powder to the sausage, cooking for another minute until fragrant.
    4. Pour in the tomato sauce and blood-red marinara, stirring to combine. Simmer for 5-7 minutes to develop flavor and thicken slightly.
    5. Measure out small portions of cooked pasta, then gently shape each into a finger-like form by elongating with your hands or a spoon, flattening one end for a ‘nail’ and tapering the other for a finger shape.
    6. Place the pasta fingers on a baking sheet and spoon some of the spicy sausage sauce over each piece, letting it drip down to mimic blood.
    7. Drizzle or carefully spoon extra red marinara around the base of the pasta fingers to enhance the bloody effect.
    8. Optional: Use thin slices of black olive or green bell pepper for ‘nails’ by pressing them onto the shaped pasta fingers for a spooky touch.
    9. Serve the spooky pasta fingers immediately, allowing the sauce to be warm and the shapes to stand out visually.

    Notes

    For extra gory effect, add chopped green herbs or shredded cheese for ‘flesh’ details. Be playful with shapes and decorations!
    This Bloody Spaghetti with Sausage Fingers is a testament to how playful Halloween can be, even in the kitchen. It’s a no-fuss recipe that turns ordinary ingredients into a creepy masterpiece, perfect for celebrating the season with a bit of chaos.

    So, fire up your stove and embrace the messy fun. Whether you’re feeding a crowd or just feeling festive, this dish adds that extra dash of spooky charm your table deserves. Happy haunting—and happy cooking!

  • Spooky Snacks: Halloween Mummy Pizza

    Spooky Snacks: Halloween Mummy Pizza

    Halloween is my favorite time to turn ordinary meals into creepy, fun treats. This Mummy Pizza combines the joy of pizza with a playful, spooky twist that kids and adults alike will love. The smell of bubbling cheese and sizzling pepperoni instantly signals festive chaos in the kitchen.

    What sets this recipe apart is its simplicity and the silly, messy fun of making tiny bandages out of cheese strips. It’s perfect for a quick party snack or an easy family dinner that sparks creativity in the oven. Plus, it’s a great way to use up leftover pizza dough from the week.

    Mummy Pizza

    Mummy Pizza is a playful dish made by spreading pizza sauce on dough, topping it with cheese and pepperoni, then creating bandage-like strips of cheese to resemble a mummy. After baking until bubbly and golden, the cheese strips crisp up slightly, giving a fun, spooky appearance and a cheesy, tender texture inside.
    Prep Time 10 minutes
    Cook Time 15 minutes
    Total Time 25 minutes
    Servings: 4
    Course: Main Course
    Cuisine: American
    Calories: 320

    Ingredients
      

    • 1 package pizza dough store-bought or homemade
    • 1/2 cup pizza sauce
    • 1 cup shredded mozzarella cheese
    • 12 slices pepperoni slices
    • additional cheese strips cut from extra cheese

    Equipment

    • Baking sheet
    • Rolling pin
    • Knife
    • Baking parchment

    Method
     

    1. Preheat your oven to 400°F (200°C) and line a baking sheet with parchment paper to prevent sticking.
    2. Roll out the pizza dough on a floured surface into a thin circle or rectangle, then transfer it onto the prepared baking sheet.
    3. Spread an even layer of pizza sauce over the dough, leaving a small border around the edges for the crust.
    4. Sprinkle a generous layer of shredded mozzarella cheese evenly over the sauce to create a cheesy base.
    5. Arrange the pepperoni slices on top of the cheese, spacing them out as desired.
    6. Use a knife to cut thin strips from additional cheese to resemble bandages. Space them evenly across the pizza, crisscrossing as if wrapping a mummy.
    7. Place the pizza in the oven and bake for about 12-15 minutes, until the crust is golden and bubbly, and the cheese strips are slightly crispy.
    8. Remove the pizza from the oven and let it cool for a few minutes. The cheese strips will firm up slightly, adding to the mummy effect.
    9. Slice the pizza into pieces and serve while hot, showcasing the playful cheese bandages and crispy pepperoni.
    This Halloween-themed pizza is more than just a meal; it’s a chance to unleash your inner kid and get a little messy. The joy of seeing tiny mummy faces emerge from the oven makes all the chaos worth it.

    Whether you’re hosting a spooky gathering or just craving a playful dinner, these mummies bring a smile to everyone. Plus, they’re a perfect excuse to turn a simple pizza into a storytelling feast with monster faces and tiny bandages. Halloween has never been so deliciously fun.