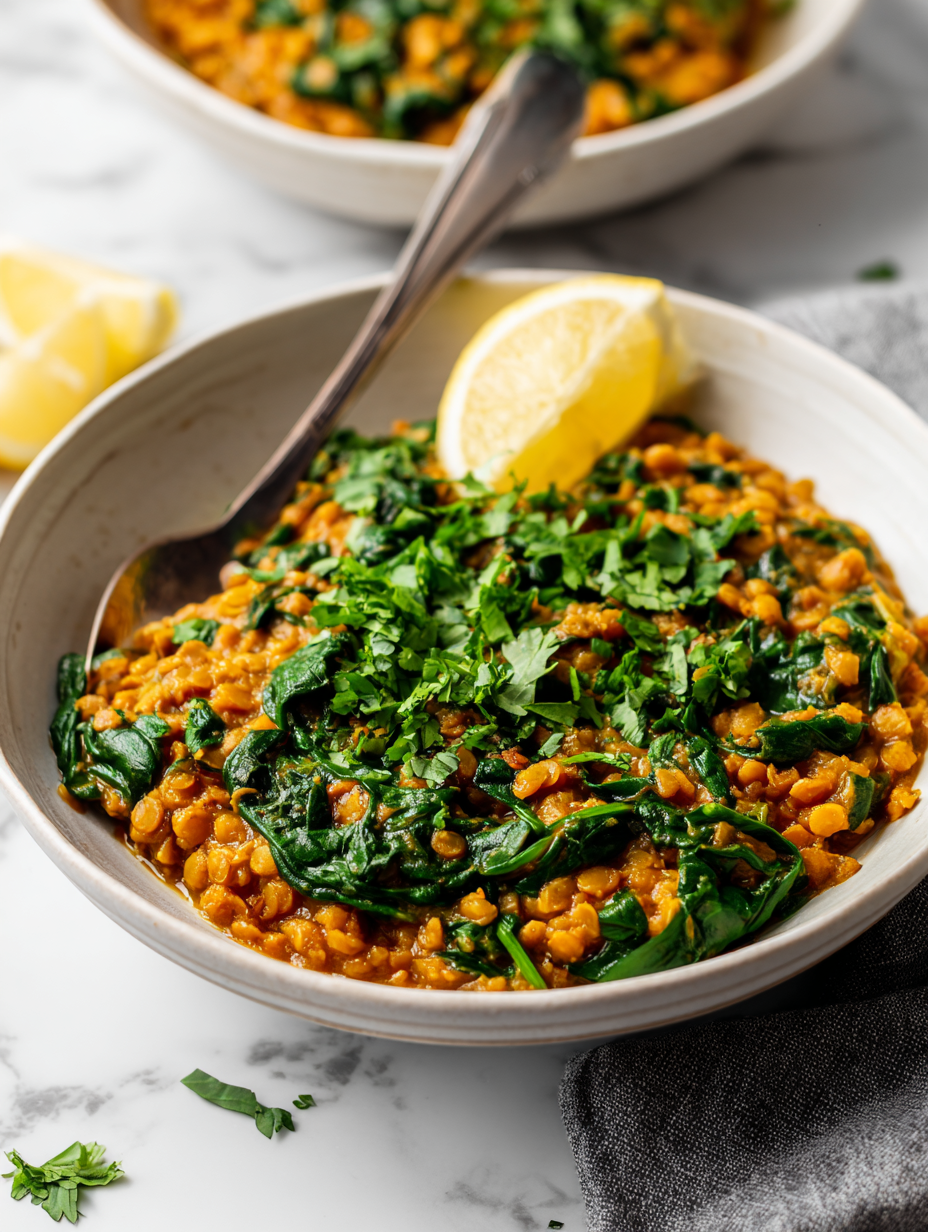
Author: HarperEvans

  • Halloween Bark Recipe: A Spooky Spin on Classic Chocolate

    Halloween Bark Recipe: A Spooky Spin on Classic Chocolate

    Halloween is my favorite excuse to go all out with chocolate and sugar. But this year, I wanted to skip the usual candy bowl and go for something more playful and a little spooky—like this bark that’s as fun to make as it is to eat. It’s a no-fuss project, perfect for getting kids involved or just indulging your own sweet tooth without the fuss.

    Why I keep making this spooky treat

    It’s endlessly customizable, easy to whip up last minute, and always a crowd-pleaser. Plus, it’s a chaos-friendly project with a sweet payoff. Watching the toppings melt into glossy, colorful patches makes me smile every time. It’s become my go-to for quick, festive happiness.

    What’s in your spooky stash?

    • Dark chocolate: It’s my go-to for rich, deep flavor, but milk or white can be swapped in if you prefer a milder taste.: Smooth, shiny, with a slight bitter edge that balances sweet toppings.
    • Candy toppings: Think crushed Oreos or gummy worms—add crunch and color, or keep it simple with sea salt for a salty contrast.: Crunchy, chewy, or sparkly—whatever makes your spooky heart happy.
    • Nuts: Toasted pecans or almonds add a smoky crunch, but skip if allergies are a concern.: Oozy in flavor and texture, they bring a little sophistication.
    • Edible glitter: Because sometimes, you want your treats to shimmer in the dim light.: Sparkling, shimmering, and totally festive.
    • Flavor extracts: A dash of peppermint or orange can turn this into a more personalized treat.: Oozy and fragrant, a little goes a long way.

    Tools of the trade for spooky chocolate

    • Double boiler or microwave: To melt chocolate gently, avoiding burning.
    • Spatula: To spread melted chocolate evenly.
    • Parchment paper: To prevent sticking and make cleanup easy.
    • Knife or breaker: To break the bark into rustic pieces.

    Step-by-step: Making Halloween Bark

    Step 1: Line a baking sheet with parchment paper.

    Step 2: Melt the dark chocolate in a double boiler or microwave, stirring every 30 seconds until smooth.

    Step 3: Pour the melted chocolate onto the prepared sheet, spreading it evenly with a spatula.

    Step 4: Sprinkle on your chosen toppings — think crushed candy, nuts, or edible glitter — while the chocolate is still warm.

    Step 5: Let the chocolate set at room temperature for at least 2 hours, or refrigerate for 30 minutes for quicker results.

    Step 6: Once firm, break into irregular shards with your hands or a knife for that rustic look.

    Key checkpoints: How to tell if your bark is perfect

    • Chocolate is fully melted and smooth, with no lumps.
    • Toppings are well distributed and adhered to the surface.
    • Chocolate has set and snapped cleanly when broken.
    • The finished bark has a glossy sheen and no sticky patches.

    Common Halloween bark slip-ups and how to fix them

    • Overheated chocolate.? Use a gentle heat, or chocolate can seize and turn grainy.
    • Toppings falling off.? Sprinkle toppings while chocolate is still warm for better adherence.
    • Bark sweating or developing condensation.? Refrigerate if quick setting is needed, but keep an eye on condensation.
    • Crumbly or jagged pieces.? Ensure chocolate is fully cooled before breaking for clean edges.

    Halloween Chocolate Bark

    This festive chocolate bark is made by melting dark chocolate and spreading it onto parchment paper, then decorating with colorful toppings like crushed Oreos, gummy worms, nuts, and edible glitter. Once set, it’s broken into rustic shards, offering a glossy, crunchy, and chewy treat perfect for Halloween celebrations. The process is quick, customizable, and yields a visually stunning, sweet snack.
    Prep Time 10 minutes
    Cook Time 15 minutes
    Total Time 25 minutes
    Servings: 8
    Course: Main Course
    Cuisine: Halloween
    Calories: 250

    Ingredients
      

    • 200 grams dark chocolate chopped or in chips
    • 1/2 cup crushed Oreos for topping
    • 1/4 cup gummy worms for topping
    • 1/3 cup toasted pecans optional, chopped
    • 1 tsp edible glitter for shimmer
    • 1/2 tsp peppermint extract optional for flavor

    Equipment

    • Double boiler or microwave
    • Spatula

    Method
     

    1. Line a baking sheet with parchment paper to prepare for the chocolate.
    2. Gently melt the dark chocolate using a double boiler or in a microwave, heating in 30-second intervals and stirring until smooth and glossy.
    3. Pour the melted chocolate onto the prepared parchment, spreading it evenly with a spatula to create a thin, smooth layer.
    4. Sprinkle crushed Oreos, gummy worms, toasted pecans, and edible glitter over the warm chocolate, distributing toppings evenly for a playful look.
    5. If using, add a few drops of peppermint extract onto the toppings for a fragrant, festive touch.
    6. Allow the chocolate to set at room temperature for about 2 hours, or refrigerate for 30 minutes for quicker firming.
    7. Once firm, break the chocolate into rustic shards using your hands or a knife, revealing the colorful toppings embedded in glossy chocolate.
    8. Enjoy your spooky, shiny Halloween bark—perfect for sharing or indulging all on your own!
    This Halloween bark isn’t just about the sweet crunch or the shiny, spooky toppings. It’s about the messy joy of creating something fun and customizable, even if your kitchen’s chaos is peeking out in every corner. Play with flavors, textures, and colors—make it your own. And honestly, it’s simple enough to whip up in a pinch, perfect for last-minute parties or just a quiet night craving something festive.

  • Spooky Stuffed Peppers: A Trick-or-Treat Twist for Your Table

    Spooky Stuffed Peppers: A Trick-or-Treat Twist for Your Table

    Stuffed peppers have always been a comfort food, but this version adds a spooky twist perfect for Halloween or a fun fall dinner. I love the way the vibrant peppers hide a treasure trove of smoky, savory filling inside. It’s a dish that feels festive without fuss, just a little bit playful and a lot delicious.

    Why I Keep Coming Back to This Recipe

    It’s forgiving and adaptable, always satisfying. The smoky, cheesy flavors bring a sense of celebration, even on regular nights. Plus, it’s a reminder that a little creativity turns simple ingredients into something fun and memorable.

    Breaking Down the Ingredients

    • Bell peppers: Colorful vessels for stuffing, their sweet crunch contrasts with savory filling.
    • Ground meat or plant-based protein: The hearty core, gives richness and substance, adaptable to your diet.
    • Cooked rice or grains: Helps bind the filling, adds chewy texture, and soaks up flavors.
    • Onions and garlic: Fundamental aromatics, smell like comfort, add depth.
    • Cheese (cheddar or mozzarella): Melty, gooey, adds a salty, smoky finish—skip if vegan.
    • Herbs and spices: Cilantro, parsley, smoked paprika—bright, smoky, and fresh.
    • Olive oil: Sauté base, adds richness, makes everything shimmer.

    Tools and Equipment for Perfect Spooky Stuffed Peppers

    • Oven: To evenly bake the peppers and melt the cheese.
    • Skillet: To sauté the aromatics and brown the filling.
    • Spoon: To stuff the peppers neatly.
    • Baking dish: To hold the peppers upright during baking.
    • Knife: To cut the tops and hollow out the peppers.

    Step-by-Step Guide to Crafting Spooky Stuffed Peppers

    Step 1: Preheat your oven to 190°C (375°F).

    Step 2: Cut the tops off 4 large bell peppers, keeping the stems for a fun, spooky look.

    Step 3: Scoop out seeds and membranes, creating little cavities.

    Step 4: In a skillet, heat a splash of oil over medium. Sauté chopped onions and garlic until fragrant and translucent.

    Step 5: Mix cooked rice, ground meat, and chopped herbs in a bowl. Season with salt, pepper, and a pinch of smoked paprika.

    Step 6: Stuff the peppers generously with the filling, pressing down slightly.

    Step 7: Place peppers upright in a baking dish. Cover with foil and bake for 30 minutes.

    Step 8: Remove foil, sprinkle with shredded cheese, and bake for another 10 minutes until cheese bubbles and edges brown.

    Step 9: Let rest for 5 minutes before serving to allow flavors to meld.

    Cooking Checkpoints & Tips for Success

    • Peppers should be firm but not hard; they soften evenly in the oven.
    • Filling needs to be moist enough to stay together but not runny.
    • Cheese should be bubbly and golden; keep an eye on the last few minutes.
    • If peppers are browning too quickly, cover with foil to prevent burning.

    Common Mistakes & How to Fix Them

    • Peppers split during baking.? Use a sharp knife to cut peppers; dull blades crush instead of cut.
    • Cheese burns before peppers are cooked.? Cover peppers with foil if the cheese browns too quickly.
    • Filling falls apart when stuffed.? Add a bit more moisture to the filling if it’s too dry.
    • Peppers toppling over during baking.? Ensure peppers are upright in baking dish; lean them against each other if needed.

    Spooky Stuffed Peppers

    Colorful bell peppers are hollowed out and filled with a savory mixture of ground meat, rice, onions, garlic, and herbs, then baked until tender and bubbling with melted cheese. This dish combines vibrant presentation with hearty, smoky flavors and a satisfying texture, perfect for festive occasions or a fun fall dinner. The peppers retain a firm but soft bite, showcasing a beautiful contrast between the crunchy exterior and savory filling.
    Prep Time 15 minutes
    Cook Time 40 minutes
    Total Time 55 minutes
    Servings: 4
    Course: Main Course
    Cuisine: Fusion
    Calories: 350

    Ingredients
      

    • 4 large bell peppers preferably colorful for visual impact
    • 1/2 pound ground meat or plant-based protein beef, turkey, or vegetarian option
    • 1 cup cooked rice white, brown, or jasmine rice
    • 1 onion finely chopped
    • 2 cloves garlic minced
    • 1 cup shredded cheese cheddar or mozzarella, optional for vegan
    • 2 tablespoons olive oil for sautéing
    • 1/4 teaspoon smoked paprika adds smoky flavor
    • to taste salt and pepper
    • fresh cilantro or parsley herbs chopped, for flavor

    Equipment

    • Oven
    • Skillet
    • Spoon
    • Baking Dish
    • Knife

    Method
     

    1. Preheat your oven to 190°C (375°F). Set a baking dish nearby to hold the peppers during baking.
    2. Using a sharp knife, carefully cut the tops off each bell pepper, keeping the stems on for a fun, spooky look. Scoop out all seeds and membranes from inside the peppers, creating a hollow cavity.
    3. Heat olive oil in a skillet over medium heat. Add chopped onions and sauté until translucent and fragrant, about 3-4 minutes, until they start to soften and smell sweet.
    4. Stir in minced garlic and cook for another minute until fragrant, making sure not to burn it.
    5. In a mixing bowl, combine cooked rice, ground meat, chopped herbs, smoked paprika, salt, and pepper. Mix well to evenly distribute flavors and ingredients.
    6. Add the sautéed onions and garlic to the bowl with the rice mixture, stirring to incorporate everything thoroughly.
    7. Using a spoon, pack the filling into each hollowed pepper, pressing down gently to fill completely without overflowing.
    8. Place the stuffed peppers upright in the baking dish, ensuring they sit steadily. Cover with foil to prevent over-browning.
    9. Bake in the preheated oven for about 30 minutes, until peppers are tender but still hold their shape.
    10. Remove the foil and sprinkle shredded cheese evenly over each pepper. Return to the oven and bake for an additional 10 minutes, until cheese is bubbly and golden brown.
    11. Once baked, carefully transfer the peppers to a serving plate and let rest for 5 minutes. The cheese will set slightly, and flavors will meld.
    12. Garnish with chopped cilantro or parsley, then serve hot to enjoy the perfect bite of smoky, cheesy goodness with a colorful crunch.
    This dish is a playful way to serve a hearty, comforting meal with a dash of whimsy. The smoky spices and gooey cheese make each bite satisfying, even if the presentation is a little spooky. Feel free to get creative with the fillings—leftover roast, spicy chorizo, or even a vegetarian bean mix all work. It’s a simple, forgiving recipe that invites you to experiment and make it your own.

  • Monster Pretzel Bites: A Chewy, Salty, Cheeky Snack for the Chaos of the Day

    Monster Pretzel Bites: A Chewy, Salty, Cheeky Snack for the Chaos of the Day

    Pretzel bites have always felt like a rebellious snack—small but mighty, chewy and salty, with a glossy, browned crust. But lately, I’ve been obsessed with making them at home, especially with a twist of my own chaos. It’s a messy process, but that’s part of the charm.
    They’re a reminder that simple ingredients—flour, yeast, salt—can turn into something unexpectedly joyful. Plus, they’re perfect for snacking, sharing, or just gobbling down in a moment of need.

    Why These Pretzel Bites Keep Calling My Name

    They’re the perfect mix of chaos and comfort—chewy, salty, a little wild, and endlessly customizable. Every batch feels like a small victory, especially when they come out glossy and golden. Plus, making them at home means I can tweak the salt, add cheese, or even a dash of spice—never boring.

    Inside the Ingredients: What Makes These Pretzel Bites Special

    • Warm milk: Creates a cozy environment for yeast, must be just warm enough—no hotter.
    • Active dry yeast: The magic that makes the dough rise and develop that chewy texture.
    • All-purpose flour: The backbone of the pretzel—gluten-y, reliable, with a hint of wheat.
    • Baking soda: Gives that classic pretzel crust—deep, salty, with a smoky bite.
    • Coarse sea salt: Sprinkled on top for crunch and that unmistakable salty punch.
    • Butter, melted: Adds richness and helps the dough stay tender, even after baking.
    • Sugar: Feeds the yeast, but also balances the salty, yeasty notes.

    Tools of the Trade for Monster Pretzel Mastery

    • Large mixing bowl: For mixing and rising the dough.
    • Dough scraper: To handle sticky dough easily.
    • Baking sheet lined with parchment: For baking the pretzel bites evenly.
    • Kitchen thermometer: To check milk temperature.
    • Slotted spoon: To boil the pretzel bites in baking soda water.

    Crafting the Perfect Monster Pretzel Bites

    Step 1: Start by warming your milk to about 38°C (100°F). It should be just warm enough to feel like a cozy bath for your finger. If it’s too hot, it’ll kill the yeast—wait till it cools slightly.

    Step 2: Dissolve the yeast and sugar into the warm milk. Let it sit for 5 minutes until it’s foamy and bubbling—like a mini volcano of promise.

    Step 3: Mix the flour, salt, and melted butter in a big bowl. Pour in the yeast mixture. Stir until it forms a sticky dough, then knead for about 8 minutes until smooth and elastic.

    Step 4: Shape the dough into a ball, cover it with a damp towel, and let it rise in a warm spot for 1 hour, or until it’s doubled in size.

    Spotting the Finish Line: How to Know Your Pretzel Bites Are Ready

    • Dough should be smooth, slightly sticky, and spring back when poked.
    • Bites turn a deep golden-brown, with a crackly crust that makes a satisfying snap.
    • Baking fills the kitchen with that warm, yeasty aroma—like comfort in the air.

    Oops Moments: Common Pretzel Pitfalls and How to Fix Them

    • Dough is too sticky, hard to handle.? If dough is too sticky, dust with a little more flour and knead lightly.
    • Pretzel bites lack color.? If pretzels are pale, increase oven temp to 220°C (430°F) or bake a few minutes longer.
    • Texture turns rubbery.? If pretzels are tough, don’t overbake, or try a shorter boil time.
    • Baking soda boil is too vigorous.? If baking soda water bubbles over, lower heat or use a larger pot.

    Homemade Pretzel Bites

    These homemade pretzel bites are chewy, salty, and golden with a glossy crust, achieved through boiling in baking soda water before baking. Made from simple ingredients like flour, yeast, and salt, they develop a satisfying snap and a slightly crisp exterior while remaining tender inside. Perfect for snacking or sharing, they can be customized with cheese, spices, or extra salt.
    Prep Time 15 minutes
    Cook Time 15 minutes
    Total Time 2 minutes
    Servings: 8
    Course: Main Course
    Cuisine: American
    Calories: 150

    Ingredients
      

    • 1 cup warm milk about 38°C (100°F), just warm to the touch
    • 2 1/4 teaspoons active dry yeast instant or active dry yeast
    • 1 tablespoon granulated sugar feeds the yeast
    • 3 1/2 cups all-purpose flour plus extra for dusting
    • 1 teaspoon salt
    • 2 tablespoons melted butter
    • 4 cups water
    • 2/3 cup baking soda for boiling water
    • coarse sea salt for sprinkling on top of pretzels

    Equipment

    • Large mixing bowl
    • Dough scraper
    • Baking sheet lined with parchment
    • Kitchen thermometer
    • Slotted spoon

    Method
     

    1. Warm the milk in a small saucepan or microwave until it reaches about 38°C (100°F). It should feel cozy but not hot to the touch.
    2. Pour the warm milk into a large mixing bowl, then sprinkle the yeast and sugar over the surface. Let it sit for 5 minutes until the mixture becomes foamy and bubbling, signaling the yeast is active.
    3. Add the flour, salt, and melted butter to the yeast mixture. Stir with a spoon or dough scraper until a sticky dough forms.
    4. Knead the dough in the bowl or on a floured surface for about 8 minutes until it becomes smooth, elastic, and slightly tacky.
    5. Shape the dough into a ball, cover it with a damp towel, and let it rise in a warm place for 1 hour, or until it doubles in size.
    6. Preheat your oven to 220°C (430°F) and line a baking sheet with parchment paper. Bring water to a boil in a large pot, then add the baking soda.
    7. Once the dough has risen, punch it down gently and turn it out onto a floured surface. Divide it into small portions and shape each into bite-sized pieces.
    8. Using a slotted spoon, carefully lower a handful of pretzel bites into the boiling baking soda water. Boil for about 30 seconds until they puff slightly and become glossy.
    9. Remove the pretzels with the slotted spoon, letting excess water drip off, then transfer them to the prepared baking sheet.
    10. Sprinkle the pretzels generously with coarse sea salt. Repeat the boiling process with remaining pieces.
    11. Bake the pretzel bites in the preheated oven for 12-15 minutes, until they are deep golden brown with a glossy, crackly crust.
    12. Remove from the oven, let cool slightly, then enjoy your chewy, salty, homemade pretzel bites—perfect for snacking and sharing!
    These pretzel bites are a messy, chewy riot—perfect for grabbing with sticky fingers during a movie night or a chaotic snack attack. Feel free to toss in some cheese, garlic, or even a sprinkle of spicy seeds before baking. They’re forgiving, fun, and a little wild—like a good day should be.

  • Black Velvet Cupcakes: A Midnight-Blue Dessert with a Deep, Rich Soul

    Black Velvet Cupcakes: A Midnight-Blue Dessert with a Deep, Rich Soul

    Black velvet cupcakes are a surprise—the dark color and deep cocoa flavor catch you off guard in the best way. They’re a little dramatic, but also comforting, especially when you need something a bit decadent. I love how the color makes them perfect for evening treats, or even fancy brunches with a dark twist. It’s about finding beauty in the moody, the mysterious, the understated.

    Why These Cupcakes Keep Calling Me

    Their deep, smoky flavor and moist crumb make them a go-to for quiet evenings. The color alone feels like a secret, and I love the way they look on a plate—mysterious and inviting. Every time I bake them, I feel a little more in control, turning simple ingredients into something memorable. They remind me that sometimes, less is more—just good cocoa, butter, and a bit of patience.

    Inside the Dark Chocolate and Cocoa

    • Dark cocoa powder: Gives that rich, smoky depth. Use Dutch-processed for a smoother flavor or natural for more acidity.
    • Buttermilk: Adds moistness and a subtle tang. If unavailable, swap with sour cream or yogurt.
    • Butter: Creamy and rich, it’s the base of the moist crumb. Consider using European-style for extra flavor.
    • Granulated sugar: Sweetens and tenderizes, balancing the cocoa’s bitterness.
    • Eggs: Bind everything together, add structure and moisture.
    • Vanilla extract: Enhances the chocolate notes, a splash brightens the overall flavor.
    • All-purpose flour: Provides structure; don’t overmix to keep it tender.

    Tools of the Midnight Kitchen

    • Mixer or whisk: To beat butter and sugar to fluffy perfection.
    • Sifter: To combine dry ingredients smoothly and prevent lumps.
    • Muffin tin and paper liners: To shape and contain the cupcakes.
    • Cooling rack: To cool cupcakes evenly and prevent sogginess.
    • Toothpick or cake tester: To check doneness without damaging the cupcakes.

    Step-by-step to a Deep-Color, Moist Cupcake

    Step 1: Preheat your oven to 175°C (350°F). Line a muffin tin with paper liners.

    Step 2: Mix dry ingredients: flour, cocoa powder, baking soda, salt. Sift to combine.

    Step 3: Cream butter and sugar until pale and fluffy, about 3-4 minutes.

    Step 4: Add eggs one at a time, beating well after each. Mix in vanilla extract.

    Step 5: Alternate adding buttermilk and dry ingredients, starting and ending with dry. Mix until just combined.

    Step 6: Divide batter evenly into liners, filling about 2/3 full.

    Step 7: Bake for 18-20 minutes. Check with a toothpick; it should come out clean.

    Step 8: Let cupcakes cool in the tin for 10 minutes, then transfer to a wire rack.

    Step 9: Finish with your favorite frosting—cream cheese works beautifully.

    Watching for the Perfect Bake and Texture

    • Cupcakes should be risen and slightly domed, with a firm, springy surface.
    • The edges are slightly darker but not burnt; a little crackle on top is good.
    • A toothpick inserted in the center should come out clean or with just a few moist crumbs.

    Common Pitfalls and How to Avoid Them

    • Cold butter or eggs can cause uneven mixing.? Ensure ingredients are at room temperature to avoid batter curdling.
    • Overmixing leads to dense, tough cupcakes.? Don’t overmix once dry ingredients are added.
    • Premature opening causes collapsing or uneven rising.? Bake until just done, don’t open the oven early.
    • Incorrect oven temp can burn or underbake.? Check oven temperature with an oven thermometer.

    Black Velvet Cupcakes

    Black velvet cupcakes are moody, decadent treats with a deep cocoa flavor and moist, tender crumb. Their striking dark color and rich texture make them perfect for evening indulgence or fancy brunches, offering a surprising and sophisticated twist on classic cupcakes.
    Prep Time 15 minutes
    Cook Time 20 minutes
    Total Time 35 minutes
    Servings: 12
    Course: Main Course
    Cuisine: American
    Calories: 250

    Ingredients
      

    • 1 3/4 cups all-purpose flour
    • 1/2 cup dark cocoa powder Dutch-processed preferred
    • 1 teaspoon baking soda baking soda
    • 1/2 teaspoon salt salt
    • 1/2 cup unsalted butter room temperature
    • 1 cup granulated sugar
    • 2 large eggs room temperature
    • 1 teaspoon vanilla extract vanilla extract
    • 3/4 cup buttermilk or sour cream/yogurt substitute

    Equipment

    • Mixer or whisk
    • Sifter
    • Muffin tin and paper liners
    • Cooling rack
    • Toothpick or cake tester

    Method
     

    1. Preheat your oven to 175°C (350°F) and line your muffin tin with paper liners. This sets the stage for even baking and easy cleanup.
    2. Sift together the flour, cocoa powder, baking soda, and salt into a large bowl. This ensures a smooth, lump-free batter with a deep chocolate flavor.
    3. In a separate bowl, beat the butter and sugar with a mixer or whisk until the mixture is pale, fluffy, and fragrant—about 3-4 minutes. This creates a light base for the cupcakes.
    4. Add eggs one at a time, beating well after each addition. Then, mix in the vanilla extract until combined. The batter will look smooth and slightly glossy.
    5. Alternate adding the buttermilk and dry ingredients to the creamed mixture, starting and ending with the dry. Mix until just combined—be careful not to overmix, as this keeps the cupcakes tender.
    6. Divide the batter evenly among the cupcake liners, filling each about two-thirds full. You should see a rich dark batter with a velvety texture.
    7. Bake for 18-20 minutes, or until the cupcakes have risen and a toothpick inserted into the center comes out clean. The tops should be slightly cracked and fragrant.
    8. Allow the cupcakes to cool in the tin for about 10 minutes, then transfer them to a wire rack. This helps them set and prevents sogginess.
    9. Once cooled, frost with your favorite rich cream cheese frosting or a dark chocolate ganache for an extra decadent finish. The deep cocoa flavor shines through every bite.
    10. Enjoy these moist, dramatic cupcakes that look as mysterious as they taste, perfect for special occasions or a quiet evening treat.
    These cupcakes aren’t just pretty; they hold a quiet, smoky richness that’s perfect for late-night gatherings or quiet moments. They’re easy enough to whip up on a whim but special enough to make a statement. Once cooled, a smear of cream cheese frosting turns them into a little midnight indulgence. Feel free to sprinkle some edible gold dust or add a dash of espresso powder for a personal touch.

  • Pumpkin Alfredo Pasta: A Cozy Twist for Autumn Nights

    Pumpkin Alfredo Pasta: A Cozy Twist for Autumn Nights

    I stumbled onto this pumpkin Alfredo by accident, really. It was one of those nights when I wanted something familiar but with a twist—something that felt like fall in a bowl. The sweetness of pumpkin, paired with creamy cheese, makes it feel indulgent yet surprisingly light. It’s become my go-to for chilly evenings, a dish that feels both nostalgic and fresh.

    Why I Keep Returning to This Pumpkin Alfredo

    It’s simple yet indulgent, perfect for busy nights when I need comfort fast. The sweetness of pumpkin paired with creamy cheese makes me nostalgic, reminding me of autumn weekends. Plus, it’s versatile—swap ingredients, adjust spices, and still land on something satisfying. It’s a dish I can tweak endlessly, and it never gets old.

    Breaking Down the Key Ingredients

    • Pumpkin: Sweet, earthy, and velvety—roasted pumpkin adds depth and natural sweetness. Skip if you’re out, but try to find a good sugar pumpkin or butternut squash.
    • Cream: Rich and smooth, it makes the sauce luscious. Heavy cream is best, but milk can work in a pinch for lighter fare.
    • Parmesan: Salty, nutty cheese that melts into the sauce. Pecorino or Gruyère can be fun swaps if you crave different notes.
    • Garlic & Shallots: Aromatics that infuse the sauce with warmth and complexity. Use fresh for the best punch.
    • Nutmeg & Sage: A pinch of nutmeg adds warmth, while sage lends an earthy aroma—both essential for that fall vibe.
    • Pasta: Fettuccine or pappardelle work well—something with a good surface to catch sauce. Gluten-free options are fine too.
    • Pumpkin seeds: Toasted seeds add crunch and a smoky contrast. Keep a handful aside for topping.

    Tools of the Trade for Pumpkin Alfredo

    • Baking sheet: Roast pumpkin evenly, caramelizing edges for deep flavor.
    • Blender or immersion blender: Create a smooth, velvety sauce from roasted pumpkin.
    • Large pot: Cook pasta efficiently and evenly.
    • Sauté pan: Gently cook aromatics and combine sauce with pasta.
    • Wooden spoon: Stir and combine ingredients without scratching your pan.

    Step-by-step to Pumpkin Alfredo Perfection

    Step 1: Start by roasting your pumpkin until it’s soft and caramelized, about 25-30 minutes at 200°C (390°F).

    Step 2: While the pumpkin cools, cook your pasta in salted boiling water until al dente, about 8-10 minutes.

    Step 3: In a pan, gently sauté garlic and shallots with a splash of olive oil until fragrant and translucent, about 2-3 minutes.

    Step 4: Blend the roasted pumpkin with cream, Parmesan, and a pinch of nutmeg until smooth and velvety.

    Step 5: Pour the pumpkin mixture into the pan with garlic and shallots, simmer on low for 5 minutes, stirring constantly.

    Step 6: Toss in the cooked pasta, stirring to coat thoroughly. Season with salt and pepper to taste.

    Step 7: Finish with a drizzle of oil, a sprinkle of extra Parmesan, and fresh sage leaves if you like.

    Step 8: Serve hot, garnished with a few toasted pumpkin seeds for crunch.

    Cooking Checks to Keep You on Track

    • Pumpkin should be deeply golden, soft, and slightly caramelized for maximum flavor.
    • Pasta must be perfectly al dente—firm but cooked through, with a slight bite.
    • The sauce should be smooth, velvety, not greasy or clumpy.
    • The final dish should smell sweet, savory, with hints of garlic and toasted pumpkin.

    Common Mistakes and How to Fix Them

    • Pumpkin was undercooked or bland.? FORGOT to roast pumpkin thoroughly? Roast longer or at a higher temp for deeper flavor.
    • Sauce split or curdled.? DUMPED in cold cream early? Add it later, once pumpkin is pureed, to keep the sauce smooth.
    • Bitter garlic flavor.? OVER-TORCHED garlic? Remove from heat immediately to avoid bitterness.
    • Clumpy, overly dense sauce.? Sauce too thick? Splash in a little pasta water to loosen it up.

    Pumpkin Alfredo Pasta

    This Pumpkin Alfredo combines roasted pumpkin with a creamy cheese sauce, creating a velvety, golden dish perfect for fall evenings. The process involves roasting pumpkin, blending it into a smooth sauce, and tossing it with al dente pasta for a comforting yet light meal with warm, aromatic flavors. The final dish is rich, creamy, and topped with toasted pumpkin seeds for added crunch and flavor.
    Prep Time 10 minutes
    Cook Time 35 minutes
    Total Time 45 minutes
    Servings: 4
    Course: Main Course
    Cuisine: American
    Calories: 520

    Ingredients
      

    • 1 small sugar pumpkin or butternut squash peeled, seeded, and cut into chunks
    • 1 cup heavy cream or milk for a lighter version
    • 1 cup Parmesan cheese grated
    • 2 cloves garlic minced
    • 1 shallot shallot finely chopped
    • 1/4 teaspoon nutmeg freshly grated if possible
    • 12 oz fettuccine or pappardelle uncooked
    • 1/4 cup pumpkin seeds toasted for topping
    • 2 tablespoons olive oil for roasting and sautéing

    Equipment

    • Baking sheet
    • Blender or immersion blender
    • Large pot
    • Sauté pan
    • Wooden spoon

    Method
     

    1. Preheat your oven to 200°C (390°F). Spread the pumpkin chunks on a baking sheet, drizzle with olive oil, and roast for 25-30 minutes until deeply golden and tender.
    2. While the pumpkin roasts, cook your pasta in salted boiling water until al dente, about 8-10 minutes. Drain and set aside.
    3. In a sauté pan, heat a splash of olive oil over medium heat. Add the minced garlic and chopped shallot, cooking until fragrant and translucent, about 2-3 minutes. Remove from heat and set aside.
    4. Once the pumpkin is roasted and cool enough to handle, transfer it to a blender. Add the cream, grated Parmesan, and a pinch of nutmeg, then blend until smooth and velvety.
    5. Pour the pumpkin mixture into the sauté pan with the garlic and shallots. Warm gently over low heat, stirring constantly, until the sauce is heated through and slightly thickened, about 5 minutes.
    6. Add the cooked pasta to the sauce, tossing to coat evenly. Season with salt and pepper to taste. The sauce should cling nicely to the pasta, creating a creamy, golden coating.
    7. Divide the pasta among serving plates. Sprinkle with toasted pumpkin seeds and garnish with fresh sage leaves if desired. Drizzle with a little olive oil for shine.

    Notes

    Roasting the pumpkin well is key for deep flavor. Adjust spices to your taste—adding a pinch of cayenne for heat or more nutmeg for warmth. Toast pumpkin seeds for crunch just before serving.
    This dish feels like wrapping yourself in a warm blanket, pumpkin’s sweetness balancing the rich cream. It’s perfect for those evenings when you want comfort without the heaviness. Feel free to add a dash of chili flakes for a gentle heat or swap sage for thyme if that’s your vibe. Each bite is a little piece of fall, cozy and satisfying.

  • Pumpkin Risotto: An Unexpected Fall Treasure with a Toasted Nut Twist

    Pumpkin Risotto: An Unexpected Fall Treasure with a Toasted Nut Twist

    Pumpkin risotto isn’t just a seasonal thing for me; it’s a reminder of childhood falls, of pumpkin patches and warm kitchens. There’s something about the way pumpkin’s sweet earthiness plays with the richness of butter and cheese that makes every spoonful feel like a small celebration. It’s honest, it’s filling, and it’s forgiving enough to tweak with what you have.

    Why This Pumpkin Risotto Won’t Fade from Memory

    Its warmth and gentle sweetness remind me of autumn’s quiet afternoons. The process of stirring, smelling the roasting pumpkin, and tasting each addition keeps me grounded. It’s a dish that feels like a small act of care, made with patience and a little bit of chaos. Every time I make it, I find a new way to tweak and love it more.

    Breaking Down the Pumpkin Risotto Essentials

    • Pumpkin puree: Gives the risotto its sweet, velvety base. Use fresh or canned, but avoid overly sweetened.
    • Arborio rice: Its high starch content makes the risotto creamy. Don’t swap for long-grain rice.
    • Chicken or vegetable broth: The liquid that brings everything together. Keep it hot for smooth stirring.
    • Parmesan cheese: Adds saltiness and depth. Pecorino works as a sharper alternative.
    • Butter and olive oil: Create a rich, glossy finish. Use good-quality for best flavor.
    • Toasted pumpkin seeds or herbs: For crunch and freshness, adding texture and color.
    • Salt and pepper: Season gradually, adjusting to taste for balance.

    Tools of the Trade for Pumpkin Risotto

    • Large, deep skillet or wide saucepan: To give the rice room to cook evenly and release its starch.
    • Ladle: For adding broth gradually and stirring gently.
    • Wooden spoon: To stir the rice without breaking grains.
    • Saucepan to warm up the broth: Keeps the broth hot and ready for the rice.
    • Grater: For freshly grating Parmesan or nutmeg if using.

    Step-by-step to a Creamy, Toasted Nut Pumpkin Risotto

    Step 1: Heat the broth until simmering, then keep it warm on low heat.

    Step 2: In a large pan, melt butter over medium heat, about 180°C/350°F.

    Step 3: Sauté chopped onion until translucent, about 5 minutes, until it smells sweet and mild.

    Step 4: Add rice and toast for 2 minutes, stirring constantly, until edges turn translucent.

    Step 5: Stir in pumpkin puree and cook for 3 minutes, until vibrant and fragrant.

    Step 6: Pour in a splash of white wine, stir until mostly evaporated, about 2 minutes.

    Step 7: Add hot broth a ladle at a time, letting rice absorb each addition before adding more.

    Step 8: Cook, stirring gently, for about 18-20 minutes, until rice is tender but still has a slight bite.

    Step 9: Taste and adjust salt, add pepper if needed.

    Step 10: Finish with a handful of Parmesan and a drizzle of good olive oil.

    Step 11: Let rest off heat for 2 minutes, then serve topped with toasted pumpkin seeds or herbs.

    Cooking Watchpoints: When It’s Just Right

    • The rice should be tender but with a slight firmness in the center.
    • The risotto should be creamy, not dry or soupy.
    • A gentle jiggle in the pan means it’s thick enough to serve.

    Avoid These Common Risotto Slip-ups

    • Adding cold broth to hot rice.? FORGOT to keep broth warm, rice cooks unevenly. Do it in a separate saucepan.
    • Pouring broth all at once.? DUMPED too much liquid at once, making it soupy. Add broth slowly, one ladle at a time.
    • Cooking on too high heat.? OVER-TORCHED the rice, resulting in a mushy texture. Stir frequently and keep heat moderate.
    • Not tasting as you go.? SKIPPED tasting during cooking, losing control of seasoning. Taste often and adjust salt.

    Pumpkin Risotto

    Pumpkin risotto is a creamy, comforting dish that combines the sweet earthiness of pumpkin with the rich, velvety texture of Arborio rice. It’s made by gradually stirring warm broth into sautéed onions and toasted rice, then finishing with Parmesan and butter for a glossy, tender result. The dish is topped with crunchy pumpkin seeds or herbs for added texture and color.
    Prep Time 10 minutes
    Cook Time 30 minutes
    Total Time 40 minutes
    Servings: 4
    Course: Main Course
    Cuisine: Italian
    Calories: 350

    Ingredients
      

    • 4 cups chicken or vegetable broth Keep warm on low heat
    • 1 tablespoon olive oil Good quality
    • 1 small onion Finely chopped
    • 1.5 cups Arborio rice Toasted in butter before adding broth
    • 1 cup pumpkin puree Fresh or canned, avoid overly sweetened
    • 1/4 cup white wine Optional, for depth
    • 1/2 cup Parmesan cheese Freshly grated
    • 2 tablespoons butter Adds richness at the end
    • 2 tablespoons extra virgin olive oil For finishing
    • 1/4 cup toasted pumpkin seeds For topping, optional
    • to taste salt and pepper Adjust gradually

    Equipment

    • Large, deep skillet or wide saucepan
    • Ladle
    • Wooden spoon
    • Saucepan to warm broth
    • Grater

    Method
     

    1. Heat the broth in a saucepan until simmering, then reduce to low and keep warm.
    2. In a large skillet, melt the butter and olive oil over medium heat until fragrant, about 1 minute.
    3. Add the finely chopped onion and sauté until translucent and soft, about 5 minutes, smelling sweet and mild.
    4. Add the Arborio rice to the skillet and toast for 2 minutes, stirring constantly, until the edges turn translucent and it starts to smell slightly nutty.
    5. Stir in the pumpkin puree and cook for 3 minutes, allowing it to meld with the rice and release a warm, fragrant aroma.
    6. Pour in the white wine and stir until it evaporates, about 2 minutes, creating a glossy sheen on the rice.
    7. Begin adding the warm broth one ladleful at a time, stirring gently and waiting until the liquid is mostly absorbed before adding more. Continue this process for about 18-20 minutes, until the rice is tender but still has a slight bite.
    8. Taste the risotto and season with salt and pepper as needed. The rice should be creamy and thick, with a gentle jiggle in the pan.
    9. Remove from heat and stir in the grated Parmesan cheese and butter, creating a glossy, rich finish.
    10. Finish by drizzling with extra virgin olive oil and sprinkling toasted pumpkin seeds or herbs for added texture and visual appeal.
    11. Let the risotto rest off the heat for 2 minutes, then serve immediately for the best creamy texture.
    This risotto feels like a cozy secret, packed with sweet pumpkin warmth and a hint of roasted nuts. It’s a dish that invites you to slow down and savor each bite, especially as the air turns crisper. Feel free to stir in your favorite herbs or a dash of smoky paprika for an extra layer of flavor. It’s honest food, perfect for sharing or keeping all to yourself on a chilly evening.

  • Halloween Pizza: A Spooky, Chewy Adventure in Every Bite

    Halloween Pizza: A Spooky, Chewy Adventure in Every Bite

    Halloween is a time for playful chaos, and what better way to celebrate than with a pizza that’s as fun as it is delicious? This recipe lets you unleash your inner monster chef, turning simple ingredients into a spooky masterpiece. It’s a chance to turn pizza night into a costume party for your taste buds.

    Why I keep making this creepy feast

    It’s pure chaos, and that’s what makes it fun. The smell of melting cheese and sizzling toppings is oddly comforting. Plus, seeing everyone’s spooky creations light up the table makes all the mess worthwhile.

    Spooky ingredients unpacked

    • Pizza dough: The base, chewy with a slight tang, ready to soak up all your creepy toppings.
    • Tomato sauce: A tangy, rich layer that keeps the crust moist and flavorful.
    • Mozzarella cheese: Oozy, gooey, and essential for that classic stretch and melt.
    • Black olives: Dark, briny eyes that add a salty punch and visual creepiness.
    • Pepperoni slices: Spicy, smoky rounds that mimic wounds or bloody bites.
    • Bell peppers: Colorful, crunchy, and perfect for making mouths or ghosts.
    • Optional extras:: Jalapeños for a fiery kick or red onions for a sweet crunch.

    Tools of the spooky trade

    • Pizza stone or baking sheet: Provides a hot surface for a crispy crust.
    • Rolling pin: Helps stretch the dough evenly.
    • Sharp knife or scissors: Cuts toppings or decorations with precision.
    • Oven thermometer: Ensures the oven is at the right temperature for baking.

    Step-by-step to spooky perfection

    Step 1: Preheat your oven to 220°C (430°F).

    Step 2: Stretch your pizza dough on a floured surface into a rough rectangle, about 12×16 inches.

    Step 3: Spread a thin layer of tomato sauce, leaving a 1-inch border.

    Step 4: Scatter shredded mozzarella evenly over the sauce.

    Step 5: Create your spooky toppings: black olives for eyes, sliced peppers for mouths, and pepperoni for bloody wounds.

    Step 6: Bake on a preheated pizza stone or baking sheet for 12-15 minutes, until the crust is golden and bubbly.

    Step 7: Remove from oven and let cool for 5 minutes.

    Step 8: Add extra toppings or decorations if you like, then serve hot.

    Key checkpoints for a wickedly good Halloween pizza

    • Crust should be crispy and golden at the edges.
    • Cheese should be bubbly and slightly browned.
    • Toppings should be cooked through, not soggy.
    • The pizza should be hot enough to melt toppings but not burn.

    Halloween pizza pitfalls and how to dodge them

    • Oven not hot enough.? Use a preheated oven to prevent soggy crust.
    • Pizza base turns soggy.? Bake on a hot surface to crisp up the base.
    • Uneven topping distribution.? Add toppings evenly for consistent cooking.
    • Over-torched edges.? Watch closely near the end to prevent burning.

    Spooky Halloween Pizza

    This playful Halloween pizza features a chewy, slightly tangy crust topped with vibrant tomato sauce and gooey mozzarella cheese. Decorated with spooky toppings like black olives, peppers, and pepperoni, it transforms simple ingredients into a fun, creepy feast with a crispy crust and bubbly, cheesy finish. Perfect for turning pizza night into a festive costume party for your taste buds.
    Prep Time 20 minutes
    Cook Time 15 minutes
    Total Time 35 minutes
    Servings: 4
    Course: Main Course
    Cuisine: American
    Calories: 320

    Ingredients
      

    • 1 ball pizza dough store-bought or homemade
    • 1/2 cup tomato sauce rich and tangy
    • 2 cups mozzarella cheese shredded
    • 1/4 cup black olives sliced for eyes
    • 1 cup bell peppers assorted colors, sliced
    • 1/2 cup pepperoni slices for wounds or bites
    • to taste jalapeños optional, for spice

    Equipment

    • Pizza stone or baking sheet
    • Rolling pin
    • Sharp knife or scissors
    • Oven thermometer

    Method
     

    1. Preheat your oven to 220°C (430°F) and place your pizza stone or baking sheet inside to heat up.
    2. Gently flour your work surface and roll out the pizza dough into a rough rectangle about 12×16 inches, aiming for an even thickness.
    3. Transfer the dough onto a piece of parchment paper or a floured pizza peel for easy transfer to the hot surface.
    4. Spread a thin layer of tomato sauce over the dough, leaving about a 1-inch border around the edges for the crust.
    5. Sprinkle the shredded mozzarella evenly over the sauce, covering the surface with a bubbly layer of cheese.
    6. Decorate your spooky masterpiece by placing sliced black olives for eyes, bell peppers to form mouths or ghosts, and pepperoni slices for bloody wounds or wounds.
    7. Carefully slide the pizza onto the preheated baking surface and bake for 12-15 minutes, until the crust turns golden and crispy, and the cheese is bubbly and slightly browned.
    8. Remove the pizza from the oven and let it cool for about 5 minutes, allowing the cheese to set slightly.
    9. If desired, add extra decorations or spicy jalapeños for an extra kick, then slice and serve your creepy Halloween pizza hot and crispy.

    Notes

    Feel free to get creative with your toppings—use ingredients to make faces, ghosts, or other spooky designs. Using a hot pizza stone helps achieve a crispier crust, and keep an eye on the edges to prevent burning.
    Making this Halloween pizza is less about perfection and more about playful chaos. The smell of bubbling cheese and smoky toppings fills the kitchen with a festive spirit. Each slice is a messy, cheesy nightmare that’s fun to assemble and even more fun to eat. This dish invites everyone to get creative, so don’t shy away from your wildest topping ideas.

  • Spiderweb Donuts: A Crispy, Intricate Delight with a Twist

    Spiderweb Donuts: A Crispy, Intricate Delight with a Twist

    Spiderweb donuts aren’t just a visual spectacle—they’re a test of patience and precision in the kitchen. I started making them on a whim, trying to mimic those delicate, lacy patterns I saw online. Turns out, the messy, web-like design is easier than you’d think, and the crispy texture is worth every second of the effort.

    Why I Keep Spinning Back to These Donuts

    Their imperfect webs remind me that beauty is in the chaos. I love the satisfaction of creating something both delicate and crispy. Every batch feels like a small victory, especially when the pattern turns out just right. Plus, they’re a conversation starter—eyes light up when you tell someone you made a web in your kitchen.

    The Web of Flavors: Ingredient Breakdown

    • All-purpose flour: Forms the crispy shell, needs good gluten structure but not too much. Swap with gluten-free if needed.
    • Sugar: Sweetens and helps with browning. Brown sugar adds depth, but white is fine.
    • Baking powder: Leavens the batter, making the donuts airy. No substitute, keep this in.
    • Milk: Moistens the batter, making it tender. Almond or oat milk works if you’re dairy-free.
    • Eggs: Bind the dough, add richness. Flax eggs or applesauce can replace if vegan.
    • Vanilla extract: Adds aroma, enhances sweetness. Lemon zest can be a bright alternative.
    • Vegetable oil: Frying fat, neutral and hot. Coconut oil gives a subtle flavor, olive oil too strong.

    Tools of the Trade for Webby Wonders

    • Deep-fry thermometer: Keeps your oil at the perfect 180°C (356°F) for even frying.
    • Piping bag or squeeze bottle: Helps create the web pattern with precise control.
    • Large heavy-bottomed pot: Provides steady, even heat for frying.
    • Cooling rack: Allows excess oil to drip off and keeps the donuts crisp.
    • Mixing bowls and spatulas: For preparing batter and mixing ingredients.

    Crafting the Perfect Spiderweb Donuts

    Step 1: Mix the dry ingredients: flour, sugar, salt, and baking powder in a big bowl.

    Step 2: Combine wet ingredients: milk, eggs, vanilla, and melted butter in a separate jug.

    Step 3: Pour wet into dry, stir gently until just combined. Don’t overmix, or your donuts will be dense.

    Step 4: Heat oil to 180°C (356°F) in a deep fryer or heavy pot. Test with a small drop of batter; it should puff up quickly.

    Crispy, Visual, and Textural Checkpoints

    • Ensure oil is hot enough before frying; a thermometer helps. Too cold, donuts will soak; too hot, they burn.
    • Watch for a golden-brown color; that’s when they’re done. Underneath, they should be firm and jiggle slightly.
    • Listen for a consistent crackle when frying; this indicates steady heat and proper frying.
    • Don’t overcrowd the pan; give each donut space to puff and crisp evenly.

    Avoid These Web-Wobbles: Mistakes and How to Fix Them

    • Oil too cold? IF THE OIL ISN’T HOT ENOUGH, DONUTS SINK AND GET SOGGY. UP TEMP TO 180°C (356°F).
    • Poor web pattern? IF THE WEB PATTERN ISN’T CLEAR, PIPING TOO SLOW OR BATTER IS TOO THICK. THIN BATTER AND PIPING FASTER.
    • Over-torched exterior? IF DONUTS BURN QUICKLY, OIL IS TOO HOT. LOWER TO 170°C (338°F).
    • Undercooked centers? IF DONUTS ARE GUMMY INSIDE, OIL WASN’T HOT ENOUGH. WAIT FOR PROPER TEMP BEFORE FRYING.

    Spiderweb Donuts

    Spiderweb donuts are crispy, lacy treats with delicate web-like patterns created through piping. Made from a simple batter of flour, sugar, eggs, and milk, they are fried until golden and crispy, showcasing a beautiful web design that is both visually striking and satisfying to eat.
    Prep Time 15 minutes
    Cook Time 10 minutes
    Total Time 25 minutes
    Servings: 8
    Course: Main Course
    Cuisine: American
    Calories: 150

    Ingredients
      

    • 2 cups all-purpose flour sifted
    • 1/2 cup sugar white or brown sugar
    • 1/2 tsp baking powder
    • 1 cup milk dairy or plant-based
    • 1 tsp vanilla extract
    • 1/4 cup vegetable oil for frying

    Equipment

    • Deep-fry thermometer
    • Piping bag or squeeze bottle
    • Large heavy-bottomed pot
    • Cooling rack
    • Mixing bowls
    • Spatula

    Method
     

    1. In a large bowl, whisk together the sifted flour, sugar, and baking powder until well combined. This creates a light, dry mixture that will form the base of your batter.
    2. In a separate jug or bowl, pour in the milk, add the beaten eggs, vanilla extract, and melted or softened butter. Whisk until smooth and combined, creating a fragrant, slightly frothy mixture.
    3. Pour the wet mixture into the dry ingredients gradually, stirring gently with a spatula until just combined. Avoid overmixing; the batter should be slightly lumpy but smooth enough to flow easily.
    4. Heat your oil in a large heavy-bottomed pot to exactly 180°C (356°F). Use a deep-fry thermometer to monitor the temperature closely for perfect frying. Once at temperature, test with a small drop of batter—if it sizzles and puffs up quickly, you’re ready.
    5. Spoon the batter into a piping bag or squeeze bottle fitted with a small round tip. Carefully pipe thin, web-like circles onto a parchment-lined tray or directly into the hot oil, creating intricate web patterns. Work quickly but steadily to maintain control over the delicate design.
    6. Fry the web patterns for about 30-40 seconds or until they turn a beautiful golden brown. Use a slotted spoon to gently lift them out and transfer to a cooling rack to drain excess oil and crisp up.
    7. Repeat the piping and frying process until all batter is used, maintaining the oil temperature around 180°C to keep the donuts crispy and evenly cooked.
    8. Allow the donuts to cool slightly on the rack until they are crispy and firm, ready to be enjoyed. Serve immediately to experience the perfect crunch and web-like appearance.
    These donuts might look like a web spun in chaos, but they’re surprisingly straightforward to make. The crispy edges and soft centers are a real treat, especially when drizzled with a shiny glaze that catches the light. Feel free to customize the toppings—think dark chocolate, sprinkles, or a dusting of cinnamon sugar. It’s all about having fun with the intricate pattern and enjoying the messy beauty of a homemade treat.

  • Halloween Trifle: A Spooky Layered Delight with a Twist

    Halloween Trifle: A Spooky Layered Delight with a Twist

    Layered desserts like this Halloween trifle are a chaos of textures and flavors that somehow work. I love how it combines the softness of cake, the creamy pumpkin filling, and the crunch of festive toppings. It’s a playful way to celebrate the season without fussing over perfect presentation.

    Why I keep making this spooky treat

    It’s just so fun to layer and decorate, and it always surprises people how deliciously comforting pumpkin can be in a dessert. Every time I make it, I remember autumn nights and childhood costumes. Plus, it’s an easy crowd-pleaser that doesn’t require fancy skills, just a little chaos and a lot of smiles.

    Breaking down the spooky ingredients

    • Pumpkin puree: Rich, oozy, with a gentle sweetness. Swap with sweet potato for a different flavor.
    • Sponge cake: Soft, absorbs flavors well. Use ladyfingers or bread if you’re out.
    • Whipped cream: Light and airy, balances the denser pumpkin. Use coconut cream for a dairy-free version.
    • Caramel or honey: Sweet, sticky, and adds a glossy finish. Maple syrup can work in a pinch.
    • Festive toppings: Gummy worms, chocolate eyeballs—spooky and fun. Candied ginger or orange zest also add zing.
    • Spices (cinnamon, nutmeg): Warm, aromatic, evoke fall flavors. Clove or allspice can amp up the spice.
    • Vanilla extract: Brightens everything up. Use bourbon vanilla for a richer aroma.

    Tools of the spooky trade

    • Large glass trifle dish: Show off the colorful layers and make serving easy.
    • Mixing bowls: Whisk and fold ingredients smoothly.
    • Rubber spatula: Gently lift and spread layers.
    • Sharp knife: Cube the cake neatly.
    • Measuring spoons and cups: Keep proportions precise.

    Step-by-step guide to spooky layers

    Step 1: Gather your ingredients and equipment before starting. This ensures a smooth layering process.

    Step 2: Prepare the cake cubes: cut your favorite sponge cake into small, bite-sized pieces, aiming for uniform sizes for even layers.

    Step 3: Make the pumpkin mousse: blend pumpkin puree with whipped cream, a touch of cinnamon, and a splash of vanilla. Chill until set.

    Step 4: Assemble the trifle: layer cake cubes, pumpkin mousse, and a drizzle of caramel or honey in a large glass dish. Repeat layers until full.

    Step 5: Chill the assembled trifle for at least 2 hours, allowing flavors to meld and textures to firm up.

    Step 6: Before serving, add spooky toppings like gummy worms, chocolate eyeballs, or candied pumpkins for a festive look.

    Key checkpoints to perfect your Halloween trifle

    • Ensure each layer is even and not overly thick for a balanced bite.
    • Taste the pumpkin mousse before assembling; adjust sweetness or spice as needed.
    • Watch the caramel drizzle carefully to prevent burning; golden amber is ideal.
    • Chill the assembled trifle long enough for flavors to meld, at least 2 hours.

    Halloween trifle pitfalls and how to avoid them

    • Layers become muddled or uneven.? USE a gentle hand when layering to prevent squishing layers.
    • Mousse is runny or unstable.? Chill the mousse thoroughly before assembling.
    • Burnt caramel ruins the look and taste.? Watch caramel closely during cooking.
    • Flavors don’t meld, and texture is off.? Allow the assembled trifle to rest in the fridge for at least 2 hours.

    Halloween Pumpkin Trifle

    This Halloween-inspired layered dessert combines soft sponge cake, creamy pumpkin mousse, and festive toppings for a playful treat. The dish features alternating layers of moist cake and smooth pumpkin filling, topped with fun spooky decorations for a seasonal presentation. Its final appearance is colorful, textured, and inviting, perfect for holiday gatherings.
    Prep Time 20 minutes
    Cook Time 10 minutes
    Total Time 3 hours
    Servings: 8
    Course: Main Course
    Cuisine: American
    Calories: 350

    Ingredients
      

    • 1 cup pumpkin puree canned or homemade
    • 1 cup heavy whipping cream chilled
    • 2 teaspoons cinnamon
    • 1 teaspoon vanilla extract
    • 1 cup sponge cake cubed into bite-sized pieces
    • 1/4 cup caramel or honey for drizzling
    • optional festive toppings gummy worms, chocolate eyeballs, candied ginger, orange zest

    Equipment

    • Large glass trifle dish
    • Mixing bowls
    • Rubber spatula
    • Sharp Knife
    • Measuring spoons and cups

    Method
     

    1. Start by preparing your pumpkin mousse: in a mixing bowl, combine pumpkin puree with cinnamon and vanilla extract. Whisk until smooth and fragrant.
    2. In a separate chilled bowl, whip the heavy cream until soft peaks form, about 3-4 minutes, until it becomes fluffy and airy.
    3. Gently fold the whipped cream into the pumpkin mixture using a rubber spatula, combining carefully until smooth and well incorporated. Chill the mousse in the refrigerator for about 15 minutes to set.
    4. Prepare your sponge cake: cut it into small, uniform cubes to ensure even layers and easy layering.
    5. Begin assembling the trifle: in your glass dish, layer a handful of cake cubes evenly across the bottom.
    6. Spoon a generous layer of pumpkin mousse over the cake, spreading gently with a spatula to create an even surface.
    7. Drizzle a small amount of caramel or honey over the mousse for added sweetness and shine.
    8. Repeat the layers: add more cake cubes, followed by mousse, and a drizzle of caramel, until your dish is filled, finishing with a layer of mousse on top.
    9. Cover the assembled trifle and refrigerate for at least 2 hours, allowing flavors to meld and textures to set.
    10. Just before serving, decorate the top with festive toppings like gummy worms, chocolate eyeballs, candied ginger, or orange zest for a spooky touch.
    11. Slice into the layered dessert and enjoy the vibrant, textured flavors that blend softness, creaminess, and fun decorations!

    Notes

    Ensure each layer is even for a balanced bite. Chill the mousse thoroughly before assembling to keep layers stable. Watch caramel closely during cooking to prevent burning. Let the assembled trifle rest in the fridge for best flavor melding.
    This Halloween trifle isn’t just a pretty face; it’s a fun, accessible way to bring a little creepy joy to your table. The mix of creamy pumpkin, sweet cake, and playful toppings makes a memorable finish to any spooky gathering. Feel free to swap in your favorite seasonal flavors or add extra spice for a warming touch. Enjoy making it as much as everyone will enjoy digging in.

  • Jack O’ Lantern Burgers: A Halloween Spin with Roasted Pumpkin and Spiced Aioli

    Jack O’ Lantern Burgers: A Halloween Spin with Roasted Pumpkin and Spiced Aioli

    Every October, I get obsessed with turning the humble burger into a little piece of festive art. The idea of roasting pumpkin and mixing it into beef feels like capturing fall in a bite, a seasonal twist that’s both comforting and a bit playful. These Jack O’ Lantern Burgers aren’t just for Halloween—they’re a reminder that good food comes from honest, simple ingredients treated with a little care.

    Why I Keep Coming Back to These Burgers

    They’re nostalgic, a little chaotic in the best way, and perfect for sharing. The roasted pumpkin adds a smoky sweetness that makes every bite memorable. Plus, they’re easy to customize—more spice, more heat, or even a veggie twist. These burgers remind me that simplicity, when approached with care, can be deeply satisfying.

    Breaking Down the Ingredients for Jack O’ Lantern Burgers

    • Pumpkin flesh: Sweet, slightly nutty, adds moisture and color—think of it as fall’s secret weapon.
    • Ground beef: Choose 80/20 for juiciness or lean if you prefer less fat, but watch for dryness.
    • Spices (cumin, smoked paprika, cinnamon): Warm, smoky, with a hint of sweet heat—builds that autumn vibe.
    • Aioli or spicy mayo: Creamy, tangy, with just enough heat to balance the sweetness.
    • Burger buns: Toasted lightly, they hold everything together—soft inside, crispy outside.
    • Toppings (cheddar, caramelized onions, arugula): Add layers of flavor and texture—think contrast and comfort.

    Tools and Equipment for the Perfect Jack O’ Lantern Burgers

    • Oven: Roasts pumpkin and prepares the buns.
    • Baking sheet: Holds the pumpkin halves during roasting.
    • Mixing bowls: Combines ingredients, mixes spices.
    • Skillet or grill pan: Cooks the burger patties to crisp perfection.
    • Thermometer: Checks internal temperature for safety and doneness.

    Crafting Your Spiced Pumpkin Burgers: A Step-by-Step Journey

    Step 1: Preheat your oven to 200°C (390°F).

    Step 2: Cut a small pumpkin or squash in half, scoop out seeds, and roast cut-side down on a baking sheet for 40 minutes.

    Step 3: Once tender and caramelized, scoop out the flesh and mash it smooth.

    Step 4: Mix the roasted pumpkin mash into your ground beef, along with spices like cumin and smoked paprika.

    Step 5: Form into burger patties, about 150g each, and chill for 15 minutes to help them hold shape.

    Cooking Checkpoints & Tips for Perfect Jack O’ Lantern Burgers

    • Look for a deep caramel color on the pumpkin after roasting.
    • Burger patties should be firm but tender, with a slight jiggle when pressed.
    • Internal temperature of the cooked burger should reach 71°C (160°F) for safety.
    • The bun should be toasted lightly for crunch and contrast.

    Common Mistakes & How to Fix Them

    • Burger patties falling apart.? IF PATTIES ARE UNSTABLE, ADD A LITTLE BREADCRUMBS OR EGG TO BIND.
    • Under-roasted, bland pumpkin.? IF PUMPKIN ISN’T CARAMELIZED, ROAST LONGER OR INCREASE TEMPERATURE SLIGHTLY.
    • Charring outside while raw inside.? IF BURGERS ARE OVER-TORCHED, LOWER HEAT OR COOK FOR LESS TIME.
    • Soggy buns spoiling the bite.? IF BREAD IS SOGGY, TOAST BUNS LIGHTLY OR DRY THEM IN A PAN.

    Jack O’ Lantern Burgers

    These festive burgers incorporate roasted pumpkin mashed into ground beef, flavored with warm spices like cumin, smoked paprika, and cinnamon. The mixture is formed into patties, grilled to perfection, and served on toasted buns with toppings like cheddar, caramelized onions, and arugula, resulting in a juicy, flavorful bite with a seasonal pumpkin twist.
    Prep Time 15 minutes
    Cook Time 30 minutes
    Total Time 45 minutes
    Servings: 4
    Course: Main Course
    Cuisine: American
    Calories: 650

    Ingredients
      

    • 1 small pumpkin or squash for roasting
    • 500 g ground beef 80/20 recommended
    • 1/2 teaspoon cumin ground
    • 1/2 teaspoon smoked paprika for smoky flavor
    • 1/4 teaspoon cinnamon adds warmth
    • salt and pepper to taste seasoning
    • 4 slices cheddar cheese optional, for topping
    • 1 large onion for caramelizing
    • 2 handfuls arugula for topping
    • 4 burger buns burger buns lightly toasted
    • mayonnaise or spicy mayo aioli or spicy mayo for serving

    Equipment

    • Oven
    • Baking sheet
    • Mixing bowls
    • Skillet or grill pan
    • Thermometer

    Method
     

    1. Preheat your oven to 200°C (390°F). Place the pumpkin or squash cut-side down on a baking sheet and roast for about 40 minutes until deeply caramelized and tender.
    2. Once roasted and cooled slightly, scoop out the pumpkin flesh and mash it until smooth, revealing its sweet, nutty aroma and vibrant color.
    3. In a mixing bowl, combine the ground beef with the mashed pumpkin, cumin, smoked paprika, cinnamon, salt, and pepper, mixing gently until well incorporated.
    4. Divide the mixture into four equal portions and shape each into a patty about 150 grams, pressing gently to ensure they hold their shape.
    5. Wrap each patty in plastic wrap and refrigerate for 15 minutes to help them set and hold together during cooking.
    6. Meanwhile, thinly slice the onion and cook it over medium heat in a skillet until golden brown and caramelized, about 15-20 minutes.
    7. Preheat a skillet or grill pan over medium-high heat. Cook the burger patties for about 4-5 minutes per side, until nicely browned and cooked through, with an internal temperature of 71°C (160°F).
    8. While the burgers cook, lightly toast the burger buns until golden and crispy on the cut sides.
    9. Assemble the burgers by spreading aioli or spicy mayo on the bottom buns, then placing the cooked patties topped with slices of cheddar cheese, caramelized onions, and fresh arugula.
    10. Finish by placing the top buns on and serving the burgers immediately, with extra mayo on the side if desired.

    Notes

    For extra flavor, add a pinch of cayenne or chili flakes to the beef mixture. Feel free to customize toppings with sautéed mushrooms or bacon for more indulgence.
    These burgers are a nod to fall’s bounty, layered with cozy spices and a touch of sweetness from roasted pumpkin. They’re fun for a party or a simple weeknight dinner that feels special. Play with toppings—maybe a smear of apple chutney, a slice of sharp cheddar, or even a dollop of spicy aioli. Whatever you do, enjoy the process, and don’t rush that first crispy bite.