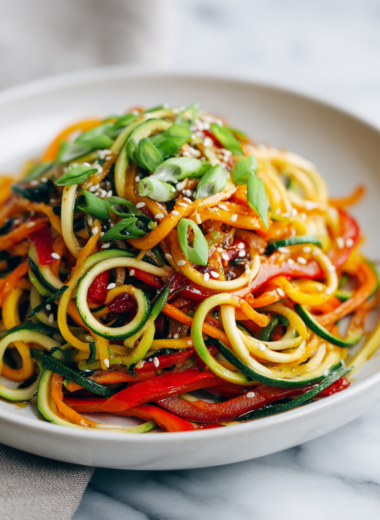
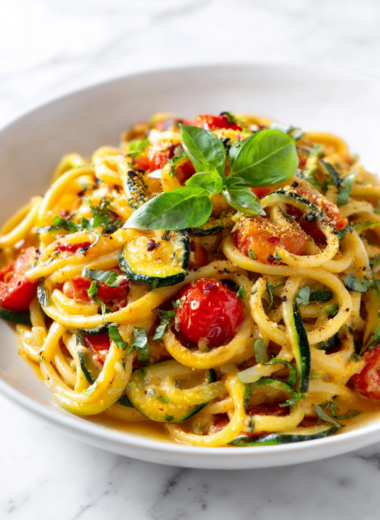
Author: HarperEvans

  • Cauliflower Steaks Recipe

    Cauliflower steaks might seem fancy, but they’re just thick slices of a humble veggie. I love how the edges get all crispy and smoky, like a good grill but in my own skillet. It’s that moment when you hear the sizzle and see that gorgeous golden crust forming—pure satisfaction.

    This recipe isn’t about perfection, it’s about feeling your way through it. There’s a bit of chaos in flipping these, a little guesswork on how long to cook, but that’s where the fun lives. Plus, it’s a way to make cauliflower feel like a proper main, not just a side dish or a salad component.

    The unpolished, real cook’s notes approach—focusing on tactile, sensory, and honest tips for perfect cauliflower steaks.

    Why cauliflower steaks matter to me.

    • I love how these steaks make cauliflower feel like a proper meal.
    • There’s a bit of a mess in the kitchen, but the smell makes it all worth it.
    • I get a little proud when I see that perfect sear, almost like I cooked a piece of steak.
    • Sometimes I add a dash of smoked paprika—changes everything!
    • They remind me of summer barbecues, even if I’m just flipping them in my own kitchen.

    My personal moment with cauliflower steaks.

    • This dish was inspired by a lazy Sunday when I had a cauliflower head that needed using up.
    • I realized slicing it thick and searing it brought out a surprising richness.
    • It’s a simple way to elevate a humble vegetable into a main course.
    • Plus, it’s forgiving—if you burn a bit, it still tastes good.

    The story behind cauliflower steaks.

    • The idea of cauliflower steaks gained popularity in the early 2010s as part of the veggie-forward trend.
    • They’re inspired by traditional meat steaks, aiming for a similar presentation and heartiness.
    • Cauliflower is a member of the cruciferous family, packed with antioxidants and fiber.
    • In some cultures, roasted cauliflower was a simple, comforting dish long before it became trendy.
    • The thick slices make it a good candidate for grilling or pan-frying, mimicking a steak-like experience.

    Ingredient breakdown.

    • Cauliflower: I like the large, dense heads for steaks; they hold together well.
    • Olive oil: Use a good quality one for flavor, but neutral is fine if you prefer less fruity notes.
    • Lemon: Brightens the dish and cuts through the richness—don’t skip it.
    • Sea salt: Enhances flavor; flaky salt adds texture and visual appeal.
    • Spices: Paprika or cumin give a smoky warmth—adjust to your taste.

    Spotlight on cauliflower and lemon.

    Cauliflower:

    • Its dense texture makes for a satisfying steak with a slightly nutty flavor.
    • During cooking, it develops a crispy exterior while staying tender inside.
    • A good cauliflower head is firm with tightly packed florets—avoid ones with brown spots.

    Lemon:

    • It adds a fresh, zesty brightness that lifts the dish.
    • The zest contains aromatic oils, so use a microplane for fine, fragrant flakes.
    • A squeeze of lemon after cooking amplifies the caramelized notes.

    Ingredient substitutions.

    • Dairy-Free: Swap butter for olive or coconut oil—still rich, but with a different fruitiness.
    • Gluten-Free: This recipe is naturally gluten-free, no swaps needed.
    • Vegan: Use olive oil instead of butter, and skip any cheese toppings.
    • Extra Heat: Add red pepper flakes to the oil for a spicy kick.
    • Herb Variations: Finish with fresh parsley or cilantro instead of lemon for different freshness.

    Equipment & Tools

    • Chef’s knife: For clean, even slices.
    • Large skillet or cast iron pan: To get an even sear.
    • Spatula or tongs: To flip the steaks carefully.
    • Lemon and salt: For finishing touches and flavor enhancement.

    Step-by-step guide to perfect cauliflower steaks.

    1. Trim the cauliflower, removing leaves and the thick core.
    2. Slice into 1-inch thick steaks, aiming for 2-3 slices per cauliflower.
    3. Preheat a large skillet over medium-high heat, add 2 tbsp oil.
    4. Place the cauliflower steaks in the hot pan; don’t overcrowd.
    5. Cook for 4-5 min until golden and crispy, then flip.
    6. Cook the other side for another 4-5 min, adjusting heat as needed.
    7. Check doneness: tender but still holding shape, with a crispy exterior.
    8. Remove from heat, squeeze fresh lemon over, sprinkle with sea salt.
    9. Let rest for 2 min before serving to let juices settle.
    10. Serve hot with your favorite sauce or a fresh herb garnish.

    Let the steaks rest for 2 minutes after cooking. Finish with lemon juice and a pinch of sea salt, then slice and serve.

    How to Know It’s Done

    • Golden-brown crust on each side.
    • A skewer goes through easily but doesn’t slide out too soft.
    • No burnt bits or blackened edges, just a deep caramel color.

    Cauliflower Steaks with Lemon and Spices

    Cauliflower steaks are thick slices of cauliflower pan-seared to achieve a crispy, golden crust with tender insides. Made with hearty cauliflower, olive oil, and bright lemon, they resemble a steak in appearance and texture, offering a satisfying main dish. The final result features a smoky, caramelized exterior with a fresh, zesty finish.
    Prep Time 10 minutes
    Cook Time 15 minutes
    Total Time 25 minutes
    Servings: 4
    Course: Main Course
    Cuisine: Vegetarian
    Calories: 150

    Ingredients
      

    • 1 head cauliflower large and dense for best steaks
    • 2 tablespoons olive oil for searing
    • 1 lemon lemon for zest and juice
    • to taste sea salt flaky for texture and flavor
    • 1 teaspoon paprika or cumin for smoky flavor

    Equipment

    • Chef’s knife
    • Large skillet or cast iron pan
    • Spatula or tongs

    Method
     

    1. Trim the cauliflower, removing leaves and cutting away the core, then place it on a cutting board.
    2. Using a sharp chef’s knife, slice the cauliflower into 1-inch thick steaks, aiming for 2-3 slices per cauliflower head.
    3. Preheat a large skillet over medium-high heat and add 2 tablespoons of olive oil, allowing it to shimmer and become fragrant.
    4. Carefully place the cauliflower steaks in the hot pan, making sure not to overcrowd; listen for a sizzle as they make contact with the hot oil.
    5. Cook each side for about 4-5 minutes, until the edges are golden brown and crispy, flipping carefully with tongs or a spatula.
    6. While cooking, zest the lemon using a microplane and squeeze out the juice into a small bowl for finishing.
    7. Once both sides are beautifully caramelized and crispy, remove the cauliflower steaks from the pan and transfer to a serving plate.
    8. Squeeze fresh lemon juice over the hot steaks, then sprinkle with flaky sea salt and a pinch of paprika or cumin for added depth.
    9. Let the cauliflower rest for 2 minutes, allowing the flavors to settle and juices to redistribute.
    10. Serve the cauliflower steaks hot, garnished with extra lemon wedges or fresh herbs if desired, and enjoy their smoky, crispy texture with a bright citrus finish.

    Cooking tips and tricks for cauliflower steaks.

    • HEAT: Ensure the pan is hot before adding cauliflower for a good sear.
    • OIL: Use a high-smoke-point oil like grapeseed or avocado.
    • SPICE: Add smoked paprika or cumin to the oil for extra flavor.
    • FLIP: Use tongs or a wide spatula to turn steaks gently.
    • REST: Let the steaks rest briefly after cooking for juicier bites.

    Common mistakes and how to fix them.

    • FORGOT TO PAT DRY: The cauliflower will steam instead of sear. Pat dry thoroughly before cooking.
    • DUMPED TOO MUCH OIL: Cauliflower gets soggy. Use just enough to coat lightly.
    • OVER-TORCHED EDGES: Reduce heat or flip sooner to prevent burning.
    • SLICES ARE TOO THIN: They fall apart. Aim for at least 1-inch slices for stability.

    Quick kitchen fixes.

    • When too soggy, reheat in oven at 200°C (400°F) to crisp up.
    • If burns, lower heat immediately and add a splash of water to deglaze.
    • Splash water on the pan if it’s smoking too much, to reduce heat.
    • Patch over a burnt spot with a sprinkle of fresh herbs for presentation.
    • Shield overcooked edges with a squeeze of lemon to cut bitterness.

    Make-ahead and storage tips.

    • Slice the cauliflower the day before; keep in an airtight container in the fridge for up to 24 hours.
    • Cooked steaks can be stored in the fridge for 2-3 days, reheated in a hot pan.
    • The flavor intensifies slightly after a day, with a more concentrated nutty aroma.
    • Reheat in a hot skillet for 2-3 min until crisp again, watching for burning.

    10 practical Q&As about making cauliflower steaks that cut through the confusion.

    1. How thick should the cauliflower steaks be?

    Use a sharp chef’s knife to cut through the dense cauliflower head, aiming for about 1-inch thick slices.

    2. Should I dry the cauliflower before cooking?

    Pat the slices dry after washing to ensure they sear properly and develop a caramelized crust.

    3. How hot should the pan be for searing?

    Preheat your pan over medium-high heat until hot, about 3-4 minutes, to get that sizzle on contact.

    4. How much oil do I need?

    Use a good amount of oil—about 2 tablespoons—so the surface sizzles and doesn’t stick.

    5. How long should I cook each side?

    Cook each side for about 4-5 minutes until golden brown, then flip carefully.

    6. How do I know when the cauliflower is done?

    Check for a firm but tender texture; a skewer should go through easily but not mushy.

    7. What if it burns?

    If the cauliflower starts to burn or blacken too quickly, reduce heat or lower the flame.

    8. How do I finish the cauliflower steaks?

    Serve with a squeeze of lemon and a sprinkle of flaky sea salt for brightness.

    9. Can I make cauliflower steaks ahead?

    Leftovers can be stored in the fridge for 2-3 days in an airtight container.

    10. How do I reheat without losing texture?

    Reheat in a hot pan or oven to regain some crispness, watching out for overcooking.

    Once you get the hang of it, cauliflower steaks become a quick, comforting meal. They’re forgiving enough to tweak with different spices or toppings, making every attempt a little different.

    And honestly, nothing beats the smell of caramelized cauliflower filling the kitchen—smoky, nutty, with that hint of lemon brightness. It’s a simple dish that’s easy to love, especially when you’re craving something hearty and clean at the same time.

  • Peanut Butter Smoothies Recipe

    Starting my day with a peanut butter smoothie isn’t just about quick breakfast; it’s about holding onto a moment of comfort amid the chaos. I’ve learned that blending this creamy, nutty drink is a small act of self-care that’s surprisingly grounding.

    It’s not just the taste — it’s the sensory experience: the smell of roasted peanuts, the silky texture, the burst of banana sweetness. It’s honest and simple, a little messy, but always satisfying. That’s what makes it my go-to when mornings are a mad dash.

    How a peanut butter smoothie can be an honest reflection of my chaotic mornings.

    Why this simple smoothie keeps me grounded.

    • I love how quick this comes together after a long morning.
    • Sometimes I toss in a handful of oats or chia seeds for extra texture.
    • The smell of peanut butter and bananas makes the whole kitchen feel cozy.
    • It’s a reliable, no-fuss breakfast that I can customize endlessly.

    My inspiration behind the peanut butter smoothie

    • This recipe was born out of a frantic morning when I needed something quick, nourishing, and satisfying.
    • The creamy texture and sweet, nutty flavor remind me of childhood mornings and late-night snacks.
    • It’s a reminder that even busy days can start with a small, comforting ritual.

    A brief history of peanut butter smoothies

    • Peanut butter smoothies gained popularity in the 1970s with the rise of health food trends.
    • The combination of bananas and peanuts is a classic pairing, reminiscent of childhood snacks.
    • Adding cinnamon or honey is a modern twist, but historically, these were used to enhance flavor and preserve.

    Ingredient insights for your peanut butter smoothie

    • Bananas: Ripe, sweet, and softens in the blender, adding natural sweetness. Use frozen for extra chill.
    • Peanut Butter: Creamy and nutty, it gives body and richness. Natural or processed, but stir well.
    • Milk: Liquid base that smooths out the blend. Substitute with almond, soy, or oat milk for dairy-free.
    • Sweetener: Honey or maple syrup adds a touch of sweetness. Adjust to taste, especially if bananas are ripe.
    • Extras: Cinnamon or cocoa powder can add depth. Use sparingly to avoid overpowering.

    Spotlight on Bananas and Peanut Butter

    Bananas:

    • Their soft, sweet flesh blends into a silky texture; ripeness affects sweetness.
    • Peanut Butter: Oily and dense, it creates a rich, creamy mouthfeel. Natural vs. processed changes flavor subtly.

    Peanut Butter:

    • The nutty aroma intensifies when warmed in the blender, adding depth.
    • Look for natural oils on top; they should be shiny and inviting.
    • The texture turns smooth and slightly glossy when blended well.

    Substitutions to suit your pantry and taste

    • Dairy-Free: Swap milk for almond or oat milk, keeping it plant-based but slightly thinner.
    • Sweetener: Use agave or date syrup for a more natural, less processed sweetness.
    • Add-ins: Incorporate Greek yogurt for creaminess or chia seeds for fiber.
    • Flavor Boost: A splash of vanilla extract brightens the flavor without extra sugar.
    • Texture Fix: Add oats or hemp seeds if you want a thicker, more filling smoothie.

    Equipment & Tools

    • Blender: To combine and smooth out all ingredients.
    • Measuring cups and spoons: To measure ingredients accurately.
    • Spatula or spoon: To scrape down the sides and mix.

    Making a peanut butter smoothie, step-by-step

    1. Gather your blender, a measuring cup, and a spoon. Keep it simple.
    2. In the blender, combine 2 ripe bananas (frozen if you want extra chill), 2 tbsp peanut butter, and 1 cup milk.
    3. Blend on high for 30-45 seconds until smooth and creamy.
    4. Check the texture: it should be velvety, not too thick. If it’s too thick, add a splash more milk and blend briefly.
    5. Taste and adjust: add honey or cinnamon if desired, then blend again for 10 seconds.
    6. Pour into a glass, and give it a little shake if it’s separated during sitting.
    7. Rest for a minute, then enjoy immediately for the best texture and flavor.

    Serve immediately or chill for 10-15 minutes for a cooler, more refreshing drink.

    How to Know It’s Done

    • Smooth and creamy texture, no chunks.
    • Color should be a light tan with a sheen.
    • Smell of roasted peanuts and bananas should be prominent.

    Creamy Peanut Butter Banana Smoothie

    This peanut butter banana smoothie combines ripe bananas, creamy peanut butter, and milk blended into a silky, frothy drink. The process involves blending until smooth, resulting in a velvety texture with a rich, nutty flavor and a hint of sweetness, perfect for a quick and satisfying breakfast or snack.
    Prep Time 5 minutes
    Total Time 5 minutes
    Servings: 1
    Course: Main Course
    Cuisine: Breakfast, Healthy
    Calories: 250

    Ingredients
      

    • 2 pieces ripe bananas preferably frozen for extra chill
    • 2 tbsp peanut butter creamy and smooth
    • 1 cup milk dairy or plant-based
    • 1 tsp honey or maple syrup optional, for added sweetness
    • a pinch cinnamon optional, for added flavor

    Equipment

    • Blender
    • Measuring cups and spoons
    • Spatula or spoon

    Method
     

    1. Place the bananas, peanut butter, and milk into the blender. If using frozen bananas, add them directly from the freezer for an extra chilled smoothie.
    2. Secure the lid and blend on high for about 30-45 seconds, until the mixture is smooth and creamy with a velvety texture. You should hear a consistent hum, and the mixture should look evenly combined with no chunks.
    3. Open the lid carefully and check the consistency. If it’s too thick for your liking, add a splash more milk, then blend again for a few seconds until it reaches your desired smoothness.
    4. Taste the smoothie and, if desired, add honey or maple syrup for extra sweetness, along with a pinch of cinnamon for warm flavor. Blend again for about 10 seconds to incorporate the flavors evenly.
    5. Pour the smoothie into a glass. You should see a light tan color with a glossy sheen, and the texture will be silky and inviting. The aroma of roasted peanuts and bananas should be prominent.
    6. Enjoy immediately for the best flavor and texture, or chill in the fridge for 10-15 minutes if you prefer it colder. Give it a gentle stir before drinking if it has sat for a bit.

    Notes

    Using frozen bananas enhances creaminess and chill, making this smoothie especially refreshing. Feel free to customize with add-ins like oats, chia seeds, or vanilla for extra flavor and texture.

    Tips and tricks for perfect peanut butter smoothies

    • Use frozen bananas for a creamier, colder smoothie.
    • Add a pinch of salt to enhance the peanut flavor.
    • Blend in stages: liquids first, then solids, for a smoother mix.
    • Adjust thickness by controlling banana and milk ratios.
    • Taste before serving: add sweetener or spice to suit your mood.

    Common mistakes and how to fix them

    • FORGOT TO BLEND LONG ENOUGH? → Blend an extra 10 seconds or add a splash of milk.
    • DUMPED TOO MUCH MILK? → Add more banana or peanut butter to thicken.
    • OVER-TORCHED? → Avoid over-blending; it makes it frothy and airy, not smooth.
    • SEPARATION AFTER STANDING? → Give it a quick stir or re-blend for a fresh, creamy texture.

    Quick fixes for common smoothie mishaps

    • When too thick, splash in more milk and blend until silky.
    • When too thin, add more frozen banana or a spoonful of oats.
    • Splash a bit of vanilla if the flavor feels flat.
    • Patch overly sweet with a squeeze of lemon or lime.
    • Shield from oxidation by drinking immediately or storing in an airtight container.

    Prepping and storing your smoothie

    • You can prepare the banana and peanut butter mixture the night before, storing in the fridge.
    • Frozen bananas make the smoothie ready to blend straight from the freezer.
    • Refrigerate for up to 24 hours; the flavors meld and intensify slightly.
    • Reheat? No — best enjoyed cold or at room temperature, with a quick stir.

    10 Practical Q&As About Peanut Butter Smoothies

    1. Can I use natural peanut butter?

    Use a creamy peanut butter for a smoother texture, but chunky can add nice bites.

    2. How do I prevent separation?

    Yes, just stir it well before blending to avoid separation in the smoothie.

    3. What if it’s too thick?

    Add a splash of milk or a bit more banana if the smoothie is too thick.

    4. How can I enhance the flavor?

    For extra flavor, toss in a pinch of cinnamon or a drizzle of honey.

    5. Can I use fresh bananas?

    Use frozen bananas for a creamier, colder smoothie without watering it down.

    In the end, this smoothie isn’t just a recipe. It’s a little ritual that reminds me to slow down, even if just for a sip. It’s honest, imperfect, and made to keep me going through whatever the day throws.

    Sometimes, I add a splash of vanilla or a sprinkle of cocoa powder, and it still feels like a treat. It’s flexible like that. And honestly, that’s what I need — a little bit of comfort in a glass.

  • Spinach Artichoke Dip Recipe

    This Spinach Artichoke Dip isn’t just a party staple; it’s a little bowl of childhood memories, melted cheese, and crispy bread. I love how it’s simple but feels like a special treat, especially when you toss in a pinch of smoked paprika. It’s the kind of dish that invites you to gather around, scoop with your fingers, and forget about the world for a bit.

    The secret to making it stand out? Not overthinking it. I’ve learned that using good-quality cream cheese and squeezing out excess water from the spinach keeps it creamy without being watery. Plus, baking it until just bubbly gives that irresistible, slightly crispy top that makes you want to dip again and again.

    Focusing on the nostalgic comfort of a classic dip with a modern twist—adding a touch of smoky paprika for depth.

    Why I Keep Coming Back to This Dip

    • I love how this dish always feels like a little celebration.
    • There’s something satisfying about mixing all those ingredients and seeing it turn creamy.
    • I’ve made this dip for friends, family, and even solo nights—each time it’s a comfort.
    • Getting the right bubbly, golden top is my favorite part—looks like a little crust of joy.
    • It reminds me of lazy weekends and good conversations around the table.

    My Inspiration Behind This Spinach Artichoke Dip

    • This recipe came together after a messy kitchen session, trying to use up leftover spinach and artichokes. I was craving something cheesy and warm, and it just clicked.
    • I’ve tweaked it over the years—less sour cream, more Parmesan, a dash of smoked paprika for depth.
    • It’s one of those dishes that feels fancy but is honestly just thrown together—reassuring in its simplicity.

    The Curious History of Spinach Artichoke Dip

    • This dish gained popularity in the 1980s at parties and potlucks, becoming a staple in American appetizer menus.
    • The combination of spinach and artichoke was inspired by Mediterranean flavors, adapted for American tastes.
    • Cream cheese and Parmesan give it that creamy, cheesy texture that melts in your mouth.
    • Some believe the addition of smoked paprika gives it a subtle smoky depth, reminiscent of Spain’s tapas.
    • It’s often served warm, but can be enjoyed at room temperature, making it versatile for different occasions.

    Ingredient Breakdown: What Makes This Dip Shine

    • Fresh spinach: I love the vibrant green and tender texture. For a quicker option, frozen spinach works, just squeeze out all excess water.
    • Artichoke hearts: I prefer the canned ones for convenience—they’re uniformly tender and mildly tangy. Fresh artichokes are more labor-intensive but can add a deeper flavor if well cooked.
    • Cream cheese: It’s the backbone of creaminess. Swap with Greek yogurt for a lighter feel, but expect less melt and richness.
    • Parmesan cheese: Adds sharp, salty notes. Grating fresh gives the best flavor, but pre-grated works in a pinch.
    • Smoked paprika: I sprinkle it for subtle smoky depth. If you don’t have it, a pinch of cayenne or regular paprika can add warmth.

    Spotlight on Key Ingredients

    Cream Cheese: It should be soft and silky, melting smoothly into the mixture. Watch for it to become shiny and creamy when mixed.:

    • Spinach: Bright green and tender when cooked. It releases a fresh grassy aroma, a sign it’s just right.
    • Artichoke: The soft, slightly nutty texture contrasts beautifully with the greens. Keep an eye out for that gentle, smoky scent when roasting.

    Lemon Juice: Brightens the dish with a fresh citrus scent. A little squeeze lifts all the flavors.:

    • Parmesan: Grated finely, it melts evenly. You’ll notice a nutty aroma as it heats, adding depth.
    • Smoked Paprika: Adds a subtle smoky aroma and a faint red shimmer on top when baked.

    Ingredient Substitutions for Different Diets and Tastes

    • Dairy-Free: Swap cream cheese with coconut cream cheese, but expect a slight coconut flavor.
    • Vegan: Use vegan cheese blends and plant-based sour cream for a dairy-free version.
    • Low-Sodium: Choose unsalted artichokes and cheese, then season carefully.
    • Gluten-Free: This recipe is naturally gluten-free; just ensure your baking dish and any added toppings are gluten-free.
    • Extra Flavor: Add cooked bacon bits or chopped sun-dried tomatoes for a flavor boost.

    Equipment & Tools

    • Large skillet: Sauté garlic and spinach.
    • Mixing bowls: Combine ingredients.
    • Small baking dish or ramekin: Bake the dip.
    • Spatula or spoon: Mix and transfer.
    • Oven: Bake to bubbly perfection.

    How to Make Spinach Artichoke Dip: Step-by-Step Guide

    1. Preheat your oven to 180°C/350°F.
    2. In a large skillet, sauté minced garlic in a tablespoon of olive oil over medium heat until fragrant, about 30 seconds.
    3. Add chopped spinach (about 4 cups fresh), cook until wilted, about 2 minutes. Squeeze out excess water and set aside.
    4. In a mixing bowl, combine softened cream cheese (8 oz), sour cream (½ cup), grated Parmesan (¼ cup), and a pinch of smoked paprika. Mix until smooth.
    5. Fold in the drained artichoke hearts (1 cup), cooled spinach, and a pinch of salt and pepper.
    6. Transfer the mixture to a small baking dish or ramekin, smoothing the top.
    7. Bake for 20-25 minutes, until bubbly and golden around the edges.
    8. Let rest for 5 minutes before serving. Sprinkle with extra Parmesan or paprika if desired.

    Allow the dip to rest for 5 minutes out of the oven. Finish with a sprinkle of paprika or extra cheese for appearance.

    How to Know It’s Done

    • Edges are golden and bubbling.
    • Smell should be fragrant, with garlic and cheese aroma.
    • Dip should be hot and creamy, not runny or dry.

    Spinach Artichoke Dip

    This Spinach Artichoke Dip is a creamy, cheesy appetizer featuring sautéed spinach and tender artichoke hearts blended with cream cheese and Parmesan. Baked until bubbly with a slightly crispy top, it offers a comforting, nostalgic flavor with a hint of smoky paprika. Perfect for gathering around with friends, it’s a dip that invites fingers and chips alike.
    Prep Time 10 minutes
    Cook Time 25 minutes
    Total Time 35 minutes
    Servings: 8
    Course: Main Course
    Cuisine: American
    Calories: 150

    Ingredients
      

    • 8 oz cream cheese softened
    • ½ cup sour cream
    • ¼ cup Parmesan cheese freshly grated
    • 1 cup artichoke hearts drained and chopped
    • 4 cups fresh spinach roughly chopped
    • 1 clove garlic minced
    • ½ teaspoon smoked paprika
    • to taste salt and pepper

    Equipment

    • Large Skillet
    • Mixing bowls
    • Small baking dish or ramekin
    • Spatula or spoon
    • Oven

    Method
     

    1. Preheat your oven to 180°C/350°F. Gather all your ingredients so they’re ready to go.
    2. In a large skillet, heat a tablespoon of olive oil over medium heat and sauté the minced garlic until fragrant, about 30 seconds. The aroma should be inviting and the garlic just starting to turn golden.
    3. Add the chopped spinach to the skillet and cook until wilted, about 2 minutes. Use a spatula to stir occasionally, and squeeze out any excess water when it’s wilted to keep the dip from becoming watery.
    4. In a mixing bowl, combine the softened cream cheese, sour cream, grated Parmesan, smoked paprika, and a pinch of salt and pepper. Mix until the mixture is smooth and creamy, with a shiny appearance.
    5. Fold in the drained and chopped artichoke hearts, then gently add the cooked spinach mixture. Mix everything thoroughly, ensuring all ingredients are evenly distributed.
    6. Transfer the mixture into a small baking dish or ramekin, smoothing the top with the back of a spoon or spatula. This helps create an even surface for baking.
    7. Bake in the preheated oven for 20-25 minutes, until the dip is bubbling around the edges and the top is lightly golden. The aroma should be rich and cheesy, promising a delicious bite.
    8. Remove the dip from the oven and let it rest for about 5 minutes. This allows it to set slightly and makes serving easier.
    9. Sprinkle a little extra Parmesan or smoked paprika on top for presentation, then serve warm with crusty bread, chips, or veggie sticks. Dip, scoop, and enjoy the cheesy, smoky goodness!

    Cooking Tips & Tricks to Elevate Your Dip

    • GARLIC: Sauté garlic briefly to mellow its sharpness and release aroma.
    • USE ROOM-TEMP CHEESE: Softens evenly, avoiding lumps.
    • SQUEEZE SPINACH: Removes excess water to prevent watery dip.
    • BAKE UNTIL BUBBLY: Ensures the cheese melts thoroughly and develops a golden top.
    • ADD A PINCH OF NUTMEG: Just a tiny bit enhances the greens’ flavor.

    Common Mistakes and How to Fix Them

    • FORGOT to squeeze out excess water? Press spinach in a clean towel, then squeeze again.
    • DUMPED too much cheese? Balance with a splash of milk or a dollop of sour cream.
    • OVER-TORCHED the top? Cover with foil and bake a few minutes longer.
    • SEASONING too bland? Add a splash of lemon juice or a pinch more salt to brighten.

    Quick Fixes for Common Dip Issues

    • When too watery, stir in a bit more grated cheese or breadcrumbs.
    • Splash in some milk if the dip is too thick after baking.
    • Patch over burnt spots with a sprinkle of cheese and a quick bake.
    • Shield the top with foil if it’s browning too fast.
    • Rescue a bland dip with a squeeze of lemon or a dash of hot sauce.

    Make-Ahead and Storage Tips

    • You can assemble the dip a day in advance; keep covered in the fridge.
    • Reheat in the oven at 180°C/350°F until bubbly and hot, about 10 minutes.
    • The flavors deepen overnight, making it even more delicious.
    • Store leftovers in an airtight container for up to 3 days; reheat gently to preserve creaminess.

    10 Practical Q&As About Spinach Artichoke Dip

    1. Can I use frozen spinach? Complicated, but yes. Just thaw and squeeze out water first.

    Use fresh spinach if possible; it’s more vibrant and less slimy. Squeeze out excess water to prevent a watery dip.

    2. Do I need canned or fresh artichokes? Canned are easiest and tend to be softer, but fresh works too if well cooked.

    Artichoke hearts should be well-drained and chopped coarsely. Too much moisture makes the dip watery.

    3. Can I make this dairy-free? Yes, with dairy-free cream cheese and sour cream, but the texture will be different.

    Cream cheese gives it that creamy, slightly tangy base. For a lighter version, swap with Greek yogurt, but expect less richness.

    4. Should I roast or raw garlic? Raw gives sharper bite, roasted adds sweetness. Choose based on your flavor preference.

    Garlic adds flavor. Use fresh garlic for punch; sauté it briefly if you want a milder, sweeter note.

    5. How do I know when it’s done? Edges should be golden, bubbling, and smell fragrant.

    Bake until bubbly and golden on top, about 20-25 minutes at 180°C/350°F. Watch for bubbling around edges.

    6. What’s a good pairing? Anything crispy—baguette slices, celery sticks, or tortilla chips.

    Serve with crusty bread, pita chips, or raw veggie sticks. The dip is rich and creamy, so crunchy textures work well.

    7. Can I freeze this? Yes, but the texture might change slightly upon thawing.

    Leftovers can be refrigerated for 2-3 days. Reheat gently in the oven until hot and bubbly, about 10 minutes at 180°C/350°F.

    8. Can I make it in advance? Yes, assemble ahead and bake just before serving.

    Use a medium mixing bowl to combine ingredients; a whisk or spatula is best for mixing. For baking, a small oven-safe dish or ramekin works well.

    9. Can I add other ingredients? Yes, chopped sun-dried tomatoes or cooked bacon bits add flavor.

    Add extra cheese on top for a crispy crust. Parmesan or mozzarella create a golden, cheesy crust that’s irresistible.

    10. How do I balance flavors? Taste as you go, adding salt or lemon gradually.

    Adjust seasonings to taste. Salt, pepper, lemon juice, or a pinch of cayenne can brighten or spice up the dip.

    Once it’s out of the oven, I like to let it rest a couple of minutes before digging in. The flavors settle, and it’s easier to scoop without everything slipping off the chip. Whether it’s for a quick snack or a game day spread, this dip’s richness and warmth always get the job done.

    It’s funny how a simple recipe like this can carry so many memories and moments of joy. I keep coming back to it, tweaking a little here and there, but the core remains cozy and familiar. Sometimes, that’s all you need—a warm, cheesy hug in a bowl.

  • Spicy Roasted Tofu Recipe

    Cooking this spicy roasted tofu is like giving your taste buds a little adventure each time. It’s about harnessing the smoky heat and crispy edges, but also about the quiet moments in the kitchen. That moment when you hear the crackle of tofu hitting the hot pan, that’s where the magic begins.

    This recipe isn’t just about flavor; it’s about those small, honest kitchen moments. It’s for nights when you need something fiery but nourishing, quick but memorable. And it’s about the joy of turning humble ingredients into something bold and satisfying.

    The unexpected connection between spice, texture, and emotional comfort — how a simple dish can evoke memories and soothe chaos.

    Why I Keep Coming Back to This Recipe

    • I love how roasting transforms the tofu into something almost meaty.
    • This recipe is my go-to when I crave something fiery but simple.
    • I’ve burned more tofu than I’d like to admit, but every mistake taught me something.
    • Sharing this with friends always sparks a little joy and surprise.

    A spicy street food memory turned into my kitchen staple

    • The inspiration came from a smoky street vendor in Bangkok, where spicy, crispy tofu was everywhere.
    • I wanted that flavor profile but with what I keep in my own kitchen.
    • It’s become a way to bring a little heat and crunch into weeknights.

    Quick facts and history about spicy roasted tofu

    • Tofu has been a staple in East Asian cuisines for centuries, prized for its adaptability.
    • The term ‘tofu’ comes from Chinese, but similar soy-based curds date back over 2,000 years.
    • Roasting tofu to crispness is a recent trend, inspired by Korean and Japanese cooking styles.
    • Spicy coatings are often influenced by street food, offering bold flavors in every bite.

    Ingredient insights and tweaks

    • Firm tofu: I like pressing it well for maximum crunch, but silken won’t hold up. Try adding a sprinkle of cornstarch for extra crispness.
    • Chili paste: I love the smoky heat, but sriracha works if you want more tang than fire.
    • Smoked paprika: Adds depth, but regular paprika is fine if you want a milder flavor.
    • Sesame oil: Brings a nutty aroma, but olive oil is a subtle alternative.
    • Soy sauce: Brings saltiness and umami; coconut aminos can be a soy-free substitute.

    Spotlight on Tofu and Spices

    Tofu:

    • It’s all about pressing and drying, so it crisps up right. Watch for a slightly squeaky texture when cooked.
    • Spice paste: The chili paste and smoked paprika create that irresistible smoky heat—don’t skimp, it’s the flavor core.

    Spice blend:

    • Chili paste: It’s the punch that ignites the dish. It crackles as it hits the hot pan, releasing smoky fumes.
    • Smoked paprika: Adds a warm, earthy aroma and a deep red hue—look for the good stuff, it’s worth it.

    Substitutions to suit your pantry and taste

    • Dairy-Free: Swap soy sauce for coconut aminos for a sweeter, milder flavor.
    • Gluten-Free: Use tamari instead of soy sauce to keep it gluten-free.
    • Extra-spicy: Increase chili paste or add a dash of cayenne for more heat.
    • Less salty: Reduce soy sauce or use a salt-free spice blend.
    • Oil options: Switch sesame oil for avocado oil for a neutral, high-heat option.

    Equipment & Tools

    • Baking sheet: To hold and bake the tofu evenly
    • Parchment paper: Prevent sticking and easy cleanup
    • Mixing bowls: Combine spices and coat tofu
    • Spatula or hands: Toss tofu in spice mixture smoothly

    Step-by-step guide to spicy roasted tofu

    1. Preheat your oven to 200°C (390°F). Line a baking sheet with parchment paper.
    2. Press the tofu for at least 30 minutes to remove excess water, then cut into 1-inch cubes.
    3. Mix your spice paste: 2 tbsp soy sauce, 1 tbsp chili paste, 1 tsp smoked paprika, 1 tsp garlic powder, 1 tbsp sesame oil.
    4. Toss the tofu cubes in the spice mixture until evenly coated.
    5. Arrange tofu on the prepared baking sheet, making sure each piece has space.
    6. Bake for 25-30 minutes, flipping halfway through, until edges are deep golden and crispy.
    7. Check the color and smell; it should smell smoky with a spicy kick.
    8. Remove from oven and let rest for 5 minutes before serving.

    Let the tofu rest for 5 minutes to set the flavor and avoid burning your mouth with hot spice.

    How to Know It’s Done

    • Edges are crispy and golden
    • Spice coating is caramelized and fragrant
    • Tofu feels firm but not hard when gently pressed

    Spicy Roasted Tofu

    This dish features firm tofu baked until crispy and coated in a smoky, spicy marinade that enhances its natural texture. The roasting process creates a golden, crunchy exterior while keeping the inside tender and flavorful, perfect for a fiery, satisfying main course. It’s a bold, flavorful dish that combines heat, crunch, and comforting spice in every bite.
    Prep Time 10 minutes
    Cook Time 30 minutes
    Total Time 40 minutes
    Servings: 4
    Course: Main Course
    Cuisine: Asian
    Calories: 180

    Ingredients
      

    • 14 oz firm tofu pressed and cut into 1-inch cubes
    • 2 tbsp soy sauce or coconut aminos for soy-free
    • 1 tbsp chili paste smoky preferred
    • 1 tsp smoked paprika regular paprika works too
    • 1 tsp garlic powder
    • 1 tbsp sesame oil or olive oil

    Equipment

    • Baking sheet
    • Parchment paper
    • Mixing bowls
    • Spatula or hands

    Method
     

    1. Preheat your oven to 200°C (390°F) and line a baking sheet with parchment paper.
    2. Press the tofu for at least 30 minutes to remove excess water, then cut it into evenly sized 1-inch cubes. This helps the tofu crisp up nicely during baking.
    3. In a mixing bowl, combine soy sauce, chili paste, smoked paprika, garlic powder, and sesame oil to make a flavorful spice paste. Whisk until smooth and fragrant.
    4. Toss the tofu cubes in the spice paste, ensuring each piece is thoroughly coated with a glossy, spicy layer.
    5. Arrange the coated tofu cubes on the prepared baking sheet in a single layer, giving each piece enough space for even roasting.
    6. Bake the tofu for 25 to 30 minutes, flipping halfway through, until the edges are deep golden and crispy with a smoky sheen. The kitchen will fill with a warm, spicy aroma.
    7. Once baked, remove the tofu from the oven and let it rest for 5 minutes, allowing the flavors to settle and the edges to firm up further.
    8. Serve the spicy roasted tofu hot, garnished with your favorite herbs or a squeeze of lime for added brightness. Enjoy the crispy, smoky bites with rice or vegetables for a satisfying meal.

    Tips and tricks for perfect spicy roasted tofu

    • SPREAD: Use a silicone brush for even spice coating.
    • SEAR: Sear tofu in a hot skillet 2 minutes per side before baking for extra crunch.
    • FLAVOR: Toast spices lightly in a dry pan for a richer taste.
    • CRISP: Flip tofu halfway through baking for even crispness.
    • HEAT: Adjust chili paste to taste, adding more for fiery bites.

    Common mistakes and how to fix them

    • FORGOT TO PRESS THE TOFU? → Place under a heavy book for 30 minutes.
    • DUMPED TOO MUCH SPICE? → Use less soy sauce or dilute with water.
    • OVER-TORCHED EDGES? → Lower oven temp to 180°C (355°F) and watch closely.
    • TOO SOFT TOFU? → Press longer or use extra-firm tofu next time.

    Fast fixes for common kitchen mishaps

    • When tofu sticks, splash in a little water and gently loosen.
    • Patch over burnt spots with a sprinkle of fresh spice mix.
    • Shield tofu from over-browning by tenting with foil.
    • When spice isn’t spicy enough, add a dash of hot sauce.
    • If the tofu is too soft, bake an extra 5 minutes to crisp up.

    Prep ahead and store for quick meals

    • Make the spice paste a day ahead to deepen the flavor.
    • Press and cut tofu in advance; keep refrigerated for up to 24 hours.
    • Refrigerate cooked tofu in an airtight container for up to 3 days.
    • Reheat in a hot oven (about 180°C/350°F) for 10 minutes until crispy, smelling smoky and spicy again.

    10 Practical Q&As About Spicy Roasted Tofu

    1. What type of tofu works best?’

    Use firm or extra-firm tofu, pressed well, so it crisps up nicely without falling apart.

    2. How long should I press the tofu?

    Press the tofu for at least 30 minutes, even better if overnight, to remove excess water.

    3. How do I get the spice evenly on the tofu?

    Mix the spice paste in a bowl, then coat the tofu evenly using a brush or your hands.

    4. What’s the perfect roasting time?

    Roast at 200°C (390°F) for about 25-30 minutes until edges are golden and crispy.

    5. How do I know when it’s done?

    Check for a deep amber color and a fragrant smoky smell to confirm doneness.

    6. Can I reheat leftovers?

    Serve immediately for the crispiest texture, or reheat in a hot oven to refresh crunch.

    7. What tools do I need?

    Use a sturdy baking sheet and parchment paper to prevent sticking and make cleanup easier.

    8. Should I add anything before serving?

    Add a squeeze of lime or a drizzle of sesame oil before serving for extra zing.

    9. How long does it last?

    Store leftovers in an airtight container in the fridge for up to 3 days.

    10. Can I prepare the spice paste ahead?

    The spice mix can be made in advance and stored in an airtight jar for a week.

    Sometimes, a simple dish like this can turn a rough day into a small celebration. The spicy aroma, the crunch, that lingering heat — it’s all a reminder of what good food can do. No matter how chaotic things get, you’ve got this roasted tofu to come back to.

    And honestly, once you get the hang of it, it’s a recipe you’ll keep coming back to, tweaking the spice, adjusting the heat. It’s honest, straightforward, and full of that quiet, unpolished magic that makes cooking real.

  • Chickpea Buddha Bowl Recipe

    When I started making this chickpea Buddha bowl, I wanted to create something that felt both grounding and uplifting. It’s not about fancy techniques but about celebrating the humble, often overlooked ingredients. The smell of roasting chickpeas, the splash of lemon, and the crunch of fresh veggies remind me of my first solo cooking adventures—messy, satisfying, and full of surprises.

    This bowl feels like a little ritual, a pause in the chaos. It’s a reminder that good, wholesome food doesn’t need to be complicated; it just needs love, a bit of patience, and a dash of curiosity.

    Focusing on the unexpected joy of transforming simple ingredients into a vibrant, nourishing bowl that’s perfect for midweek comfort.

    Why this bowl matters to me

    • I love how this dish feels like a little celebration of everyday ingredients.
    • It’s my fallback when I need something quick but satisfying.
    • The aroma of roasted chickpeas always makes me smile.
    • I’ve shared this bowl with friends during busy weeknights, and everyone leaves with a full belly and a happy heart.

    Personal story behind the bowl

    • This recipe came together on a rainy Tuesday when I needed something nourishing but quick.
    • I wanted to make a dish that was flexible, so I could use whatever vegetables I had on hand.
    • The idea of roasting chickpeas came from craving crunch and smoky flavor.
    • It’s become a weekly ritual—something I look forward to, even on the busiest days.

    A little history and fun facts about your bowl

    • The Buddha bowl concept originated from the idea of nourishing the body with a balanced plate.
    • Chickpeas have been a staple in Middle Eastern and Indian cuisines for thousands of years.
    • Roasting chickpeas enhances their nutty flavor and gives them a satisfying crunch.
    • The vibrant colors in this bowl are inspired by traditional Japanese donburi bowls, emphasizing visual appeal.

    Ingredient insights and tweaks

    • Chickpeas: I prefer canned for convenience, but dried soaked overnight gives a deeper flavor and crunch.
    • Lemon: Brightens every bite—don’t skip it. Use fresh for the best zing.
    • Tahini: Creamy and nutty, adds richness. Mix with water or lemon for a smooth dressing.
    • Vegetables: Crunchy cucumbers and sweet peppers balance the earthiness of chickpeas.
    • Herbs: Fresh parsley or cilantro add a pop of color and freshness—don’t skip the chopping.

    Spotlight on Chickpeas and Lemon

    Chickpeas:

    • When roasting, they ooze a nutty aroma and turn crispy, almost popcorn-like.
    • Bullets: They behave differently depending on dryness—dried chickpeas roast more evenly and deeply.
    • Lemon: Brightens everything. When squeezed, the juice crackles against the hot ingredients, releasing fresh oils.

    Lemon:

    • Its zest adds a fragrant, aromatic punch—use it to elevate the dressing.
    • Bullets: Fresh lemon juice is more vibrant; bottled can dull the sharpness if overused.

    Substitution notes

    • Dairy-Free: Swap tahini for cashew or sunflower seed butter for a nutty, creamy alternative.
    • Gluten-Free: Use cauliflower rice instead of grains for a low-carb option.
    • Vegan: The recipe is already vegan, but ensure your tahini and dressings are free from animal products.
    • Spicy: Add a pinch of cayenne or chili flakes to the chickpeas before roasting.
    • Sweetness: Drizzle honey or maple syrup over vegetables before roasting for a caramelized touch.

    Equipment & Tools

    • Baking sheet: Roast chickpeas and vegetables evenly.
    • Mixing bowls: Toss ingredients with oil and seasonings.
    • Cooking pot: Prepare grains.
    • Knife and chopping board: Prep vegetables and herbs.
    • Measuring spoons and cups: Ensure accurate seasoning.

    Step-by-step guide for your Chickpea Buddha Bowl

    1. Preheat your oven to 200°C (390°F).
    2. Drain and rinse the canned chickpeas. Pat dry.
    3. Toss chickpeas with olive oil, salt, and a pinch of smoked paprika.
    4. Spread on a baking sheet, roast for 20-25 minutes, shaking halfway.
    5. Meanwhile, chop your favorite vegetables—cucumbers, carrots, bell peppers.
    6. Toss veggies with a bit of olive oil, lemon juice, salt, and pepper.
    7. Cook grains like quinoa or rice as per package instructions.
    8. Assemble the bowl: start with grains, then add roasted chickpeas and veggies.
    9. Drizzle with tahini or lemon-tahini dressing.
    10. Garnish with fresh herbs and a squeeze of lemon.

    Let the assembled bowl sit for 2-3 minutes before serving to let flavors meld. Finish with a fresh squeeze of lemon and herbs.

    How to Know It’s Done

    • Chickpeas are golden and crispy.
    • Vegetables are roasted and slightly caramelized.
    • Grains are tender and fluffy.

    Chickpea Buddha Bowl

    This vibrant chickpea Buddha bowl combines roasted chickpeas, fresh vegetables, and grains to create a nourishing, balanced meal. The dish features crispy chickpeas, crunchy veggies, and a tangy lemon-tahini dressing, resulting in a colorful, textured bowl perfect for midweek comfort. It’s simple to assemble and full of wholesome flavors and textures.
    Prep Time 15 minutes
    Cook Time 25 minutes
    Total Time 40 minutes
    Servings: 4
    Course: Main Course
    Cuisine: Mediterranean, Vegan
    Calories: 350

    Ingredients
      

    • 1 can canned chickpeas drained and rinsed
    • 2 tablespoons olive oil divided, for roasting and dressing
    • 1 teaspoon smoked paprika smoked paprika
    • 2 cups cooked grain (quinoa or rice) cooked according to package instructions
    • 1 cucumber chopped
    • 1 bell pepper sliced
    • 1 carrot sliced or grated
    • 2 tablespoons lemon juice fresh lemon juice
    • 2 tablespoons tahini creamy and nutty
    • 1 clove garlic minced, optional for dressing
    • fresh parsley or cilantro to taste herbs chopped, for garnish

    Equipment

    • Baking sheet
    • Mixing bowls
    • Cooking pot
    • Knife and chopping board
    • Measuring spoons and cups

    Method
     

    1. Preheat your oven to 200°C (390°F). Line a baking sheet with parchment paper. Drain and rinse the chickpeas thoroughly, then pat them dry with a clean towel or paper towels.
    2. Toss the chickpeas with 1 tablespoon of olive oil, smoked paprika, and a pinch of salt. Spread them evenly on the prepared baking sheet.
    3. Roast the chickpeas in the oven for 20-25 minutes, shaking the pan halfway through, until they turn golden and crispy with a bubbling aroma.
    4. While the chickpeas roast, cook your grains according to the package instructions. Fluff with a fork and set aside.
    5. Chop the cucumber, slice the bell pepper, and slice or grate the carrot for added crunch and color.
    6. Prepare the lemon-tahini dressing by whisking together the tahini, lemon juice, minced garlic, and remaining 1 tablespoon of olive oil. Add water gradually to reach your desired consistency, and season with salt to taste.
    7. Assemble the bowls by dividing the cooked grains among four bowls, then layering roasted chickpeas, chopped vegetables, and herbs on top.
    8. Drizzle each bowl generously with the lemon-tahini dressing, then garnish with chopped herbs and an extra squeeze of lemon if desired.
    9. Let the assembled bowls rest for 2-3 minutes to allow flavors to meld, then serve immediately and enjoy this colorful, nourishing meal.

    Notes

    For extra flavor, sprinkle some chili flakes on the chickpeas before roasting or add avocado slices for creaminess. You can prepare the chickpeas and grains a day ahead to save time, storing them separately in airtight containers.

    Tips and tricks for perfect results

    • Use parchment paper for even roasting and easy cleanup.
    • Toss chickpeas during roasting for uniform crispness.
    • Add herbs at the end to keep their fresh flavor.
    • Use a sharp knife to chop vegetables quickly.
    • Taste and adjust seasoning before assembling the bowl.

    Common mistakes and how to fix them

    • FORGOT to dry chickpeas thoroughly → They won’t crisp up. Pat dry and roast again.
    • DUMPED too much oil on chickpeas → They become greasy. Use just enough to coat evenly.
    • OVER-TORCHED the vegetables → They turn bitter. Roast at a lower temp or check early.
    • SCOURED the lemon juice → It’s too sharp. Balance with a touch of honey or maple syrup.

    Fast fixes for common kitchen mishaps

    • When chickpeas aren’t crispy enough, give them a quick blast in the oven.
    • Splash a little vinegar if the dressing is too flat.
    • Patch over over-salted grains with a squeeze of lemon.
    • Shield your vegetables from burning by tossing them more often.
    • If the bowl feels dull, add a fresh herb or lemon zest for brightness.

    Make-ahead and storage tips

    • Roasted chickpeas can be made a day ahead; store in an airtight container for crispness.
    • Cook grains ahead and refrigerate for up to 3 days—reheat gently for a fluffy texture.
    • Chopped vegetables last about 1-2 days in the fridge; keep them covered.
    • Dress the assembled bowl just before eating to keep everything fresh and vibrant.

    10 Practical Q&As About the Chickpea Buddha Bowl

    1. Can I use dried chickpeas instead of canned?

    Use canned chickpeas for convenience, but roast dried ones soaked overnight for extra crunch and flavor.

    2. How do I know when the chickpeas are roasted enough?

    Roast the chickpeas until they’re golden and slightly crispy, about 20-25 minutes at 200°C (390°F).

    3. Should I marinate the vegetables before roasting?

    Mix the vegetables with olive oil, salt, and a squeeze of lemon before roasting to boost their flavor.

    4. How can I make the dressing more tangy?

    Use tahini or a lemon-tahini dressing for creaminess. Adjust acidity with more lemon if needed.

    5. Can I skip the grains?

    Cook grains like quinoa or rice as a base, then layer the roasted veggies and chickpeas on top.

    6. When should I add fresh herbs?

    Add chopped herbs like parsley or cilantro after roasting for freshness.

    Every time I make this, I feel a small sense of victory. It’s a dish that’s flexible, forgiving, and so satisfying to eat. Plus, it keeps me grounded, especially when life feels like it’s spinning too fast. The simple act of assembling this bowl turns a busy day into a moment of quiet pride.

    And honestly, it’s become my go-to for easy, nourishing lunches. No matter how hectic life gets, I know I’ve got this bowl waiting, ready to nourish and energize.

  • Peppermint Hot Chocolate Recipe

    When the world outside is gray and cold, I find myself craving that familiar rush of warmth. But not just any hot chocolate will do; I want the kind that whispers winter in every sip, with a fresh, peppermint twist that feels almost like biting into a candy cane. It’s about making comfort a little more vivid, a little more alive.

    This recipe isn’t about quick fixes or pre-mixed powders. It’s about slow-rolling the flavor, infusing the milk with lush peppermint and rich cocoa, so every sip feels like a small, sweet rebellion against the chill. It’s the kind of drink that makes you pause, breathe in that sharp mint aroma, and feel a little more present in the coldest part of the season.

    The unexpected comfort of peppermint hot chocolate made with homemade, slow-infused peppermint syrup.

    Why This Peppermint Hot Chocolate Means Everything Right Now

    • Making this feels like wrapping myself in a warm blanket.
    • I love the way the mint blooms into the cocoa, filling the kitchen with that fresh, sweet aroma.
    • There’s a nostalgic rush every time I see the steam swirl up from the mug, like a secret winter spell.

    My Cozy Peppermint Discovery

    • This recipe was born out of a chilly evening, craving something both comforting and invigorating.
    • I wanted the mint flavor to be bold but not overpowering, so I experimented with steeping fresh leaves.
    • The slow infusion process really makes a difference, turning a simple drink into something memorable.

    A Little Peppermint History

    • Peppermint hot chocolate is a holiday staple in many countries, especially around Christmas.
    • The combination of chocolate and mint dates back to the 19th century, popularized by British confectionery.
    • Peppermint oil has natural cooling properties, which is why it pairs so well with hot drinks.
    • In some cultures, mint in hot chocolate is believed to aid digestion after heavy winter meals.

    Ingredients Deep Dive

    • Milk: I use whole milk for richness, but almond or oat milk adds a nutty, sweet note.
    • Cocoa powder: Dutched cocoa gives a smoother, less acidic flavor, but natural cocoa adds brightness.
    • Peppermint: Fresh leaves offer a clean, crisp flavor, while extract is more intense and convenient.
    • Sweetener: Honey brings floral notes, sugar is classic, and maple syrup adds warmth.
    • Garnishes: Whipped cream adds creaminess, peppermint sticks add visual fun.

    Spotlight on Peppermint and Cocoa

    Cocoa powder: Rich, slightly bitter, creating a deep chocolate base that balances mint.:

    • Peppermint: Bright, sharp aroma that awakens the senses with a cool burst.
    • During heating, peppermint leaves release oils that deepen flavor and aroma.
    • Fresh mint provides a cleaner, more natural taste compared to extracts.

    Milk: The creamy backbone that carries the chocolate and mint flavors, needs gentle heating.:

    • Cocoa’s natural bitterness is mellowed by sugar, making the drink smooth and inviting.
    • When heated, cocoa releases a warm, inviting aroma that fills the kitchen.
    • Dutched cocoa’s smoothness makes for a velvety texture, unlike natural cocoa.

    Smart Ingredient Swaps

    • Dairy-Free: Use coconut or almond milk for a creamy, nutty twist—less rich but still cozy.
    • Sweetener: Maple syrup adds a caramel note, honey gives a floral touch, agave is neutral.
    • Peppermint: Peppermint extract can substitute fresh leaves, but loses the bright, fresh scent.
    • Chocolate: Dark chocolate chips melt into the milk for a richer, more decadent flavor.
    • Garnish: Use crushed peppermint candies instead of sticks for a crunchy finish.

    Equipment & Tools

    • Small saucepan: Warm and blend the ingredients
    • Whisk: Ensure smooth, lump-free cocoa mixture
    • Strainer or fine sieve: Remove mint leaves if used
    • Mugs: Serve hot chocolate beautifully

    Step-by-step to Peppermint Hot Chocolate

    1. Combine 2 cups of milk and 2 tablespoons of cocoa powder in a small saucepan.
    2. Warm over low heat, stirring constantly, until the cocoa dissolves and the milk is steaming (about 3–4 minutes).
    3. Add 3-4 fresh peppermint leaves or a teaspoon of peppermint extract. Let it simmer on very low heat for 5 minutes.
    4. Remove from heat, strain out the mint leaves if used, then stir in 1–2 tablespoons of sugar or honey to taste.
    5. Pour into mugs, top with whipped cream if desired, and garnish with a peppermint stick or a sprig of mint.

    Serve immediately with whipped cream and garnish, enjoy the aroma and warmth.

    How to Know It’s Done

    • Milk should be steaming, not boiling.
    • Cocoa should be fully dissolved, no lumps.
    • Peppermint flavor should be vibrant but not overpowering.

    Homemade Peppermint Hot Chocolate

    This cozy beverage combines rich cocoa and fresh peppermint leaves infused slowly into warm milk, resulting in a smooth, velvety hot chocolate with a bright, refreshing twist. The process involves gentle heating and straining to create a comforting drink with a vivid mint aroma and a luxurious texture. Topped with whipped cream and garnished with peppermint sticks, it’s the perfect winter treat.
    Prep Time 10 minutes
    Cook Time 10 minutes
    Total Time 20 minutes
    Servings: 2
    Course: Main Course
    Cuisine: American
    Calories: 200

    Ingredients
      

    • 2 cups whole milk or almond/oat milk for dairy-free option
    • 2 tablespoons cocoa powder preferably Dutched for smoothness
    • 3-4 fresh peppermint leaves peppermint leaves or 1 teaspoon peppermint extract
    • 1-2 tablespoons honey or sugar adjust to taste
    • whipped whipped cream optional topping
    • peppermint sticks for garnish peppermint sticks optional, for presentation

    Equipment

    • Small Saucepan
    • Whisk
    • Strainer or fine sieve
    • Mugs

    Method
     

    1. Pour the milk into a small saucepan and place it over low heat.
    2. Whisk in the cocoa powder, stirring constantly until it’s fully dissolved and the mixture is smooth, with a gentle simmer beginning (small bubbles around the edges, fragrant aroma).
    3. Add the fresh peppermint leaves, gently pressing them with the back of a spoon to release their oils, then let the mixture simmer very low for about 5 minutes, allowing the mint to infuse the milk with a bright, refreshing aroma.
    4. Remove the saucepan from the heat and strain out the peppermint leaves using a fine sieve, pressing gently to extract remaining flavor. Discard the leaves.
    5. Stir in the honey or sugar, tasting and adjusting the sweetness as needed, until fully dissolved and the mixture is smooth and velvety.
    6. Pour the hot chocolate into mugs, then top generously with whipped cream and garnish with a peppermint stick or a sprig of fresh mint for a festive look.
    7. Serve immediately while steaming hot, enjoy the rich cocoa aroma combined with the invigorating scent of fresh peppermint.

    Tips & Tricks for a Perfect Peppermint Hot Chocolate

    • FLAVOR: Use fresh mint for a brighter, more vibrant taste.
    • BALANCE THE SWEET: Adjust sugar after tasting the steeped milk.
    • HEAT CARE: Keep the milk just steaming, not boiling, to prevent scalding.
    • INFUSE LONGER: For a stronger mint flavor, steep longer, but don’t let it boil.
    • SMOOTH TEXTURE: Whisk continuously during heating to avoid lumps.
    • GARNISH: A peppermint stick or a sprig of fresh mint elevates presentation.

    Common Peppermint Hot Chocolate Mistakes and How to Fix Them

    • FORGOT TO strain mint leaves → Use a fine sieve to remove bits before serving.
    • DUMPED too much peppermint → Use a teaspoon to control flavor, then adjust sweetness.
    • OVER-TORCHED milk → Lower heat and stir constantly, avoid boiling.
    • SEIZED cocoa → Whisk vigorously to smooth out lumps.

    Rescue Your Peppermint Hot Chocolate Quickly

    • When too bitter → Add a touch more sugar or honey.
    • If milk scalds → Remove from heat immediately and whisk vigorously.
    • Splash of cream → Fix thinness by stirring in a spoonful of butter or cream.
    • When peppermint flavor is weak → Add more extract or fresh mint steeped longer.
    • Patch flavor imbalance → Stir in a small pinch of salt to round out sweetness.

    Storing and Reheating Tips

    • Prepare the peppermint syrup ahead and keep in the fridge for up to a week.
    • Reheat the milk gently on the stove or microwave, stirring until warm and fragrant.
    • Adding fresh whipped cream just before serving keeps it fluffy and inviting.
    • The flavor intensifies slightly overnight, so make it a day ahead for a more pronounced mint taste.

    10 Practical Q&As about Peppermint Hot Chocolate

    1. Can I use peppermint extract instead of fresh mint?

    Use good quality cocoa powder for richness, and fresh peppermint for a bright, clean flavor.

    2. How do I know when the milk is hot enough?

    Warm the milk gently on low-medium heat, just until it starts to steam, avoid boiling to keep it smooth.

    3. When should I add the peppermint for the best flavor?

    Sweeten to taste with sugar or honey after heating, then stir in chopped peppermint or peppermint extract.

    4. Should I muddle or bruise the mint before adding?

    Chop the peppermint finely or bruise it slightly to release more flavor into the hot milk.

    5. What’s the best way to avoid clumps of cocoa?

    Use a whisk to blend cocoa and peppermint into the milk, creating a silky, uniform drink.

    6. How long can I keep leftovers?

    Serve immediately for the best flavor and aroma, garnished with whipped cream or a peppermint stick.

    7. Will reheating affect the flavor?

    Store in a sealed jar in the fridge for up to 2 days, then reheat gently on the stove.

    8. How can I fix a reheated drink that’s too thick?

    Add a splash of milk and stir well when reheating to restore creaminess.

    9. Can I make it less sweet or more minty?

    Adjust sweetness and mint intensity according to your taste before serving.

    10. Why is temperature so important?

    Use a thermometer to ensure milk is heated to about 60°C (140°F) for optimal flavor.

    There’s a quiet magic in crafting this peppermint hot chocolate from scratch, in letting those fresh mint leaves steep into warm milk. It’s a small ritual that turns ordinary winter nights into moments worth savoring.

    And honestly, once you get the hang of making this, it becomes a cozy secret—something you whip up when the world needs a little extra warmth and a splash of peppermint cheer.

  • Air Fryer Roasted Green Beans Recipe

    Green beans in the air fryer might sound simple, but there’s an art to getting that perfect crunch without overcooking them. I’ve experimented with different timings and oils, trying to capture that just-roasted vibe from a quick weeknight snack to a side dish that doesn’t feel lazy.

    What I love about this method is how it keeps the beans vibrant and fresh, with a smoky, roasted aroma that fills the kitchen. It’s like giving your green beans a little spa day — quick, hot, and full of flavor, with minimal fuss and mess.

    The surprising crunch: achieving perfect roasted green beans in the air fryer, with tips for maximizing crispness and flavor.

    Why I Keep Coming Back to This Simple Green Bean Trick

    • I love how quick this comes together, especially on busy nights.
    • Nothing beats that first crispy bite—smoky, fresh, and just a little charred.
    • It’s a simple dish, but it reminds me how good vegetables can taste when treated right.
    • Every time I make these, I feel like I’ve cracked a little secret of the kitchen.

    The accidental discovery that keeps me coming back

    • This recipe was born out of necessity—and experimentation. I was craving something crunchy, bright, and healthy, but didn’t want to turn on the oven.
    • One day, I tossed some beans into the air fryer, hoping for a quick fix. The result was so good, I couldn’t stop making it.
    • It’s become a staple because it’s fast, fuss-free, and totally customizable.

    A little history and fun facts about green beans and air frying

    • Green beans have been a garden staple since ancient times, loved for their snap and versatility.
    • Air frying green beans is a modern twist—combining quick cooking with a roasted flavor that’s hard to beat.
    • This technique echoes traditional roasting but in a way that preserves freshness and adds a crispy edge.
    • A dash of lemon after roasting brightens the flavor, reminiscent of summer days and outdoor picnics.

    Deep dive into green beans and seasonings

    • Green beans: Fresh and bright—look for firm, vibrantly colored beans. Slightly limp beans won’t crisp up well.
    • Olive oil: Just enough to coat; it helps with browning and adds flavor. Use a neutral oil if you prefer less flavor impact.
    • Salt: Enhances natural sweetness and balances the smoky notes. Add after roasting for best flavor.
    • Lemon: Brightens everything—use freshly squeezed for zing.
    • Parmesan: Adds saltiness and umami—sprinkle right after roasting, while beans are hot.

    Spotlight on Green Beans and Lemon

    Lemon: Its zest and juice brighten the dish, adding a fresh, citrusy spark.:

    • Green beans: Their snap and bright color tell you they’re fresh; avoid dull, limp beans.
    • During roasting, they develop a smoky aroma and a slight char that boost flavor.

    Olive oil: A good-quality oil coats the beans evenly, encouraging crispness and a subtle richness.:

    • Lemon juice: It’s the finishing touch—be sure to add right after roasting to preserve brightness.
    • The zest adds aromatic oils that lift the flavor profile, making each bite lively and clean.

    Substitutions to customize your green beans

    • Dairy-Free: Skip Parmesan; sprinkle nutritional yeast for a cheesy flavor without dairy.
    • Oil-Free: Use a spray of water or a flavored vinegar to help beans crisp, but expect less browning.
    • Low-Sodium: Reduce salt and add herbs or spices for flavor—paprika or garlic powder work well.
    • Vegan: Skip cheese, add a dash of smoked paprika or nutritional yeast for depth.
    • Fresh Herbs: Toss in chopped parsley or cilantro after roasting for a fresh burst.

    Equipment & Tools

    • Air fryer: Main appliance to roast the beans evenly.
    • Mixing bowl: Tossing the beans with oil and seasonings.
    • Tongs or silicone spatula: Tossing and serving the beans.
    • Measuring spoons: Measuring oil and seasonings.

    Step-by-step: Perfectly Roasted Green Beans in the Air Fryer

    1. Preheat your air fryer to 200°C (400°F).
    2. Wash and trim the green beans, then toss them with 1 teaspoon of oil per cup.
    3. Spread beans in a single layer in the basket. Don’t overcrowd.
    4. Roast for 8-10 minutes, shaking halfway through. Watch as they turn a bright green with browned tips.
    5. Check for crunch and aroma. They should smell smoky and look vibrant.
    6. Remove and season immediately with salt, lemon, or cheese. Rest for 1 minute before serving.

    Serve immediately, seasoned to taste. For extra crunch, sprinkle with Parmesan or a squeeze of lemon.

    How to Know It’s Done

    • Color: Bright green with lightly browned tips.
    • Texture: Crisp on the outside, tender inside.
    • Aroma: Smoky with a hint of nuttiness.

    Air Fryer Crispy Green Beans

    These green beans are tossed with a touch of oil and roasted in the air fryer until vibrant and crispy, showcasing a perfect balance of crunch and tenderness. The high heat creates a smoky, roasted aroma with lightly charred tips, finished with fresh lemon zest and optional Parmesan for added flavor. An easy, healthy side dish with a delightful texture and bright appearance.
    Prep Time 10 minutes
    Cook Time 10 minutes
    Total Time 20 minutes
    Servings: 4
    Course: Main Course
    Cuisine: Modern
    Calories: 120

    Ingredients
      

    • 1 lb fresh green beans trimmed and washed
    • 1 tsp olive oil or neutral oil
    • to taste salt preferably sea salt or flaky salt
    • 1 lemon lemon for zest and juice
    • 2 tbsp Parmesan parmesan optional, freshly grated

    Equipment

    • Air fryer
    • Mixing bowl
    • Tongs or silicone spatula
    • measuring spoons

    Method
     

    1. Preheat your air fryer to 200°C (400°F) to get it ready for roasting.
    2. Place the washed and trimmed green beans in a mixing bowl, then drizzle with a teaspoon of olive oil. Toss gently to coat all the beans evenly; they should glisten slightly but not be swimming in oil.
    3. Spread the beans in a single layer in the air fryer basket, making sure they’re not overcrowded so hot air can circulate freely for maximum crispiness.
    4. Roast for 8 to 10 minutes, shaking the basket halfway through. You’ll hear a gentle sizzling and see the beans turn a vibrant green with lightly browned tips as they develop that smoky aroma.
    5. Once crispy and fragrant, carefully remove the basket. Check for crunch—if they need a bit more, cook for another minute or two, watching to prevent overburning.
    6. Transfer the hot green beans to a serving bowl. Finely grate some Parmesan over the top if using, and season immediately with salt to enhance their natural sweetness and smoky flavor.
    7. Zest a lemon directly over the beans, then squeeze in a little fresh lemon juice for brightness. Toss gently to distribute the flavors evenly.
    8. Serve immediately while still crispy and fragrant. Enjoy the vibrant, smoky crunch as a perfect side or snack.

    Notes

    For extra flavor, sprinkle with chopped fresh herbs like parsley or cilantro after roasting. To make this dish vegan, omit Parmesan or substitute with nutritional yeast.

    Tips and tricks for perfect roasted green beans

    • Use a light oil to keep the beans crispy—avocado or grape seed oil work well.
    • Shake or toss halfway through cooking to promote even browning.
    • Don’t overcrowd the basket; air needs space to circulate.
    • Season immediately after roasting for maximum flavor.
    • Add a squeeze of lemon or sprinkle of Parmesan right after roasting for extra zest.

    Common mistakes and how to fix them

    • FORGOT to shake? Just give the basket a good toss mid-cook to prevent uneven roasting.
    • DUMPED too much oil? Wipe off excess with paper towel and reduce oil next time.
    • OVER-TORCHED the tips? Lower the temp slightly or check earlier next round.
    • UNDERCOOKED? Extend cooking time by 2 minutes and check for crispness.

    Fast fixes for common roasting hiccups

    • When beans are soggy, pop them back in the air fryer for 2 minutes at 200°C.
    • If they’re burnt on tips, reduce heat to 180°C and cook 2 more minutes.
    • Splash a little vinegar if they taste flat or dull.
    • Patch over under-seasoned beans with a dash of flavored salt.
    • Shield from overcooking by checking early—don’t rely solely on time.

    Prepping and storing green beans for quick cooking

    • Trim and wash the beans ahead of time; store in a sealed container in the fridge for up to 24 hours.
    • Refrigerate leftovers in an airtight container for up to 2 days. Reheat in the air fryer at 180°C (350°F) for 3-4 minutes.
    • The beans might lose some crispness after cooling but can be revived with a quick re-roast.
    • Adding seasonings after reheating helps preserve their fresh flavor.

    10 Practical Q&As About Air Fryer Roasted Green Beans

    1. Can I use frozen green beans?

    Use fresh green beans, trimmed, for the best crunch and flavor. Frozen can work but may be a bit limp.

    2. How much oil do I need?

    Toss beans with a little oil—about 1 teaspoon per cup—so they crisp up and don’t stick.

    3. What’s the ideal cooking temperature?

    Cook at 200°C (400°F) for about 8-10 minutes, shaking halfway to promote even roasting.

    4. How do I know when they’re done?

    Watch for a vibrant green color with slightly browned edges—this means they’re perfectly roasted.

    5. Can I make these ahead?

    Serve immediately for maximum crispness. They can be refrigerated for a day but taste best fresh.

    6. Should I season before or after cooking?

    Adjust salt and seasonings after roasting; they might lose some punch if seasoned beforehand.

    7. What tools are best for tossing?

    Use a silicone spatula or tongs to toss, avoiding the delicate tips from breaking.

    8. Can I add toppings after cooking?

    Add a squeeze of lemon or a sprinkle of Parmesan right after roasting for extra flavor.

    9. How much green beans can I cook at once?

    Don’t overcrowd the air fryer basket; give space for hot air to circulate.

    10. What should I smell to tell it’s ready?

    Check for doneness by texture—crisp on the edges, tender inside, with a smoky aroma.

    This recipe feels like a small victory—simple, fast, and satisfying. It’s perfect right now, when quick and healthy sides are the main event in my kitchen.

    Plus, it’s endlessly adaptable. Toss in some garlic powder, chili flakes, or a sprinkle of cheese after roasting. Whatever makes your taste buds do a happy dance, this method makes it easy.

  • Peanut Butter Cups Recipe

    Making peanut butter cups at home isn’t just about sweetness, it’s about controlling that perfect balance of texture and flavor. I’ve always loved how the smooth, salty peanut butter contrast with the glossy, bittersweet chocolate. It’s a small, satisfying act—turning simple ingredients into something that feels indulgent, yet familiar.

    This recipe is a bit of a therapy session, honestly. I’ve battled with melting chocolate on humid days, and I’ve learned to embrace the little frustrations—that’s where the real cooking happens. It’s about patience, a gentle hand, and tasting your way through the process. No fancy equipment needed, just some good ingredients and a bit of time.

    A cook’s notes perspective on mastering the art of homemade peanut butter cups, emphasizing the tactile and sensory experience.

    Why I keep coming back to this recipe

    • I love how melting chocolate fills the house with a warm, sweet aroma.
    • There’s a chaos in the kitchen when I’m rushing to fill the molds, but also a quiet satisfaction.
    • I’ve had a few failures—like chocolate seizing or peanut butter sliding out—but those teach patience.
    • Sharing these with friends feels like passing on a secret, a little joy in each bite.

    A personal story behind the peanut butter cups.

    • This recipe started as a way to use up leftover chocolate and peanut butter after a baking binge.
    • Over time, I realized the joy wasn’t just in eating them, but in the process—melting, mixing, filling, cooling.
    • It’s a reminder that simple ingredients, treated with care, can create something special.

    A little history and fun facts about peanut butter cups.

    • The first commercial peanut butter cups were introduced by Reese’s in 1928, blending peanut butter and chocolate into a portable treat.
    • Originally, these candies were a way to make use of leftover chocolate and peanut butter in confectionery factories.
    • Peanut butter cups have become a symbol of nostalgic American candy culture, especially around Halloween.
    • Making them at home allows you to customize sweetness and add a pinch of sea salt or a drizzle of caramel.

    Ingredient insights—what makes each component special.

    • Chocolate: I prefer a good quality semi-sweet chocolate—smooth, with a rich aroma. If you only have milk chocolate, it’s sweeter but less intense.
    • Peanut Butter: Creamy and salty, it must be smooth for easy spreading. Natural peanut butter adds depth, but store-bought is less oily and more consistent.
    • Honey or powdered sugar: I add a touch to the peanut butter for sweetness and easier spreading. Feel free to skip if you like it less sweet.
    • Cocoa butter or coconut oil: I use a little to help the chocolate melt smoothly and set shiny. Swap with a neutral oil if needed.
    • Salt: Just a pinch enhances all the flavors, especially if you’re using natural peanut butter.

    Spotlight on key ingredients

    Peanut Butter:

    • Chocolate: It’s the backbone—melts into a glossy pool, with a deep, roasted aroma that’s irresistible.
    • Chocolate’s tempering is key—aim for a smooth, shiny coat that snaps when broken.
    • Use good quality chocolate for complex flavor and better texture.

    Honey or powdered sugar:

    • Peanut Butter: It’s the core—creamy, salty, with a rich, roasted peanut scent that’s comforting.
    • Natural oils can cause it to slide if warm, so keep it cool and stir well.
    • Adding a touch of sugar or honey can balance the saltiness and make it more spreadable.

    Substitution options for different diets and preferences.

    • Dairy-Free: Swap regular chocolate with dairy-free dark or vegan options for rich flavor.
    • Nut-Free: Use sunflower seed butter instead of peanut butter, but expect a slightly different flavor.
    • Sweetener: Substitute honey with maple syrup or agave—adjust the quantity for sweetness.
    • Oil: Use coconut oil or vegetable oil if you want a softer, more melt-in-your-mouth texture.
    • Add-ins: Mix in chopped nuts or dried fruit for extra texture and flavor.

    Equipment & Tools

    • Muffin tin or silicone molds: Shape and hold the cups
    • Double boiler or microwave: Gently melt chocolate
    • Spatula or small spoon: Spread and fill
    • Piping bag (optional): Neatly fill the cups
    • Cooling rack: Even cooling and setting

    Step-by-step guide to perfect homemade peanut butter cups.

    1. Line a muffin tin with paper liners or silicone molds.
    2. Melt the chocolate: use a double boiler or microwave in short bursts, stirring often. Aim for a smooth, shiny consistency.
    3. Spoon a layer of melted chocolate into each liner, about 1 teaspoon, and gently tap to level. Chill for 10 minutes.
    4. Mix the peanut butter with a little honey or powdered sugar until smooth and spreadable.
    5. Remove the tin from fridge. Spoon or pipe a dollop of peanut butter mixture on top of the chocolate layer.
    6. Cover the peanut butter with another layer of melted chocolate, ensuring the filling is completely sealed.
    7. Tap the tray gently on the counter to remove air bubbles and smooth the top.
    8. Chill the cups in the fridge for at least 1 hour, or until the chocolate is firm and snaps.
    9. Once set, remove from fridge. Let sit at room temperature for 5 minutes before serving, for optimal texture.

    Allow the cups to rest in the fridge until fully set. Before serving, let them sit at room temperature for 5 minutes to soften slightly, enhancing the flavor and texture.

    How to Know It’s Done

    • Chocolate is glossy and smooth after melting.
    • Chocolate layer is firm and snaps when gently broken.
    • Peanut butter filling is well coated and sealed with chocolate.

    Homemade Peanut Butter Cups

    These homemade peanut butter cups are a delightful treat combining smooth, salty peanut butter with glossy, bittersweet chocolate. The recipe involves melting chocolate, mixing and spreading peanut butter filling, and chilling until firm, resulting in a rich, satisfying bite with a shiny, crisp exterior and creamy interior.
    Prep Time 20 minutes
    Cook Time 10 minutes
    Total Time 30 minutes
    Servings: 12
    Course: Main Course
    Cuisine: American
    Calories: 150

    Ingredients
      

    • 200 g semi-sweet chocolate good quality, chopped
    • 1/2 cup peanut butter creamy and salty
    • 1 tbsp honey optional, for sweetness
    • 1 tsp cocoa butter or coconut oil helps with melting and shine
    • a pinch sea salt enhances flavor

    Equipment

    • Muffin tin or silicone molds
    • Double boiler or microwave
    • Spatula or small spoon
    • Cooling rack

    Method
     

    1. Line your muffin tin or silicone molds with paper liners or silicone cups to prepare for filling.
    2. Gently melt the chocolate using a double boiler or microwave in short bursts, stirring until smooth and shiny—your kitchen will fill with a rich, chocolate aroma.
    3. Spoon about a teaspoon of melted chocolate into each mold, gently tapping or swirling to create an even, glossy layer—set a timer for 10 minutes to let the chocolate firm up slightly.
    4. Meanwhile, stir the peanut butter with honey and a pinch of sea salt until smooth and slightly spreadable—this creates a rich, sweet, salty filling.
    5. Once the chocolate layer has set, spoon or pipe a small dollop of the peanut butter mixture onto each chocolate base, pressing down gently for a smooth layer—this step builds the creamy interior.
    6. Cover the peanut butter with another layer of melted chocolate, ensuring the filling is completely sealed—use the back of a spoon to smooth out the top if needed.
    7. Gently tap the filled molds on the counter to release any air bubbles and create a smooth, even surface—then place them in the fridge to chill for at least an hour until the chocolate is firm and snaps when broken.
    8. Once set, remove the cups from the fridge and let sit at room temperature for 5 minutes to soften slightly—this enhances the flavor and makes them easier to enjoy.

    Tips and tricks for a smooth, shiny finish.

    • Use a rubber spatula for gentle folding and spreading.
    • Keep chocolate below 50°C (122°F) to prevent seizing or blooming.
    • Chill in short bursts to avoid condensation that can cause sticking.
    • Add a pinch of salt to chocolate to enhance flavor.
    • For ultra-smooth chocolate, strain melted chocolate through a fine sieve before pouring.

    Common pitfalls and how to fix them.

    • FORGOT TO CHILL BEFORE FILLING? Freeze the chocolate layer for 5 minutes to firm up.
    • DUMPED TOO MUCH PEANUT BUTTER? Use a small spatula to lift excess and smooth the surface.
    • OVER-TORCHED CHOCOLATE? Add a teaspoon of vegetable oil and stir until smooth.
    • SEIZED CHOCOLATE? Add a teaspoon of hot milk or cream, stir gently, and heat briefly.

    Fast fixes for common issues.

    • If the chocolate is thick and grainy, add a splash of hot milk and stir until smooth.
    • When the peanut butter is too thick, warm it slightly to make spreading easier.
    • Splash a little hot water on the chocolate if it’s not melting smoothly.
    • Patch cracks in the chocolate with a tiny brush of melted chocolate.
    • Shield delicate fillings from over-heating by using a double boiler method.

    Make-ahead and storage tips for perfect peanut butter cups.

    • Prep the cups: melt and fill the molds up to 24 hours ahead. Keep refrigerated.
    • Store in an airtight container in the fridge for up to a week, or freeze for longer.
    • Chocolate may develop a white bloom over time; it’s harmless but can be repelled by proper storage.
    • Reheat in the fridge or at room temperature for best texture, 5–10 minutes, until slightly soft.

    10 Practical Q&As About Making Peanut Butter Cups at Home

    1. What kind of chocolate should I use?

    Use a good quality semi-sweet or bittersweet chocolate for a balanced flavor. The chocolate should melt smoothly and be shiny when cooled.

    2. Can I use chunky peanut butter?

    Creamy peanut butter works best. Natural peanut butter with some oil separation is fine, just stir it well before using.

    3. How do I melt the chocolate properly?

    Melt the chocolate gently over a double boiler or in short bursts in the microwave, stirring often to avoid burning.

    4. How long do I need to chill the peanut butter cups?

    Chill the cups in the fridge for at least an hour, or until the chocolate is firm and snaps when broken.

    5. Can I just use a baking sheet without liners?

    Use cupcake liners for easy removal and cleaner-looking cups. Silicone liners are especially handy.

    6. Should I add anything to the peanut butter?

    Stir the peanut butter with a bit of honey or powdered sugar if you want a sweeter, more spreadable filling.

    7. What if my chocolate seizes?

    Avoid over-heating the chocolate or it will seize and become grainy. Keep temperatures below 50°C (122°F).

    8. How do I get a smooth peanut butter filling?

    For a smoother filling, warm the peanut butter slightly before mixing, but not so hot it melts the chocolate.

    9. How can I fill the cups neatly?

    Use a small spoon or piping bag to neatly fill the cups, avoiding messy overflows.

    10. How long do homemade peanut butter cups last?

    Store the peanut butter cups in an airtight container in the fridge for up to a week.

    Once chilled, these peanut butter cups are as good as store-bought, but with a home-made touch. They’re perfect for a quick treat or an impromptu gift, wrapped up in parchment. I like how they feel familiar, yet a little more personal, when you make them yourself.

    And honestly, the best part? The smell of melting chocolate and roasted peanuts filling your kitchen. It’s a reminder that sometimes, simple pleasures are the best—no fuss, just good ingredients, and a bit of patience. That’s what makes these cups more than just candy; they’re a little moment of joy.

  • Black Bean Salad Recipe

    Black bean salad often feels like a summer picnic staple, but I’ve found it’s just as good in the middle of winter, especially when I want something fresh and hearty. It’s a no-fuss dish, but I love how it can be dressed up or down, depending on what I have in the fridge.

    The secret for me is in the dressing—bright, tangy, with a hint of spice—making each bite pop with flavor. I like to think of it as a salad that’s more than the sum of its parts, a little celebration of beans, herbs, and citrus.

    Celebrating the humble black bean in a way that highlights its versatility and rustic charm, turning a simple salad into a vibrant, satisfying dish.

    Why this salad matters to me

    • I love how this salad brightens up any meal, especially on gloomy days.
    • Making it reminds me of summer cookouts with friends, laughter, and good food.
    • I feel proud when I toss this together—it’s honest, simple, and satisfying.

    A little story behind the bowl

    • I first started making this salad when I wanted something quick, healthy, and flavorful after long workdays.
    • The vibrant colors and fresh herbs make it feel like a celebration on a plate.
    • It’s become a go-to for picnics, packed lunches, and even last-minute dinners.

    A brief history of black beans and their place in cuisine

    • Black beans, also called turtle beans, have been cultivated in the Americas for thousands of years.
    • The salad’s fresh, zesty vibe is inspired by Latin American cuisine, where beans are a staple.
    • Canned beans became popular in the 20th century, making dishes like this quick and accessible.

    Ingredient insights and tweaks

    • Black beans: I love their creamy texture and earthy flavor, but rinsing removes excess salt—try kidney beans if you prefer a firmer bite.
    • Red onion: Adds sharpness and crunch; soak briefly if raw onion is too pungent.
    • Lime juice: Brightens everything with a citrus punch; lemon can replace it but with a slightly different zest.
    • Fresh herbs: Cilantro is classic, but parsley or mint can add new twists.
    • Olive oil: Brings richness; avocado oil can be a mild, nutty swap.

    Spotlight on key ingredients

    Black beans:

    • They should be plump and shiny; overcooking makes them mushy, so cook just until tender.
    • A good rinse washes away excess salt and bean water, keeping the salad fresh.

    Lime juice:

    • Freshly squeezed is bright and zesty, with a fragrant, citrus aroma.
    • It should shimmer in the dressing, not dominate or fade into the background.

    Substitutions for different tastes and diets

    • Dairy-Free: Swap olive oil for avocado or walnut oil for a rich, nutty flavor.
    • Herb-Free: Add a splash of vinegar or hot sauce if herbs aren’t your thing.
    • Spice It Up: Include chopped jalapeños or a dash of cayenne for heat.
    • Make It Vegan: Skip any cheese or dairy-based dressings.
    • Make It Heartier: Toss in corn, diced sweet potatoes, or roasted peppers.

    Equipment & Tools

    • Can opener: Open the canned beans.
    • Chef’s knife: Chop herbs and vegetables.
    • Large mixing bowl: Combine all ingredients.
    • Whisk or fork: Mix the dressing.
    • Measuring spoons and cups: Ensure accurate seasoning and liquids.

    Step-by-step for a vibrant black bean salad

    1. Drain and rinse the black beans thoroughly under cold water.
    2. Chop the red onion, cilantro, and any other fresh herbs you like.
    3. In a large bowl, whisk together lime juice, olive oil, salt, pepper, and a pinch of cumin.
    4. Add the beans, chopped vegetables, and herbs to the dressing.
    5. Gently toss everything together until well coated.
    6. Taste and adjust seasoning—more lime or salt if needed.

    Serve immediately or chill for an hour to let flavors meld. Garnish with extra herbs before serving.

    How to Know It’s Done

    • Beans should be cool and firm, not mushy.
    • Herbs should be bright green and fragrant.
    • Dressing should be tangy and well mixed, not oily or separated.

    Black Bean Salad

    This vibrant black bean salad combines tender, rinsed beans with fresh herbs, crisp vegetables, and a tangy, spicy citrus dressing. The dish has a bright, hearty texture with a colorful, appetizing appearance, perfect for any season. It’s a quick, no-fuss recipe that can be dressed up or down for a satisfying meal or side.
    Prep Time 10 minutes
    Total Time 10 minutes
    Servings: 4
    Course: Main Course
    Cuisine: Latin American
    Calories: 180

    Ingredients
      

    • 1 can 15 oz black beans rinsed and drained
    • 1/2 red onion red onion finely chopped
    • 1/4 cup chopped fresh cilantro roughly chopped
    • 2 limes lime juice freshly squeezed
    • 2 tablespoons olive oil
    • 1/2 teaspoon salt
    • 1/4 teaspoon black pepper
    • 1/4 teaspoon cumin ground cumin

    Equipment

    • Can opener
    • Chef’s knife
    • Large mixing bowl
    • Whisk or fork
    • Measuring spoons and cups

    Method
     

    1. Use a can opener to open the black beans, then rinse them thoroughly under cold water to remove excess salt and bean water. Drain well and transfer to a large mixing bowl.
    2. Finely chop the red onion until it’s almost like a fine dice, then add it to the bowl with the beans. This adds crunch and sharpness to the salad.
    3. Roughly chop the fresh cilantro and sprinkle it over the beans and onion, bringing bright herbal notes to the mix.
    4. In a small bowl, squeeze the juice of two fresh limes until you have about 1/4 cup of bright, fragrant citrus. Add this to a whisk or fork along with the olive oil, salt, pepper, and cumin, then whisk everything together until well combined and slightly frothy.
    5. Pour the dressing over the bean mixture, then gently toss everything together using a large spoon or spatula, ensuring the beans, herbs, and vegetables are evenly coated with the tangy dressing.
    6. Taste the salad and adjust the seasoning if needed—add a little more lime juice for extra brightness or a pinch more salt for flavor balance. Serve immediately or let it chill in the fridge for about 30 minutes to deepen the flavors.

    Notes

    For added spice, include chopped jalapeños or a dash of hot sauce. This salad can be made ahead and stored in the fridge for up to 2 days. Stir again before serving to refresh the flavors.

    Tips and tricks for perfect salad

    • Use fresh lime juice for a sharper, brighter flavor.
    • Chop herbs finely for even distribution and better flavor release.
    • Adjust acidity and salt after tasting—balance is key.
    • For extra smoky depth, add a pinch of smoked paprika.
    • Toss gently to keep the beans whole and intact.

    Common pitfalls and how to fix them

    • FORGOT TO RINSE THE BEANS? Rinse again to remove excess salt and bean water.
    • DUMPED TOO MUCH DRESSING? Add more beans or vegetables to balance.
    • OVER-TORCHED THE ONION? Soak it in cold water for 10 minutes to mellow.
    • MISSED THE HERB GARNISH? Sprinkle fresh herbs just before serving for brightness.

    Rescue and pantry hacks

    • When too salty, add a squeeze of lemon and a teaspoon of honey.
    • If beans are mushy, mash lightly and serve as a dip.
    • Splash a little vinegar if the salad lacks zing.
    • Patch blandness with a dash more lime juice or hot sauce.
    • Shield delicate herbs from bruising by adding last.

    Make-ahead tips and storage hacks

    • Prepare and assemble the salad up to 24 hours in advance, keeping the dressing separate.
    • Store in an airtight container in the fridge; flavors deepen after a few hours.
    • The salad keeps well for 2 days, but herbs may wilt—add fresh ones before serving.
    • Reheat is unnecessary; serve chilled or at room temp, tasting for seasoning adjustments.

    10 Practical Q&As About Black Bean Salad

    1. Can I use dried beans instead of canned?

    Use canned black beans for convenience, but rinse them well to remove excess salt and bean water.

    2. Can I make this ahead with dried beans?

    Yes, soak and cook dried beans until tender, about 1-1.5 hours, then drain and cool before mixing.

    3. What’s the best dressing for this salad?

    Fresh lime juice brightens the salad, while olive oil adds richness. Adjust acidity to taste.

    4. Can I customize the herbs and spice?

    Add chopped cilantro or parsley for freshness. For a spicy kick, include finely chopped jalapeños.

    5. How long does this salad stay fresh?

    The salad is best served within 2 days. Store in an airtight container in the fridge.

    6. What dishes go well with this salad?

    Yes, it pairs well with grilled meats, tacos, or as a hearty vegetarian main.

    7. How do I prevent the salad from becoming watery?

    Ensure beans are fully cooled before mixing to prevent wilting herbs or making the salad watery.

    8. Any tips for chopping ingredients efficiently?

    Use a sharp knife for chopping vegetables; it helps keep everything fresh and clean.

    9. How do I balance flavors in the salad?

    Adjust salt and acidity after mixing, tasting as you go to get the flavor just right.

    10. Should I serve this cold or at room temperature?

    Serve chilled or at room temperature, depending on your preference and the weather.

    This salad is one of those things that feels like a little victory every time I make it. It’s simple, honest, and just really satisfying when I want something quick but full of flavor.

    Plus, it’s endlessly adaptable—swap in different herbs or add some crumbled cheese, and it’s like reinventing the wheel. It’s not fancy, but it’s real, and sometimes that’s exactly what I need.

  • Peanut Butter & Jelly Smoothie Bowl Recipe

    Sometimes, breakfast feels like a fleeting moment of childhood joy, especially when you turn a simple combo into a bowl of dreams. This peanut butter & jelly smoothie bowl is my way of merging that nostalgic sizzle with a fresh, healthful twist.

    It’s not just about the taste, but the texture—thick, creamy, with a sparkle of berry tartness. I love how it’s quick enough for mornings that demand instant comfort and bright enough to start any day on a sweet, satisfying note.

    The Unexpected Nostalgia of a Childhood Classic Transformed into a Modern Breakfast

    Why I keep coming back to this simple pleasure

    • I love how this bowl makes me feel like a kid again.
    • It’s my go-to when I crave comfort without the heaviness.
    • Pouring toppings feels like decorating a little edible canvas.
    • I often add a splash more peanut butter for that extra rich, nutty kick.

    The quiet inspiration behind my favorite breakfast

    • I first made this on a chilly morning after a sleepless night, craving something familiar yet fresh.
    • The instant I blended the berries and peanut butter, the aroma took me right back to childhood snacks. It’s a comfort that’s easy to whip up on busy days.
    • This recipe is a reminder that sometimes, the simplest ingredients—banana, berries, peanut butter—are enough to create a moment of joy.

    A quick look at the history and fun facts behind the flavors

    • The classic PB&J sandwich dates back to the early 1900s, but turning it into a smoothie bowl is a modern twist.
    • Frozen berries became popular in the 1980s, boosting the shelf life and convenience.
    • Peanut butter was first introduced in the late 19th century, originally marketed as a health food for the infirm.
    • The concept of smoothie bowls surged in popularity around 2010, blending health trends with Instagram aesthetics.

    Breaking down the key ingredients and their quirks

    • Banana: Ripe bananas are key for natural sweetness and creamy texture. Use frozen for an extra chill.
    • Mixed berries: Fresh or frozen, they add tartness and vibrant color. Frozen boosts coldness and consistency.
    • Peanut butter: Creamy or chunky, it adds richness. Use almond butter for a different nutty flavor.
    • Milk: Use dairy or plant-based options; coconut milk makes it extra tropical.
    • Honey: Optional, adds shine and sweetness—skip if you want it less sweet.

    Spotlight on peanut butter and berries

    Peanut Butter:

    • It’s gooey, salty, and rich, adding depth. Watch out for oil separation—stir well.
    • Berries: Juicy and tart, they burst with flavor. Frozen ones give a nice icy crunch.

    Mixed Berries:

    • Berries: Their vibrant color and tartness make the bowl lively. Slightly thaw if frozen for easier blending.
    • They can be substituted with fresh or frozen, depending on your mood and season.

    Smart swaps to customize your bowl

    • Dairy-Free: Swap cow’s milk for almond, coconut, or oat milk—each adds a different flavor profile.
    • Nut-Free: Use sunflower seed butter instead of peanut butter, for a milder, seed-based richness.
    • Sweetener: Maple syrup or agave can replace honey, for a different sweetness and flavor.
    • Thickening: Add a spoonful of Greek yogurt or silken tofu for extra creaminess.
    • Flavor Boost: A splash of vanilla extract can enhance the overall taste.

    Equipment & Tools

    • blender: to blend all ingredients into a smooth, creamy base
    • spatula: to scoop and smooth the mixture into the bowl
    • serving bowl: to present the finished dish attractively

    Step-by-step guide to a super satisfying smoothie bowl

    1. Gather your equipment: blender, spatula, and a bowl for serving.
    2. In the blender, combine 1 ripe banana, 1/2 cup mixed berries (fresh or frozen), and 2 tbsp peanut butter.
    3. Add 1/4 cup milk (dairy or plant-based). Blend until smooth and thick—about 30 seconds.
    4. Check the texture: it should be spoonable, not runny. Add more frozen fruit if needed.
    5. Pour into a bowl, then top generously with sliced bananas, berries, granola, and a drizzle of honey.
    6. Finish with a sprinkle of chopped nuts or shredded coconut for extra crunch.
    7. Serve immediately, enjoying the cold, creamy texture and the burst of fruity flavor.

    Serve immediately for best texture and flavor. No resting needed.

    How to Know It’s Done

    • Bowl is thick and holds shape when spooned.
    • Toppings are colorful, fresh, and not soggy.
    • Smell: fragrant peanut butter and berries, inviting and sweet.

    Peanut Butter & Jelly Smoothie Bowl

    This smoothie bowl combines the nostalgic flavors of peanut butter and jelly into a thick, creamy treat. Blended bananas, berries, and peanut butter create a luscious base with a tart, fruity punch, topped with fresh fruit and crunchy extras for a visually appealing and satisfying breakfast.
    Prep Time 5 minutes
    Total Time 5 minutes
    Servings: 2
    Course: Main Course
    Cuisine: American
    Calories: 350

    Ingredients
      

    • 1 ripe banana preferably frozen for extra chill
    • 1/2 cup mixed berries fresh or frozen
    • 2 tbsp peanut butter creamy or chunky
    • 1/4 cup milk dairy or plant-based
    • 1 tsp honey optional, for added sweetness
    • to taste toppings sliced bananas, berries, granola, nuts, shredded coconut

    Equipment

    • Blender
    • Spatula
    • serving bowl

    Method
     

    1. Gather your blender, spatula, and a serving bowl to start.
    2. Place the ripe banana and mixed berries into the blender.
    3. Add the peanut butter and pour in the milk.
    4. Blend everything on high for about 30 seconds, until the mixture is thick, smooth, and creamy. You should hear a gentle whirring, and the mixture should be uniform without lumps.
    5. Check the consistency; it should be spoonable and thick. If it’s too runny, add a few more frozen berries and blend again for a few seconds.
    6. Use a spatula to scoop the thick smoothie into your serving bowl, smoothing the top for an even surface.
    7. Decorate the top with sliced bananas, berries, granola, nuts, and shredded coconut for a colorful, inviting look.
    8. Finish by drizzling honey over the toppings if desired, adding a touch of sweetness and shine.
    9. Serve immediately with a spoon, enjoying the cold, creamy texture and burst of fruity flavor in every bite.

    Pro tips for perfecting your smoothie bowl

    • BLEND: Start on low, then increase speed to avoid splatter.
    • TASTE: Roast nuts lightly for added depth before chopping.
    • TEXTURE: Use frozen berries for a more ice-cold, tart punch.
    • VISUAL: Layer toppings for a colorful, Instagram-worthy look.
    • FLAVOR: A pinch of sea salt can intensify the sweetness.

    Common pitfalls and how to dodge them

    • FORGOT to blend enough? Add a splash more milk and blend again.
    • DUMPED too much liquid? Add more frozen fruit or a spoonful of peanut butter.
    • OVER-TORCHED the toppings? Use a lower heat or remove earlier.
    • SLICED fruit soggy? Add toppings just before serving to keep crunch.

    Fast fixes for common smoothie bowl mishaps

    • When too thick, splash in a bit more milk and blend briefly.
    • Splash extra honey if the fruit isn’t sweet enough.
    • Patch bland flavor with a squeeze of fresh lemon or lime.
    • Shield toppings from moisture by adding just before serving.
    • When toppings slide, press them gently into the surface for staying power.

    Prepping and storing for busy mornings

    • The smoothie base can be made a day ahead and stored in the fridge, but expect it to thicken slightly.
    • Toppings are best added fresh; however, sliced fruit can be prepared in advance and kept in airtight containers.
    • Refrigerated smoothie should be stirred before serving to remix separated ingredients.
    • Leftover smoothie can be frozen in ice cube trays for quick, on-the-go portions.

    10 Practical Q&As for the Peanut Butter & Jelly Smoothie Bowl

    1. Can I use frozen bananas?

    Use ripe bananas for natural sweetness and creaminess. They give the bowl a soft, oozy texture that melts in your mouth.

    2. Should I thaw the bananas before blending?

    Yes, frozen bananas make the bowl thicker and colder—perfect for a refreshing start to the day.

    3. What if I don’t have fresh berries?

    No need to thaw; just add a splash of milk to help blend if it gets too thick.

    4. Can I substitute almond butter for peanut butter?

    Frozen berries work just as well, and they boost the cold, tart flavor with their icy crunch.

    5. Is honey necessary?

    Absolutely. Almond butter adds a slightly different nutty flavor but keeps the creaminess.

    6. How do I prevent the smoothie from becoming too runny?

    Not at all. The bananas and berries usually provide enough sweetness, but a drizzle of honey can add a nice touch.

    7. What toppings work best?

    Use less milk or add more frozen fruit to keep it thick and spoonable.

    8. How long can I store leftovers?

    Granola, sliced fruit, a drizzle of honey, or chopped nuts all add texture and flavor.

    9. Can I make this vegan?

    Best enjoyed fresh, but you can keep it covered in the fridge for up to a day—just stir before serving.

    This bowl isn’t just a quick fix; it’s a little reminder that childhood favorites can be reimagined into something nourishing and fun. Plus, it’s a treat that keeps you coming back, layer by layer.

    In the chaos of busy mornings, a spoonful of this can bring a slow, sweet pause. It’s simple, honest, and packed with that familiar, comforting flavor—like a hug in a bowl.