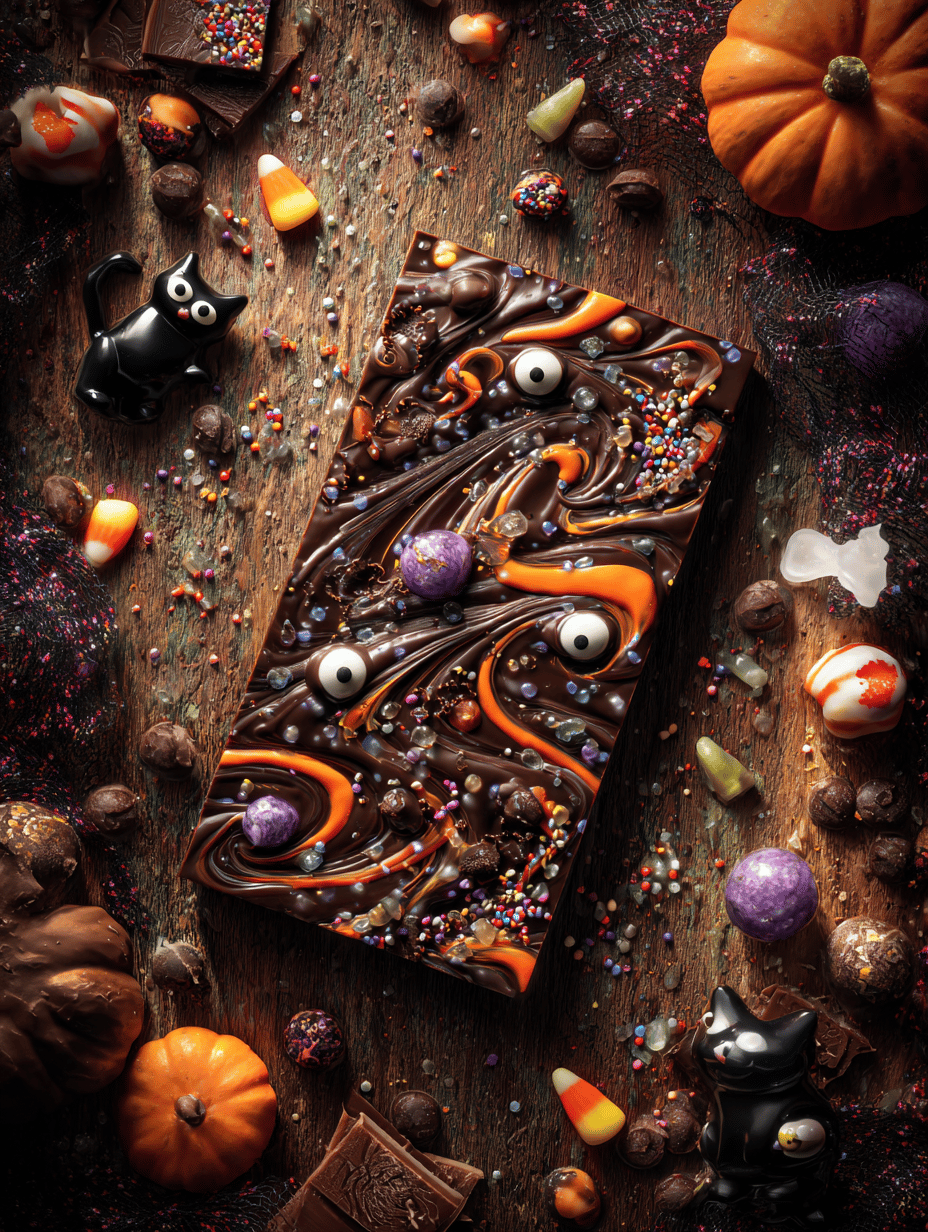
Author: HarperEvans

  • The Secret Ingredient That Turns Oreo Slushies into Winter Wonderland

    The Secret Ingredient That Turns Oreo Slushies into Winter Wonderland

    Ever thought an ordinary snack like an Oreo slushie could take you on a nostalgic trip down memory lane? When the winter wind bites, a chilled treat suddenly feels like a warm hug — if that hug was topped with crushed Oreos. It’s a simple joy that packs a punch of childhood comfort and refreshment in one icy sip.

    This recipe isn’t just about mixing ice and cookies. It’s about creating a chilly escape you can whip up at home, no fancy equipment needed. The magic lies in the balance of creamy and crunchy, with a hint of vanilla whispering through every spoonful.

    Oreo Slushie

    An Oreo slushie is a cold, creamy beverage made by blending crushed Oreo cookies with ice and milk until smooth. The final texture is thick and icy, with crunchy bits of cookie throughout, creating a refreshing treat reminiscent of childhood snacks.
    Prep Time 5 minutes
    Total Time 5 minutes
    Servings: 2
    Course: Main Course
    Cuisine: None
    Calories: 200

    Ingredients
      

    • 8 cookies Oreos roughly crushed
    • 1 1/2 cups milk cold
    • 2 cups ice

    Equipment

    • Blender
    • Measuring cup

    Method
     

    1. Place the Oreos in a blender and pulse a few times to roughly crush them into smaller pieces.
      8 cookies Oreos
    2. Add the cold milk to the blender with the crushed Oreos.
      8 cookies Oreos
    3. Add the ice cubes to the blender.
      8 cookies Oreos
    4. Blend on high speed until the mixture is thick, smooth, and slushy, about 30-60 seconds.
    5. Stop the blender and check the consistency; if it’s too thick, add a splash more milk and blend briefly to combine.
    6. Pour the Oreo slushie into glasses, allowing the icy, creamy mixture to settle slightly.
    As the seasons shift, your Oreo slushie offers a little burst of happiness on the coldest days. It’s quick, it’s nostalgic, and it’s endlessly customizable. Sometimes, all you need is a bowl of icy sweetness to remind you of simpler times.

    So next time you crave a treat that’s both indulgent and effortless, reach for this recipe. It’s perfect for cozy nights in or unexpected guests. And honestly, it might just become your go-to cold snack whenever you need a quick escape from the ordinary.

  • Pumpkin Muffins with a Secret Spiced Twist

    Pumpkin Muffins with a Secret Spiced Twist

    As autumn leaves start to carpet the streets, I find myself craving a muffin that captures the season’s cozy charm. But not just any pumpkin muffin—one that hides a dash of unexpected spice at its core. This recipe transforms a simple bake into a sensory adventure, with warm cinnamon and a hint of smoky paprika blending beneath sweet pumpkin aroma.

    What makes these muffins special is their ability to surprise at every bite. The tender crumb, infused with rustic pumpkin and a whisper of ginger, makes my kitchen smell like a festive patch. They’re perfect for carving out a moment of calm amidst the busy fall days, whether for breakfast or a midday pick-me-up.

    Spiced Pumpkin Muffins

    These pumpkin muffins feature a tender crumb infused with warm cinnamon, ginger, and a hint of smoky paprika, creating a cozy autumn flavor. The batter is mixed and then baked until golden with a slightly domed top, resulting in moist, moist-textured muffins with a rustic appearance that hides a flavorful spice blend inside.
    Prep Time 15 minutes
    Cook Time 20 minutes
    Total Time 35 minutes
    Servings: 12
    Course: Main Course
    Cuisine: American
    Calories: 220

    Ingredients
      

    • 1 1/2 cups all-purpose flour
    • 1 cup granulated sugar
    • 1/2 teaspoon baking soda
    • 1/2 teaspoon salt
    • 1 teaspoon ground cinnamon
    • 1/2 teaspoon ground ginger
    • 1/4 teaspoon smoked paprika
    • 1 cup canned pumpkin puree
    • 1/2 cup vegetable oil
    • 2 large eggs

    Equipment

    • Mixing bowls
    • Whisk
    • Muffin tin
    • Paper liners or grease

    Method
     

    1. Preheat your oven to 375°F (190°C) and line a muffin tin with paper liners or lightly grease the cups.
    2. In a large mixing bowl, whisk together the flour, sugar, baking soda, salt, cinnamon, ginger, and smoked paprika until well combined. This creates a flavorful dry base for your muffins.
    3. Add the canned pumpkin, vegetable oil, and eggs to the dry ingredients. Whisk everything together until the batter is smooth and uniform, with no streaks of flour remaining.
    4. Using a spoon or ice cream scoop, evenly divide the batter among the muffin cups, filling each about three-quarters full. The batter will be thick but scoopable.
    5. Place the muffin tin in the oven and bake for about 20 minutes, or until the muffins are golden brown on top and a toothpick inserted into the center comes out clean.
    6. Remove the muffins from the oven and let them cool in the tin for 5 minutes before transferring to a wire rack to cool completely. The aroma of spices will fill your kitchen.

    These pumpkin muffins aren’t just about comfort; they carry a playful twist that makes each bite magical. The combination of spices and soft pumpkin texture creates something truly unique, especially when shared with friends or family during cozy gatherings.

    As we head into colder months, baking these muffins feels like wrapping yourself in a warm blanket. The simple joy of pulling golden muffins from the oven, their spicy scent filling the air, reminds me why baking remains always worth it—especially with a recipe that surprises and delights at once.

  • Stuffed Peppers: A Cozy Autumn Twist on Classic Comfort

    Stuffed Peppers: A Cozy Autumn Twist on Classic Comfort

    As the leaves turn vibrant shades of amber and crimson, I find myself craving dishes that are hearty yet bright. Stuffed peppers evoke a sense of nostalgia, yet I love giving them a seasonal twist with roasted squash, crunchy walnuts, and fragrant herbs. The smell of peppers roasting in the oven fills the house with warmth and promises a satisfying meal.

    These stuffed peppers are more than just a comfort food; they’re a canvas for creativity. Whether you prefer a Mediterranean-inspired filling or a spicy Mexican version, they adapt beautifully to whatever you have in your pantry. Best of all, they’re effortless to prepare, perfect for busy weeknights or leisurely weekend meals.

    Stuffed Roasted Peppers with Squash and Walnuts

    This dish features bell peppers filled with a mixture of roasted squash, crunchy walnuts, and fresh herbs, then baked until tender and slightly browned. The peppers are roasted to develop a smoky flavor, while the filling offers a hearty yet bright bite with varying textures from soft squash to crunchy nuts, wrapped in a colorful, appealing presentation.
    Prep Time 20 minutes
    Cook Time 40 minutes
    Total Time 1 hour
    Servings: 4
    Course: Main Course
    Cuisine: Mediterranean
    Calories: 250

    Ingredients
      

    • 4 large bell peppers preferably red or yellow for color
    • 2 cups squash cubes butternut or acorn squash works well
    • 1/2 cup chopped walnuts to add crunch
    • 2 tablespoons olive oil for roasting and filling
    • 2 cloves garlic minced
    • 1/4 cup chopped fresh herbs parsley, basil, or thyme
    • Salt and pepper to taste
    • Optional grated cheese for topping if desired

    Equipment

    • Baking sheet
    • Mixing bowl
    • Knife
    • Cutting board
    • Spoon
    • Oven

    Method
     

    1. Preheat the oven to 400°F (200°C). Slice the squash into small cubes, then spread them on a baking sheet drizzled with a tablespoon of olive oil. Roast until tender and lightly caramelized, about 20 minutes, stirring halfway through.
    2. While the squash roasts, cut off the tops of the bell peppers and remove the seeds and membranes. Place them on a baking sheet lined with parchment paper, and brush the outside with a little olive oil. Roast the peppers until they are slightly softened and charred in spots, about 15-20 minutes.
    3. Transfer the roasted squash to a mixing bowl. Add the minced garlic, chopped herbs, chopped walnuts, and a drizzle of olive oil. Season generously with salt and pepper, then mix until well combined. The filling should look vibrant and slightly chunky.
    4. Once the peppers are cool enough to handle, carefully stuff each pepper with the warm squash mixture, pressing gently to pack the filling in. If desired, sprinkle grated cheese on top for extra flavor.
    5. Return the stuffed peppers to the oven and bake for an additional 15-20 minutes, until the peppers are tender and the filling is heated through. The tops should be lightly golden if cheese is added.
    6. Remove the peppers from the oven and let them cool slightly. Serve warm, garnished with extra herbs if desired. The peppers should be soft with a flavorful, slightly caramelized filling that offers a satisfying blend of textures.

    Notes

    You can customize the filling with different herbs or add a spicy kick with chili flakes. For a vegan version, skip the cheese and increase the nuts or add some nutritional yeast.

    Whenever I make stuffed peppers, I appreciate how they bring everyone together at the table. The vibrant colors and inviting aromas make dinner feel special, even on ordinary days. Pair them with a crisp salad or a warm loaf of bread, and you have a wholesome, satisfying meal that celebrates the flavors of the season.

    This dish is a reminder that simple ingredients, when treated with love and a touch of spice, create something truly memorable. It’s a versatile classic that fits seamlessly into cozy autumn nights or casual family dinners. So go ahead, fill those peppers with your favorite ingredients and enjoy every flavorful bite.

  • Spooky Sweetness: Halloween Ghost Brownies That Haunt Your Heart

    Spooky Sweetness: Halloween Ghost Brownies That Haunt Your Heart

    Every October, I crave that nostalgic aroma of chocolate mingling with the scent of crispy edges and melting frosting. But this year, I decided to shake things up by making Halloween Ghost Brownies—an eerie yet adorable treat that combines dark, fudgy goodness with playful ghost figures. These bites pack a punch of creativity and flavor, perfect for holiday gatherings or a mischievous movie night.

    What makes this recipe stand out is the unexpected contrast of spooky and sweet. The ghost decorations are simple yet striking, giving your dessert table an instant Halloween upgrade. Plus, the process of creating these little specters is just chaotic enough to be fun, even if you end up covered in cocoa powder.

    Halloween Ghost Brownies

    These brownies are rich, fudgy treats baked until moist and dense, topped with ghost-shaped decorations made from frosting or melted marshmallows. The final appearance features dark, glossy brownie bases adorned with white ghost figures that have playful, melted edges, perfect for Halloween festivities.
    Prep Time 20 minutes
    Cook Time 25 minutes
    Total Time 45 minutes
    Servings: 12
    Course: Main Course
    Cuisine: American
    Calories: 220

    Ingredients
      

    • 1/2 cup unsalted butter melted
    • 1 cup granulated sugar
    • 2 large eggs
    • 1 teaspoon vanilla extract
    • 3/4 cup unsweetened cocoa powder dutch-process preferred
    • 1/2 cup all-purpose flour
    • 1/4 teaspoon baking powder
    • 1/4 teaspoon salt
    • 1 cup white frosting frosting or melted marshmallows for ghost decorations
    • 1 cup chocolate chips or chopped dark chocolate chocolate chips

    Equipment

    • Mixing bowls
    • Whisk
    • Baking pan
    • Parchment paper
    • Cooling rack
    • Piping bag or plastic zip-top bag

    Method
     

    1. Preheat your oven to 350°F (175°C) and line a baking pan with parchment paper for easy removal.
    2. In a large mixing bowl, whisk together the melted butter and sugar until well combined and slightly shiny.
    3. Add the eggs one at a time, whisking thoroughly after each addition to incorporate air and create a smooth, glossy batter.
    4. Stir in the vanilla extract, then sift in the cocoa powder, flour, baking powder, and salt. Fold gently until the mixture is uniform and free of streaks.
    5. Pour the batter into the prepared baking pan, spreading evenly with a spatula to smooth the surface.
    6. Bake in the preheated oven for 20-25 minutes, until a toothpick inserted in the center comes out with moist crumbs and the top is set.
    7. Remove the pan from the oven, let it cool in the pan for 15 minutes, then transfer to a wire rack to cool completely.
    8. Once cooled, cut the brownies into squares or rectangles, creating a flat surface for decorating.
    9. Fill a piping bag or a plastic zip-top bag fitted with a small round tip with white frosting or melted marshmallows.
    10. Squeeze out the frosting onto each brownie as a dollop for the ghost’s body, creating a rounded head and body with slight uneven edges for a spooky effect.
    11. Use a small spoon or the back of a knife to slightly smear or melt the edges of the frosting, giving the ghosts a wispy, haunted appearance.
    12. Optionally, sprinkle a few chocolate chips onto the frosting as eyes or allow some to melt slightly for expressive ghost faces.
    13. Place the decorated brownies on a serving platter and enjoy this fun, spooky treat with a glass of milk or hot cocoa.

    These ghostly brownies are more than just a treat—they’re a story in every bite. The rich chocolate paired with the playful ghost shapes makes them irresistible for kids and adults alike. Plus, they add a touch of whimsy to any Halloween fête or cozy night in.

    Whenever I bake these, I’m reminded that a little chaos in the kitchen can lead to the most charming results. They’re quick to assemble, forgiving of mistakes, and guaranteed to spark smiles. As the air turns crisp and the pumpkins start to glow, these creepy, cute brownies evoke the spirit of the season perfectly.

  • The Surprising Charm of the Sprite Slushie: A Refreshing Twist

    The Surprising Charm of the Sprite Slushie: A Refreshing Twist

    Imagine capturing the fizzy, lemon-lime magic of Sprite and turning it into a cool, icy treat that screams summer’s playful spirit. This Sprite Slushie isn’t just a drink; it’s a mini celebration in a glass that refuses to melt away the chaos of daily life. Its bright, tangy aroma crashes over you with a promise of instant refreshment.

    What makes this recipe stand out is its daring simplicity—just three ingredients, yet the results are endlessly versatile. From spontaneous backyard parties to a quick pick-me-up during a brutal workday, this slushie fits seamlessly into any occasion. Plus, it’s so easy, even the most kitchen-challenged can master it in minutes.

    Sprite Slushie

    The Sprite Slushie is a frozen beverage made by blending lemon-lime soda with ice to create a bright, fizzy, and icy treat. It has a smooth, slushy texture with a cheerful color and tangy aroma, perfect for hot weather or festive gatherings.
    Prep Time 5 minutes
    Total Time 5 minutes
    Servings: 2
    Course: Main Course
    Calories: 150

    Ingredients
      

    • 2 cups lemon-lime soda (e.g., Sprite) chilled
    • 1 cup ice cubes preferably crushed or small pieces

    Equipment

    • Blender
    • Measuring cup

    Method
     

    1. Pour the lemon-lime soda into the blender.
    2. Add the ice cubes to the blender with the soda.
    3. Secure the lid on the blender and blend on high until the mixture becomes smooth and slushy, about 30-45 seconds.
    4. Pause to check the texture; if it’s too thick, add a splash more soda and blend briefly to combine.
    5. Once the mixture is evenly blended and has a vibrant, icy appearance, pour it into glasses.
    6. Serve immediately with a straw or a small spoon, enjoying the fizzy, tangy slush.

    Notes

    For an extra touch, garnish with a lime wedge or colorful straw.
    This Sprite Slushie captures the essence of carefree summer days, no matter the season outside your window. It’s a reminder that sometimes, the simplest ingredients can create the most joyful moments. So next time you crave something utility-fresh and nostalgic, reach for this bubbly cool-down. It’s a small act of refreshment, but oh, does it leave a big smile.

  • Autumn’s Hidden Gem: Rustic Roasted Pumpkin Soup

    Autumn’s Hidden Gem: Rustic Roasted Pumpkin Soup

    As the leaves turn and the air crisps, I find myself craving something that captures the essence of fall. This roasted pumpkin soup isn’t just a warm meal; it’s a sensory journey through autumnal nostalgia and cozy mornings. Each step, from roasting to blending, fills my kitchen with the smells of caramelized pumpkin and whispering cinnamon.

    The beauty of this recipe is in its simplicity and the way it transforms humble ingredients into something memorable. It’s perfect for weekend brunches or a quick weeknight dinner when the season’s bounty feels especially vibrant. Plus, it’s versatile enough to serve with crusty bread or a sprinkle of toasted seeds, making each bowl uniquely yours.

    Roasted Pumpkin Soup

    This roasted pumpkin soup is made by baking chunks of pumpkin until caramelized, then blending them into a smooth, velvety broth infused with warming spices like cinnamon. The final texture is creamy and slightly thick, with a rich orange color and a fragrant aroma. It’s served hot, often garnished with seeds or herbs.
    Prep Time 15 minutes
    Cook Time 45 minutes
    Total Time 1 hour
    Servings: 4
    Course: Main Course
    Cuisine: comfort food
    Calories: 180

    Ingredients
      

    • 1 kg pumpkin peeled and cut into chunks
    • 2 tablespoons olive oil
    • 1 teaspoon cinnamon ground
    • 1 small onion chopped
    • 2 cloves garlic minced
    • 4 cups vegetable broth
    • 1 cup cream optional, for richness
    • to taste salt and pepper
    • a handful pumpkin seeds for garnish

    Equipment

    • Baking sheet
    • Blender

    Method
     

    1. Preheat your oven to 400°F (200°C). Spread the pumpkin chunks evenly on a baking sheet, drizzle with olive oil, and sprinkle with a pinch of salt. Roast until the edges are golden and caramelized, about 25-30 minutes.
    2. In a large pot, sauté the chopped onion and minced garlic in a bit of olive oil over medium heat until they soften and become fragrant, about 5 minutes. The onions should turn translucent and aromatic.
    3. Add the roasted pumpkin to the pot with the sautéed onions and garlic. Pour in the vegetable broth and stir to combine. Bring the mixture to a gentle simmer.
    4. Use an immersion blender to purée the soup directly in the pot until smooth and creamy. Alternatively, transfer the mixture carefully to a blender and purée in batches, then return to the pot.
    5. Stir in the ground cinnamon and adjust seasoning with salt and pepper to taste. If using, add the cream for extra richness and stir until well incorporated.
    6. Reduce the heat and let the soup simmer gently for another 5 minutes, allowing the flavors to meld and the texture to thicken slightly.
    7. Taste the soup and make any final adjustments with salt, pepper, or more cinnamon if desired. Then, ladle the warm soup into bowls.
    8. Garnish each serving with a handful of toasted pumpkin seeds for added crunch and flavor. Serve hot with crusty bread if desired.

    Notes

    For a vegan version, omit the cream or replace with coconut milk. Toast pumpkin seeds beforehand for extra flavor.

    With just a handful of ingredients and a little patience, this roasted pumpkin soup becomes a snapshot of fall’s quiet beauty. It’s a dish that invites lingering at the table, savoring the textures and flavors that remind us of shorter days and longer evenings. Sometimes, comfort is found in the slow, fragrant process of roasting a pumpkin and turning it into something warm and satisfying.

    Whether you’re seeking a moment of calm or a way to celebrate the season’s harvest, this soup fits right in. It fosters a sense of tradition while respecting the fleeting beauty of autumn. A bowl of this will always mark the changing seasons with gratitude and gentle warmth.

  • Beware the Sweet Spell: Halloween Poison Toffee Apples

    Beware the Sweet Spell: Halloween Poison Toffee Apples

    Every October, I get enchanted by the eerie glow of Halloween decorations, but this year I wanted to try something darker—so I concocted a recipe that’s as visually striking as it is mischievous: Poison Toffee Apples. These aren’t your usual candied treats; they come with a wicked twist that surprises your taste buds while playing with classic fall nostalgia.

    The secret? An unsettling black toffee coating that shimmers like a mysterious potion. The smell alone—rich caramel mingled with a whisper of charcoal—draws everyone in. I love how playful yet sinister they look, perfect for a devilish gathering or a spooky midnight snack.

    WHY I LOVE THIS RECIPE?

    • Their vibrant, haunting appearance adds a dramatic touch to any Halloween spread.
    • The combination of sweet toffee and sharp apple creates a thrilling flavor punch.
    • It’s an exciting way to turn simple ingredients into creepy edible art.
    • The chaos of dipping and decorating fuels my holiday spirit.
    • The nostalgic scent of roasting apples and toffee triggers childhood memories of fall fairs.

    AVOID MY DISASTER (You’re Welcome)

    • FORGOT to oil the baking sheet—sticky toffee stuck like glue, wash with extra hot water next time.
    • DUMPED too much black food coloring—got a muddy mess, add less or mix thoroughly.
    • OVER-TORCHED the toffee—bitter flavor, burn smell, rescue with butter and quick stirring.
    • SKIPPED the apple prep—dull knives slip, sharpen for neat toffee coating strokes.

    QUICK FIXES THAT SAVE YOUR DAY

    • When toffee is too sticky, SPLASH in a little cold water—smooths right out.
    • Patch uneven coating by reheating briefly and swirling the apples again.
    • SHIELD your work surface with parchment for easy clean-up after messy dips.
    • When dipped apples are drippy, scoop and chill to firm up quickly.
    • When the toffee color is dull, add a tiny pinch of black food dye and stir in the pan—shimmer effect!

    Poison Toffee Apples

    Poison Toffee Apples are whole fresh apples coated in a glossy, black toffee layer that shimmers like a mysterious potion. The toffee coating becomes crisp as it cools, creating a dark, glossy exterior that encases the juicy, crisp apple inside, giving a blend of chewy and crunchy textures with a striking appearance.
    Prep Time 15 minutes
    Cook Time 20 minutes
    Total Time 35 minutes
    Servings: 4
    Course: Main Course
    Cuisine: Halloween
    Calories: 250

    Ingredients
      

    • 4 large fresh apples preferably tart variety like Granny Smith
    • 2 cups granulated sugar for the toffee
    • 1/2 cup light corn syrup helps prevent crystallization
    • 1/2 cup water to dissolve sugar
    • 4 drops black food coloring for the dark coating
    • 1 tablespoon unsalted butter to smooth the toffee

    Equipment

    • Large saucepan
    • Lollipop sticks or skewers
    • Baking sheet
    • Parchment paper
    • Wooden spoon

    Method
     

    1. Wash and thoroughly dry the apples, then insert a lollipop stick or skewer into the stem end of each apple, twisting gently to secure.
    2. Line a baking sheet with parchment paper and set it aside for the dipped apples.
    3. Combine sugar, corn syrup, water, and a few drops of black food coloring in a large saucepan over medium heat. Stir gently until the sugar dissolves completely and the mixture begins to bubble.
    4. Attach a candy thermometer to the pan and cook the mixture without stirring until it reaches 300°F (hard crack stage), about 10-15 minutes. The mixture will turn dark and shimmer, indicating it’s ready.
    5. Once the toffee reaches the desired temperature, remove the pan from heat and stir in one tablespoon of butter to smooth and slightly cool the mixture.
    6. Working quickly to prevent the toffee from hardening, dip each apple into the hot toffee mixture, swirling to coat evenly. Use the back of a spoon to help cover the apple if needed.
    7. Lift the apple out and gently tap to remove excess toffee, then place it on the prepared parchment-lined baking sheet.
    8. Repeat the dipping process with all apples, ensuring each is coated evenly and has a glossy, dark shimmer.
    9. Allow the toffee-coated apples to cool completely at room temperature until the coating is firm and crisp, about 15-20 minutes.
    10. Once cooled and hardened, transfer the apples to a serving platter and enjoy their sinister, glossy appearance.

    Notes

    To achieve the best shine, avoid stirring the toffee once it begins to boil. If the toffee becomes too dark or bitter, add a small amount of butter to mellow the flavor. For neat dipping, keep the toffee warm but not bubbling too aggressively.
    These Poison Toffee Apples are a perfect blend of playful horror and nostalgic comfort. They’re not just a treat but a conversation starter at any Halloween festivity, evoking that thrill of spooky surprises. I love how a simple apple can become a small piece of spooky art that’s as fun to make as it is to eat.

    As the season deepens, I find that these darkly beautiful candies remind us to embrace the chaos and joy of fall. They bring a touch of mischief to the crisp air and flickering candlelight. Sometimes, the best Halloween memories come from little moments of sweet, sinister delight like this.

  • Peach Slushie Magic: A Cool Spin on Summer’s Sweetest Fruit

    Peach Slushie Magic: A Cool Spin on Summer’s Sweetest Fruit

    In the depths of summer, I crave a chill treat that captures the sun’s sweet promise. Instead of reaching for the usual ice cream or store-bought pops, I turn to my freezer and pull out ripe peaches. The aroma of a perfectly ripe peach, with its honeyed scent and tender flesh, transports me instantly to a warm, sunny orchard.

    This recipe isn’t just about cooling down. It’s about rediscovering the simple joy of fresh fruit blended into a smooth, icy delight. The secret lies in balancing the natural sweetness of peaches with a splash of lemon and a hint of honey, creating a flavor that’s refreshingly complex. It’s a small ritual that makes summer feel just a little more special.

    Peach Frozen Treats

    This recipe involves blending ripe peaches with lemon juice and honey to create a smooth, icy dessert. The end result is a vibrant, refreshing frozen treat with a bright color and silky texture, perfect for a hot summer day.
    Prep Time 10 minutes
    Total Time 10 minutes
    Servings: 4
    Course: Main Course
    Cuisine: Summer
    Calories: 100

    Ingredients
      

    • 4 cups ripe peaches, pitted and sliced preferably frozen for easier blending
    • 2 tablespoons honey adjust to taste
    • 1 tablespoon lemon juice fresh preferred

    Equipment

    • Blender
    • Measuring cups and spoons

    Method
     

    1. Add the sliced peaches, honey, and lemon juice into a blender. Start blending on low speed, then gradually increase to high, until the mixture is smooth and creamy, with no chunks remaining.
    2. Stop the blender and check the texture; it should be thick and slushy. If the mixture is too firm, add a splash of water or extra lemon juice and blend briefly to loosen it.
    3. Pour the blended mixture into a shallow container or freezer-safe dish. Smooth the surface with a spatula to ensure even freezing.
    4. Place the container in the freezer and let it chill for at least 4 hours or until fully frozen. Stir the mixture every 30 minutes during the first 2 hours to prevent large ice crystals from forming.
    5. Once frozen, remove the mixture from the freezer and let it sit at room temperature for a few minutes to soften slightly. Then, scoop into bowls or cups.
    6. Serve immediately and enjoy this icy, fruit-forward treat, with a vibrant color and smooth, scoopable texture.

    As the days grow hotter, this peach slushie becomes my go-to refuge from the heat. It’s quick to whip up, requiring just a handful of ingredients, yet it feels indulgent and festive each time. Perfect for backyard barbecues or a solo break on the porch, it instantly cools and uplifts.

    Even better, this recipe is flexible — swap in other seasonal fruits or tweak the sweetness to match your mood. It’s a reminder that sometimes, the simplest ingredients create the most satisfying moments. Whether you enjoy it bright and tangy or mellow and sweet, this slushie will become your summer staple.

  • Blueberry Bliss: The Surprising Virtues of a Frozen Treat

    Blueberry Bliss: The Surprising Virtues of a Frozen Treat

    When summer hits and the heat becomes relentless, I crave that one cool, invigorating snack that screams freshness. But instead of reaching for the usual store-bought options, I love mixing up a blueberry slushie that captures the essence of a summer morning. It’s a blend of tart blueberries and just enough sweetness, frozen into a slushy symphony of flavor.

    This recipe isn’t just a drink; it’s a nostalgic trip to childhood, but with a sophisticated twist. The vivid purple hue and cool texture turn an ordinary berry into a refreshing escape on the hottest days. Plus, it’s ridiculously quick to make, perfect for a spontaneous treat.

    Blueberry Slushie

    This blueberry slushie is a frozen beverage made by blending fresh or frozen blueberries with a touch of sweetener and ice, resulting in a vibrant purple, icy texture. It offers a refreshing, cool experience with a balance of tartness and sweetness, perfect for hot days. The final product is a visually appealing, slushy drink with a smooth, icy consistency.
    Prep Time 5 minutes
    Total Time 5 minutes
    Servings: 2
    Course: Main Course
    Cuisine: American
    Calories: 80

    Ingredients
      

    • 2 cups fresh or frozen blueberries if using fresh, freeze for at least 2 hours
    • 1 tablespoon honey or sugar adjust to taste
    • 1 cup ice cubes
    • 1/2 cup water or fruit juice for blending smoother, optional

    Equipment

    • Blender
    • Measuring cups and spoons

    Method
     

    1. Add the blueberries and honey to the blender.
    2. Pour in the water or fruit juice to help the blending process.
    3. Secure the lid and pulse a few times to start breaking down the berries.
    4. Switch to high speed and blend until the mixture is smooth and the blueberries are fully puréed.
    5. Add the ice cubes to the blender and pulse a few times to start chilling and breaking them down.
    6. Blend on high until the slushie reaches a thick, icy, and smooth consistency, about 30-40 seconds.
    7. Pour the blueberry slushie into glasses and serve immediately to enjoy its refreshing texture.

    Notes

    For an extra tart flavor, add a squeeze of lemon juice. You can also substitute honey with agave syrup or maple syrup for variation.

    Blueberry slushies are perfect for last-minute gatherings or a solo moment of refreshment. They effortlessly combine health benefits with indulgence, thanks to those antioxidants and natural sugars.

    Experimenting with different berries or adding a splash of lemon can elevate this simple treat even more. So next time the sun blazes down, grab those blueberries and blend away for a garden-fresh chill that’s hard to beat.

  • Whimsical Winter: The Hidden Charm of Roasted Butternut Squash & Carrot Soup

    Whimsical Winter: The Hidden Charm of Roasted Butternut Squash & Carrot Soup

    As the days grow shorter and the air feels crisp, there’s a peculiar joy in embracing the earthy, sweet aroma of roasted vegetables. Butternut squash and carrots, when roasted to perfection, release a comforting sweetness that fills the kitchen with a seasonal whisper. This soup isn’t just food; it’s a nostalgic nod to cozy afternoons and hearty harvests we often overlook.

    What makes this recipe irresistible is not just the flavor but the process — the caramelization creating a depth of taste that simmering alone cannot achieve. It’s a symphony of textures and flavors, where the velvety smoothness of the pureed squash meets the gentle sweetness of roasted carrots. Perfect for slowing down and savoring the quiet magic of fall’s bounty.

    Roasted Butternut Squash and Carrot Soup

    This soup features roasted butternut squash and carrots, which develop a sweet, caramelized flavor during cooking. The vegetables are blended into a smooth, velvety texture with a warm, seasonal aroma that captures the essence of fall harvests.
    Prep Time 15 minutes
    Cook Time 45 minutes
    Total Time 1 hour
    Servings: 4
    Course: Main Course
    Cuisine: comfort food
    Calories: 180

    Ingredients
      

    • 1 pound butternut squash peeled, seeded, and cut into chunks
    • 3 large carrots peeled and cut into chunks
    • 2 tablespoons olive oil for roasting vegetables
    • 1 small onion diced
    • 2 cloves garlic minced
    • 4 cups vegetable broth
    • 1/2 teaspoon ground nutmeg optional
    • to taste salt and pepper
    • 2 tablespoons cream or coconut milk for garnish, optional

    Equipment

    • Baking sheet
    • Large pot or Dutch oven
    • Blender or immersion blender
    • Sharp Knife
    • Peeler

    Method
     

    1. Preheat your oven to 400°F (200°C). Spread the peeled and chopped butternut squash and carrots on a baking sheet, then drizzle with olive oil and toss to coat evenly. Roast for about 35-40 minutes, until the vegetables are tender and slightly caramelized around the edges, filling the kitchen with a sweet aroma.
    2. While the vegetables roast, sauté the diced onion and minced garlic in a large pot over medium heat with a drizzle of olive oil until the onion becomes translucent and fragrant, about 5 minutes.
    3. Add the roasted vegetables to the pot with the sautéed onion and garlic. Pour in the vegetable broth and bring the mixture to a gentle simmer.
    4. Use an immersion blender directly in the pot or transfer the mixture to a blender to puree until completely smooth and velvety. Return to the pot if needed, and stir in the ground nutmeg, salt, and pepper to taste.
    5. Warm the blended soup for a few minutes over low heat, adjusting the seasoning as desired. If using cream or coconut milk, swirl it in now for added richness.
    6. Serve the soup hot, garnished with a drizzle of cream or coconut milk if desired, and enjoy the cozy, velvety smoothness of this seasonal dish.

    This roasted butternut squash and carrot soup offers a gentle reminder that simple ingredients, when treated with care, create something truly special. It’s a dish that warms you from the inside out, whether shared with loved ones or enjoyed in peaceful solitude. As the seasons change, let this humble soup be your cozy companion in the kitchen.

    In a world of constant noise, there’s a quiet pleasure in the smooth, sweet comfort of this soup. It invites a moment of calm and a chance to appreciate seasonal richness at its best. Truly, it’s a bowl that celebrates autumn’s fleeting beauty and the comforting charm of home cooking.