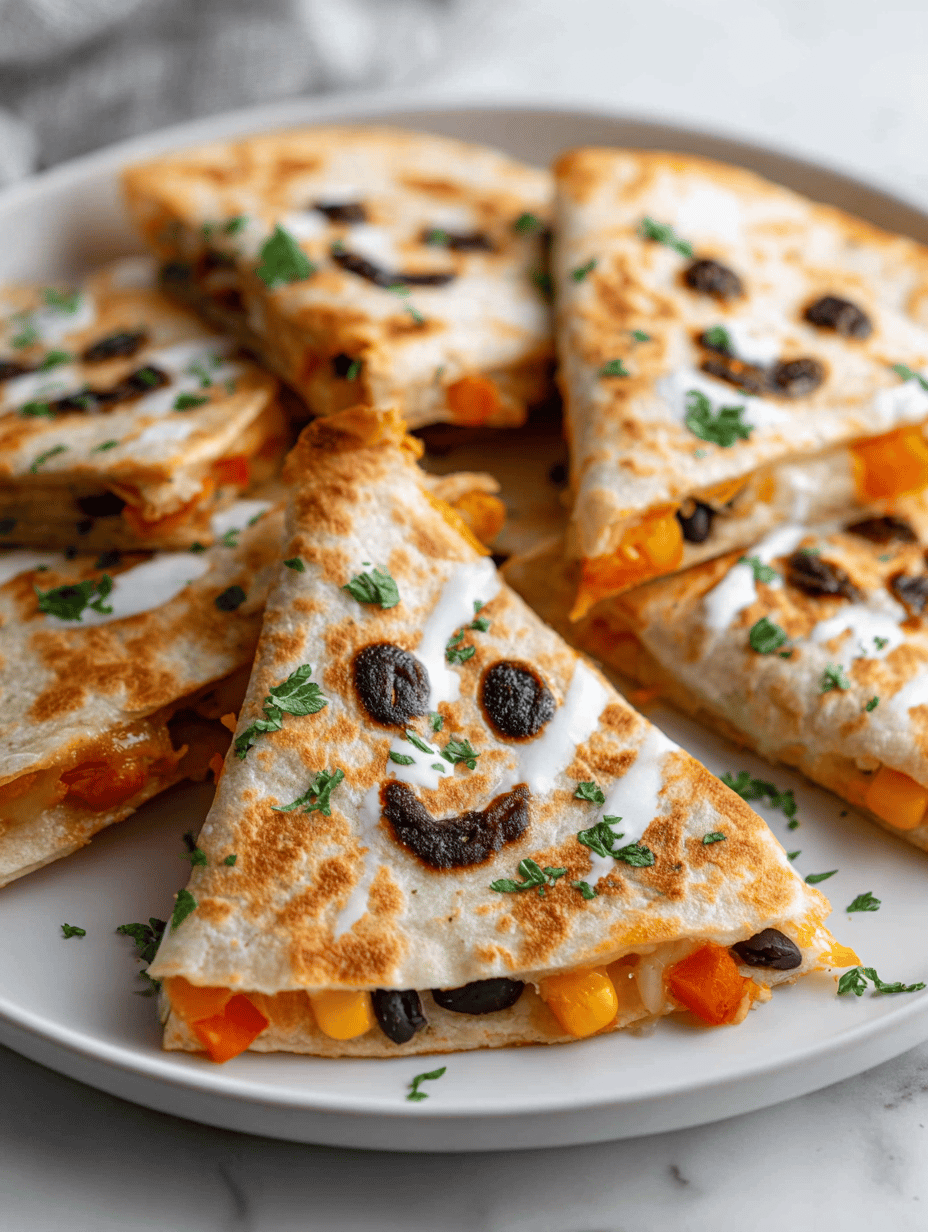
Author: HarperEvans

  • Hauntingly Delicious Halloween Monster Eyeball Cake Pops

    Hauntingly Delicious Halloween Monster Eyeball Cake Pops

    Halloween is the perfect time to embrace playful scares that taste as good as they look. This year, I decided to create a spooky treat that’s as much a conversation starter as it is a sweet bite — Monster Eyeball Cake Pops.

    The secret? A gooey, vibrant center that mimics the unsettling look of eyeballs, complete with eerie red veins and glossy, bloodshot detail. They’re surprisingly easy to make, turning simple cake and frosting into creepy, adorable mini monsters that everyone will want to gobble up.

    Transforming a basic cake pop into a monster’s eye required a dash of creativity and a splash of chaos, but each bite delivers a satisfying crunch with a hint of fruity surprise inside. These treats are perfect for Halloween parties, especially if you want your dessert table to be as memorable as your costume.

    Monster Eyeball Cake Pops

    Monster Eyeball Cake Pops are bite-sized treats made by transforming cake and frosting into spherical pops that resemble creepy eyeballs. Each cake ball is coated in glossy white chocolate, decorated with red veins and bloodshot details for a spooky, realistic appearance. The final treat has a crunchy outer layer with a colorful, gooey center, creating a playful and eerie dessert perfect for Halloween celebrations.
    Prep Time 30 minutes
    Cook Time 10 minutes
    Total Time 40 minutes
    Servings: 20
    Course: Main Course
    Cuisine: Halloween
    Calories: 130

    Ingredients
      

    • 1 box Prepared cake (store-bought or homemade) crumbled into fine pieces
    • 1/2 cup Frosting to bind the cake crumbs
    • 12 Lollipop sticks for inserting into cake balls
    • 1 bag White chocolate melts or white chocolate chips, melted
    • 1 small Red food coloring for veins and bloodshot effect
    • 1 small Black gel food coloring for pupils and veins
    • optional Edible red glitter or shimmer for extra spooky look

    Equipment

    • Mixing bowls
    • Lollipop sticks
    • Microwave or double boiler
    • Baking sheet
    • Parchment paper
    • Spoon or piping bag
    • Small brush

    Method
     

    1. Crumb the prepared cake into fine pieces in a mixing bowl until uniform.
    2. Add frosting to the cake crumbs and gently fold together until the mixture is moist and can be shaped easily.
    3. Scoop out portions of the mixture and roll them between your palms to create smooth, round spheres about 1.5 inches in diameter.
    4. Insert a lollipop stick into each cake ball, about halfway through, pressing gently to secure.
    5. Place the cake pops on a parchment-lined baking sheet and chill in the freezer for about 15 minutes to firm up.
    6. Meanwhile, melt the white chocolate in a microwave or double boiler until smooth and glossy, about 2-3 minutes.
    7. Dip each chilled cake pop into the melted white chocolate, swirling gently to coat evenly, then hold upright to let excess drip off.
    8. Place the coated cake pops back on the parchment to set. You can refrigerate them for faster setting if desired.
    9. Using a small brush or a piping bag, add red food coloring to create bloodshot veins and blood around the edges for a creepy effect.
    10. Use black gel color to carefully add a small dot for the pupil in the center of each white surface, creating a realistic eyeball look.
    11. Optional: Brush on edible red glitter or shimmer for a more eerie, blood-like sheen, then let everything set completely.
    12. Once decorated and fully set, serve these spooky Monster Eyeball Cake Pops on a platter for your Halloween party or dessert table.
    These Monster Eyeball Cake Pops add just the right amount of fun and fright to your Halloween gathering. Their playful spookiness coupled with inviting flavors makes them a hit among kids and adults alike.

    More than just a sweet treat, they turn ordinary ingredients into a spectacle of creativity and chaos. As you make these, enjoy the festive chaos and the delight of watching everyone bite into your creepy yet delicious creation.

  • Haunted Kitchen: Bloody Spaghetti & Sausage Fingers for a Spooky Feast

    Haunted Kitchen: Bloody Spaghetti & Sausage Fingers for a Spooky Feast

    As the air turns crisp and the nights grow longer, I find myself drawn to the playful chaos of Halloween cooking. This year, I wanted to craft a dish that sparks both giggles and shivers—something eerily fun and surprisingly easy. The scent of savory sausage and spiced tomato sauce fills my kitchen, turning it into a mini haunted house of flavors.

    The best part? Watching the kids’ eyes light up when they see the gruesome ‘fingers’ and the blood-red pasta. It’s not just a meal; it’s a messy, joyful event that invites everyone to join in the spooky spirit. Plus, it’s perfect for parties where you want your food to be as wild as your costumes.

    Spooky Blood-Red Pasta with Sausage and ‘Fingers’

    This dish features pasta coated in a vibrant red sauce made from spiced tomato and savory sausage, shaped to resemble grotesque fingers for a Halloween-themed presentation. The process includes cooking the pasta and sausage together, shaping the pasta into finger-like structures, and creating a gruesome, blood-red appearance for a fun, spooky meal. The final dish has a saucy, slightly chewy texture with playful, finger-like pasta shapes that are perfect for festive parties.
    Prep Time 15 minutes
    Cook Time 20 minutes
    Total Time 35 minutes
    Servings: 4
    Course: Main Course
    Cuisine: Halloween
    Calories: 480

    Ingredients
      

    • 12 oz pasta (penne or spaghetti)
    • 1 lb Italian sausage casings removed
    • 2 cups tomato sauce spiced for flavor
    • 2 cloves garlic minced
    • 1 teaspoon chili powder adds depth and spice
    • to taste salt and pepper
    • 1 cup blood-red marinara for extra spooky color
    • optional olive oil for frying sausage

    Equipment

    • Large pot
    • Slotted spoon
    • Baking sheet
    • Cooking utensils

    Method
     

    1. Bring a large pot of salted water to a boil and cook the pasta until al dente, following package instructions. Drain and set aside.
    2. In a skillet, cook the sausage over medium heat, breaking it apart with a spatula until browned and cooked through, about 8 minutes.
    3. Add the minced garlic and chili powder to the sausage, cooking for another minute until fragrant.
    4. Pour in the tomato sauce and blood-red marinara, stirring to combine. Simmer for 5-7 minutes to develop flavor and thicken slightly.
    5. Measure out small portions of cooked pasta, then gently shape each into a finger-like form by elongating with your hands or a spoon, flattening one end for a ‘nail’ and tapering the other for a finger shape.
    6. Place the pasta fingers on a baking sheet and spoon some of the spicy sausage sauce over each piece, letting it drip down to mimic blood.
    7. Drizzle or carefully spoon extra red marinara around the base of the pasta fingers to enhance the bloody effect.
    8. Optional: Use thin slices of black olive or green bell pepper for ‘nails’ by pressing them onto the shaped pasta fingers for a spooky touch.
    9. Serve the spooky pasta fingers immediately, allowing the sauce to be warm and the shapes to stand out visually.

    Notes

    For extra gory effect, add chopped green herbs or shredded cheese for ‘flesh’ details. Be playful with shapes and decorations!
    This Bloody Spaghetti with Sausage Fingers is a testament to how playful Halloween can be, even in the kitchen. It’s a no-fuss recipe that turns ordinary ingredients into a creepy masterpiece, perfect for celebrating the season with a bit of chaos.

    So, fire up your stove and embrace the messy fun. Whether you’re feeding a crowd or just feeling festive, this dish adds that extra dash of spooky charm your table deserves. Happy haunting—and happy cooking!

  • Peach Crisp: A Nostalgic Twist on Summer’s Favorite Fruit

    Peach Crisp: A Nostalgic Twist on Summer’s Favorite Fruit

    There’s something magically comforting about a warm peach crisp that sparks childhood memories and summer evenings alike. The aroma of baked peaches mingled with cinnamon and buttery oats can turn any day around. Today, I’m sharing a version that elevates this classic with an unexpected hint of cardamom, making it feel both nostalgic and fresh.

    Imagine biting into tender, caramelized peaches that burst with sweetness, topped with a crunchy, spiced oat topping that crackles softly in the oven. It’s a dessert that’s perfect for casual family dinners or surprising guests with minimal fuss. The best part? It practically makes itself once the fruit is prepped.

    Peach Crisp with Cardamom

    This peach crisp features tender, caramelized peaches topped with a crunchy, spiced oat mixture. The dish combines fresh peaches baked with cinnamon and cardamom, resulting in a warm, golden-brown dessert with a crispy topping and juicy fruit interior.
    Prep Time 15 minutes
    Cook Time 35 minutes
    Total Time 50 minutes
    Servings: 6
    Course: Main Course
    Cuisine: American
    Calories: 280

    Ingredients
      

    • 4 cups peach slices about 4-5 ripe peaches, peeled and sliced
    • 1/4 cup granulated sugar
    • 1 teaspoon ground cinnamon
    • 1/4 teaspoon ground cardamom for a warm, aromatic flavor
    • 1 tablespoon lemon juice
    • 1 cup old-fashioned oats
    • 1/2 cup all-purpose flour
    • 1/2 cup light brown sugar
    • 1/2 cup unsalted butter cold and cut into small pieces
    • 1/4 teaspoon salt

    Equipment

    • 9×13 inch baking dish
    • Mixing bowls
    • Measuring cups and spoons
    • Oven

    Method
     

    1. Preheat your oven to 375°F (190°C). In a large mixing bowl, toss the sliced peaches with sugar, cinnamon, cardamom, and lemon juice until well coated. Transfer the mixture to a greased baking dish, spreading it out evenly.
    2. In a separate bowl, combine oats, flour, brown sugar, and salt. Mix until uniform. Add the cold, cubed butter to the dry ingredients.
    3. Use your fingers or a pastry cutter to rub the butter into the dry ingredients until the mixture resembles coarse crumbs. This creates a flaky, crunchy topping.
    4. Sprinkle the oat topping evenly over the peaches in the baking dish, covering the fruit completely.
    5. Bake in the preheated oven until the topping is golden brown and the peach filling is bubbling, about 35 minutes. The kitchen will fill with a warm, spicy aroma as it bakes.
    6. Allow the peach crisp to cool slightly before serving. Spoon into bowls and enjoy the warm, juicy fruit topped with crunchy, spiced oats.
    Whether you’re celebrating the height of summer or craving a cozy end to a cooler evening, this peach crisp holds its charm. Its simplicity makes it a reliable crowd-pleaser, and the subtle spice adds a delightful complexity worth dreaming about. Share it hot with a scoop of vanilla, and you’ll see eager smiles light up the table, old friends to new.

  • Spine-Chilling Sip: The Halloween Bloody Mary

    Spine-Chilling Sip: The Halloween Bloody Mary

    Ever wondered what it would be like to mix a classic cocktail with a dash of Halloween chaos? This Bloody Mary isn’t just a drink; it’s a theatrical experience. The rich tomato base, tinged with a vibrant blood-red hue, makes every sip a moment of both amusement and spookiness.

    The trick is in the details: a splash of spicy horseradish, a hint of smoky Worcestershire, and the unexpected surprise of green olives and celery that look like eerie props. Perfect for a Halloween party or a daring brunch, this cocktail turns a simple drink into a conversation starter. Watch your guests’ faces light up—or gasp—as they take that first gory sip.

    Bloody Mary Cocktail

    This Bloody Mary is a savory cocktail made with tomato juice, vodka, and a blend of spices, served over ice and garnished with green olives and celery. Its vibrant red appearance and flavorful profile make it a striking beverage for festive occasions or brunch gatherings.
    Prep Time 5 minutes
    Total Time 5 minutes
    Servings: 1
    Course: Main Course
    Cuisine: American
    Calories: 120

    Ingredients
      

    • 4 oz tomato juice preferably chilled
    • 2 oz vodka
    • 1 tsp Worcestershire sauce
    • 0.5 tsp hot sauce such as Tabasco
    • 0.25 tsp ground black pepper
    • 0.25 tsp celery salt
    • 1 slice lemon wedge for garnish and extra flavor
    • 2 whole green olives with pimiento
    • 1 stalk celery stalk for garnish
    • Ice cubes ice cubes for filling the glass

    Equipment

    • Cocktail shaker
    • Tall glass
    • Stirring spoon
    • Knife
    • Cutting board

    Method
     

    1. Fill a tall glass with ice cubes, creating a chilled base for the cocktail.
    2. In a cocktail shaker, combine tomato juice, vodka, Worcestershire sauce, hot sauce, black pepper, and celery salt. Stir gently to mix all the flavors together.
    3. Secure the lid and shake the mixture for about 10 seconds, creating a slight froth and evenly distributing the seasonings.
    4. Remove the lid and carefully pour the tomato mixture over the prepared ice in the glass, allowing it to settle smoothly.
    5. Squeeze a lemon wedge into the drink for added brightness, then gently stir with a stirring spoon to combine.
    6. Garnish the drink with green olives on a skewer and a celery stalk for a colorful, spooky presentation.
    7. Serve immediately as a savory, visually striking cocktail with a spicy kick.
    This Bloody Mary transforms the usual brunch staple into a festive spectacle that can match any haunted theme. Its bold flavors and playful presentation elevate any Halloween gathering from ordinary to unforgettable.

    Enjoy making this gory masterpiece, and remember—sometimes, a little chaos in a glass is just what the season calls for. Cheers to a spooky, flavorful Halloween that keeps everyone talking long after the last sip.

  • The Surprising Art of Vodka Slushies: A Chill Mix of Nostalgia and Creativity

    The Surprising Art of Vodka Slushies: A Chill Mix of Nostalgia and Creativity

    Every summer, I find myself craving something icy and unexpectedly sophisticated. This isn’t your average frozen drink; it’s a vodka slushie that combines childhood nostalgia with a splash of adult flair. The secret lies in the simplicity of frozen fruit, vodka, and a touch of sweetener, blended into smooth, shimmery chill.

    What makes this especially fun is how versatile it is. You can customize flavors from tart lemon to luscious berry, making each batch uniquely yours. It feels like throwing a tiny, spontaneous celebration in a glass, perfect for scorching afternoons or a laid-back gathering.

    Frozen Fruit Vodka Slushie

    This vodka slushie combines frozen fruit blended with vodka and a touch of sweetener, resulting in a smooth, icy beverage with a shimmery appearance. The mixture becomes a semi-frozen, pourable slushie with a refreshing flavor and a vibrant color, perfect for hot days or casual gatherings.
    Prep Time 5 minutes
    Total Time 5 minutes
    Servings: 2
    Course: Main Course
    Cuisine: Modern
    Calories: 150

    Ingredients
      

    • 2 cups frozen mixed berries or your favorite frozen fruit
    • 0.5 cup vodka adjust to taste
    • 1-2 tablespoons sweetener honey, simple syrup, or agave syrup
    • 0.5 cup water optional, for adjusting consistency

    Equipment

    • Blender
    • Measuring cups and spoons

    Method
     

    1. Add the frozen berries, vodka, sweetener, and water into the blender.
    2. Secure the lid and blend on high speed until the mixture is smooth and has a slushy, semi-frozen consistency, about 30-45 seconds.
    3. Check the texture; if it’s too thick, add a splash more water and blend briefly to loosen it up. If it’s too thin, add a few more frozen berries and blend again.
    4. Once blended to your desired slushy texture, pour the mixture into chilled glasses.
    5. Garnish with a fresh berry or a slice of citrus if desired, and serve immediately to enjoy the icy chill.

    These vodka slushies come as a refreshing escape from the heat and a playful nod to carefree days gone by. They’re easy to whip up, requiring no fancy equipment—just a good blender and a free afternoon. Next time you want something chilled and a little wild, you’ll know exactly what to make.

    So, whether you’re inviting friends over or just treating yourself, this recipe is bound to become a staple. It’s all about enjoying the moment, one icy sip at a time, with flavors that sparkle as brightly as the summer sun.

  • The Secret Ingredient: How Roasted Garlic Transforms Your Tomato Sauce

    The Secret Ingredient: How Roasted Garlic Transforms Your Tomato Sauce

    Cooking this tomato sauce isn’t just about blending ripe tomatoes and simmering; it’s about elevating the flavor through a hidden twist. I discovered that roasting garlic until golden and fragrant adds a deep, caramelized sweetness that balances the acidity perfectly. The aroma alone, wafting through the kitchen, makes everyone curious.

    Most recipes skip the roasting step, but I promise, this small extra effort creates a richer, more complex sauce. The subtle nutty undertones from the garlic make this sauce unforgettable. It’s a simple change that turns an everyday dish into a warm, nostalgic experience.

    Roasted Garlic Tomato Sauce

    This tomato sauce is made by blending ripe tomatoes and simmering them with roasted garlic, which adds a caramelized sweetness and depth of flavor. The final sauce has a rich, velvety texture with a deep golden hue from the roasted garlic, making it both vibrant and inviting.
    Prep Time 10 minutes
    Cook Time 30 minutes
    Total Time 40 minutes
    Servings: 4
    Course: Main Course
    Cuisine: American
    Calories: 150

    Ingredients
      

    • 4 cloves garlic cloves whole, unpeeled
    • 2 pounds ripe tomatoes chopped or halved
    • 2 tablespoons olive oil divided, for roasting and cooking
    • 1 small onion finely chopped
    • to taste salt
    • to taste black pepper

    Equipment

    • Baking sheet
    • Blender or food processor
    • Saucepan
    • Wooden spoon

    Method
     

    1. Preheat the oven to 400°F (200°C). Place the garlic cloves on a baking sheet, drizzle with a teaspoon of olive oil, and roast for about 20 minutes until golden and fragrant.
    2. While the garlic roasts, heat a tablespoon of olive oil in a saucepan over medium heat. Add the chopped onion and sauté until translucent and soft, about 5 minutes, filling the kitchen with a sweet aroma.
    3. In a blender or food processor, combine the chopped tomatoes and the roasted garlic cloves (squeeze out of their skins). Blend until smooth and vibrant red in color.
    4. Pour the blended tomato mixture into the saucepan with the sautéed onion. Bring to a gentle simmer over medium-low heat, stir occasionally, and let cook for 15-20 minutes to develop flavor and thicken slightly.
    5. Season the sauce with salt and black pepper to taste, adjusting as needed for flavor balance.
    6. Once the sauce reaches your desired consistency and aroma, remove it from heat and serve over pasta, grilled vegetables, or your favorite dishes. Enjoy the rich, velvety texture enhanced by the caramelized garlic.

    Notes

    For a thicker sauce, simmer longer until it reaches your preferred consistency. Roasting the garlic is key to adding a deep, sweet flavor that elevates the entire dish.
    Once you try this roasted garlic tomato sauce, you’ll wonder why you ever made it any other way. It pairs beautifully with pasta, drizzled over grilled vegetables, or as a dip for crusty bread. The secret is in the slow, gentle roasting—it’s about uncovering flavor that’s been hiding in plain sight.

    This recipe feels especially timely now, as comforting, homemade flavors are more sought after than ever. Plus, it’s quick enough for busy weeknights but special enough for weekend gatherings. A jar of this sauce on the shelf is like having a little piece of culinary magic ready whenever you need it.

  • Spooky Snacks: Halloween Mummy Pizza

    Spooky Snacks: Halloween Mummy Pizza

    Halloween is my favorite time to turn ordinary meals into creepy, fun treats. This Mummy Pizza combines the joy of pizza with a playful, spooky twist that kids and adults alike will love. The smell of bubbling cheese and sizzling pepperoni instantly signals festive chaos in the kitchen.

    What sets this recipe apart is its simplicity and the silly, messy fun of making tiny bandages out of cheese strips. It’s perfect for a quick party snack or an easy family dinner that sparks creativity in the oven. Plus, it’s a great way to use up leftover pizza dough from the week.

    Mummy Pizza

    Mummy Pizza is a playful dish made by spreading pizza sauce on dough, topping it with cheese and pepperoni, then creating bandage-like strips of cheese to resemble a mummy. After baking until bubbly and golden, the cheese strips crisp up slightly, giving a fun, spooky appearance and a cheesy, tender texture inside.
    Prep Time 10 minutes
    Cook Time 15 minutes
    Total Time 25 minutes
    Servings: 4
    Course: Main Course
    Cuisine: American
    Calories: 320

    Ingredients
      

    • 1 package pizza dough store-bought or homemade
    • 1/2 cup pizza sauce
    • 1 cup shredded mozzarella cheese
    • 12 slices pepperoni slices
    • additional cheese strips cut from extra cheese

    Equipment

    • Baking sheet
    • Rolling pin
    • Knife
    • Baking parchment

    Method
     

    1. Preheat your oven to 400°F (200°C) and line a baking sheet with parchment paper to prevent sticking.
    2. Roll out the pizza dough on a floured surface into a thin circle or rectangle, then transfer it onto the prepared baking sheet.
    3. Spread an even layer of pizza sauce over the dough, leaving a small border around the edges for the crust.
    4. Sprinkle a generous layer of shredded mozzarella cheese evenly over the sauce to create a cheesy base.
    5. Arrange the pepperoni slices on top of the cheese, spacing them out as desired.
    6. Use a knife to cut thin strips from additional cheese to resemble bandages. Space them evenly across the pizza, crisscrossing as if wrapping a mummy.
    7. Place the pizza in the oven and bake for about 12-15 minutes, until the crust is golden and bubbly, and the cheese strips are slightly crispy.
    8. Remove the pizza from the oven and let it cool for a few minutes. The cheese strips will firm up slightly, adding to the mummy effect.
    9. Slice the pizza into pieces and serve while hot, showcasing the playful cheese bandages and crispy pepperoni.
    This Halloween-themed pizza is more than just a meal; it’s a chance to unleash your inner kid and get a little messy. The joy of seeing tiny mummy faces emerge from the oven makes all the chaos worth it.

    Whether you’re hosting a spooky gathering or just craving a playful dinner, these mummies bring a smile to everyone. Plus, they’re a perfect excuse to turn a simple pizza into a storytelling feast with monster faces and tiny bandages. Halloween has never been so deliciously fun.

  • Spooky Sweet & Savory: Halloween Bat Wings That Chime with Flavors

    Spooky Sweet & Savory: Halloween Bat Wings That Chime with Flavors

    Every October, I hunt for recipes that pull me into a nostalgic, yet delightfully chaotic season. This year, I stumbled upon a strange yet charming idea—transforming everyday chicken wings into tiny bats with soy sauce glaze and dark soy accents. The savory aroma emanates with a blend of caramelized sugar, garlic, and soy, making my kitchen smell like a haunted forest in the making.

    These Bat Wings aren’t just about the spooky look—they’re a playful twist on the classic wing, perfect for a Halloween gathering that aims to be both fun and flavorful. The crispy edges, coated in a shiny, dark glaze, crackle with each bite, giving way to juicy, tender meat inside. Honestly, I can’t get enough of that sweet-savory contrast, especially when paired with a quick dip in spicy soy dipping sauce.

    Bat Wings with Soy Glaze

    This dish features crispy chicken wings coated in a shiny soy sauce glaze with dark soy accents, resembling tiny bats for a fun Halloween presentation. The wings are baked until crispy and caramelized, developing a savory-sweet flavor and a crackling exterior. The final appearance is dark, glossy, and bat-shaped, with juicy meat inside.
    Prep Time 15 minutes
    Cook Time 30 minutes
    Total Time 45 minutes
    Servings: 4
    Course: Main Course
    Cuisine: Fusion
    Calories: 320

    Ingredients
      

    • 2 pounds chicken wings drumettes and flats
    • 3 tablespoons soy sauce
    • 1 tablespoon dark soy sauce
    • 2 cloves garlic minced
    • 1 tablespoon brown sugar packed
    • 2 teaspoons rice vinegar
    • 1 tablespoon cornstarch mixed with water
    • 1 tablespoon water for cornstarch slurry
    • vegetable oil for baking and glazing

    Equipment

    • Baking sheet
    • Mixing bowls
    • Silicone brush
    • Oven

    Method
     

    1. Preheat your oven to 400°F (200°C) and line a baking sheet with aluminum foil or parchment paper.
    2. Pat the chicken wings dry with paper towels to ensure crispy skin after baking.
    3. Place the wings in a large mixing bowl and toss them with a little vegetable oil to help the skin crisp up.
    4. Arrange the coated wings in a single layer on the prepared baking sheet, spacing them evenly.
    5. Bake the wings in the oven for about 30 minutes, flipping halfway through, until they are golden brown and crispy.
    6. Meanwhile, combine soy sauce, dark soy sauce, minced garlic, brown sugar, and rice vinegar in a small saucepan over medium heat.
    7. Bring the mixture to a gentle simmer, allowing the sugar to dissolve and the aromas to develop, about 2-3 minutes.
    8. Mix the cornstarch with water to make a slurry, then whisk it into the simmering sauce to thicken it into a glossy glaze.
    9. Brush the glaze generously over the hot, baked wings with a silicone brush, coating them evenly for a shiny, dark finish.
    10. Return the glazed wings to the oven for an additional 5 minutes to set the glaze and deepen the color.
    11. Remove the wings from the oven and let them rest for a couple of minutes — the glaze will become sticky and crackling as it cools.
    12. Serve the wings with the dark soy accents resembling little bats—perfect for a playful Halloween presentation.

    Notes

    For extra fun, use a small cookie cutter or knife to cut wing shapes into the glazed wings before baking for a more bat-like appearance.

    Creating Halloween Bat Wings is a quirky way to add some flavor chaos to your festivities. The simple ingredients and quick marinade make it an accessible yet impressive dish, perfect for last-minute parties or a themed family dinner. Plus, the tricky bat shape makes it easy to wow kids and adults alike.

    As the season deepens, dishes like these remind me how food can carry a bit of magic—turning ordinary ingredients into something memorable. The crispy skin, smoky soy aroma, and playful presentation make this recipe a must-try. It’s a little bit spooky, a lot tasty, and absolutely fun to make.

  • Chill Out with the Secrets of the Ultimate Chocolate Slushie

    Chill Out with the Secrets of the Ultimate Chocolate Slushie

    When the temperature rises and your freezer feels more like a tropical island than your trusty kitchen partner, a cold treat becomes essential. But instead of reaching for the usual frozen desserts, I love turning to a homemade chocolate slushie that balances chill with a rich cocoa punch. It’s a simple pleasure that feels like a tiny rebellion against the heat.

    This recipe isn’t just about cooling down; it’s about experiencing a texture that melts on your tongue with every sip, leaving behind a faint whisper of chocolate. The best part? It’s incredibly adaptable, letting you customize sweetness and creaminess according to your mood. Perfect for spontaneous summer cravings or as a nostalgic nod to childhood ice cream escapes.

    Homemade Chocolate Slushie

    This chocolate slushie combines rich cocoa with crushed ice and a touch of sweetness, blended until smooth and icy. It has a creamy, slushy texture that melts on the tongue with a hint of chocolate flavor, perfect for hot days. The recipe is highly adaptable, allowing customization of sweetness and creaminess.
    Prep Time 5 minutes
    Total Time 5 minutes
    Servings: 2
    Course: Main Course
    Cuisine: Western
    Calories: 250

    Ingredients
      

    • 1 cup crushed ice preferably made with large ice cubes
    • 3 tablespoons unsweetened cocoa powder preferably Dutch-processed for deeper flavor
    • 2 tablespoons sugar adjust to taste or substitute with honey or agave syrup
    • 1 cup milk dairy or plant-based, depending on preference
    • 1/2 cup vanilla ice cream adds creaminess and richness

    Equipment

    • Blender
    • Measuring cups and spoons

    Method
     

    1. Add the crushed ice to your blender, ensuring it’s evenly distributed in the container.
    2. Pour in the milk, then add the unsweetened cocoa powder and sugar directly on top of the ice.
    3. Toss in the vanilla ice cream for extra creaminess and a more decadent texture.
    4. Seal the blender and blend on high speed for about 30-45 seconds, until the mixture is smooth, slushy, and evenly combined. You’ll hear a consistent hum, and the mixture should look thick and icy.
    5. Stop the blender and check the consistency—if it’s too thick, add a splash more milk and blend briefly again, or add more ice for a thicker texture.
    6. Pour the chocolate slushie into glasses, watching it flow in thick, fudgy ribbons.
    7. Serve immediately with a straw or spoon, and enjoy the cold, creamy, chocolatey treat.
    As summer hints at its final curtain call, this chocolate slushie stands ready in the freezer to summon memories of carefree afternoons. It’s not just a treat; it’s a way to pause, sip, and enjoy the simple joys of a chilled chocolate fix.

    Whether shared or savored solo, this recipe keeps things fun and flexible. Sometimes, a quick blend of what’s in the pantry is all you need to turn a hot day into a cool adventure. So, pull out your blender and indulge in a moment of icy bliss whenever the craving strikes.

  • Spooky Specter: The Spider Cheese Ball for Halloween WOWs

    Spooky Specter: The Spider Cheese Ball for Halloween WOWs

    As the air turns crisper and shadows grow longer, Halloween calls for treats that delight the senses and spark joy. This Spider Cheese Ball isn’t just a dip; it’s a centerpiece that whispers spooky tales before your guests even dig in. The way the gooey cheese pairs with crunchy crackers and those creepy crawly spider legs makes every bite a playful adventure.

    Turning a classic cheese ball into a Halloween spectacle taps into a bit of childhood nostalgia and a dash of chaos. It’s surprisingly simple but brings a whole lot of fun—especially when the kids squeal at the sight of it. Plus, it serves as a conversation starter, turning your snack table into a haunted wonderland.

    Spider Cheese Ball

    The Spider Cheese Ball is a creamy, crumb-coated cheese mixture shaped into a ball and decorated with crunchy spider leg pretzels, creating a spooky, eye-catching centerpiece. The cheese is blended until smooth, then chilled to firm up before being decorated for serving. Its final appearance resembles a spider with legs radiating from the center, combining soft texture with a crunchy exterior.
    Prep Time 20 minutes
    Total Time 20 minutes
    Servings: 8
    Course: Main Course
    Cuisine: American
    Calories: 210

    Ingredients
      

    • 16 oz cream cheese, softened
    • 1 cup shredded cheddar cheese
    • 1/2 cup chopped green onions
    • 1 tbsp Worcestershire sauce
    • 1/2 tsp garlic powder
    • 1 package crackers or crushed pretzels for coating
    • 12 pretzel sticks pretzel sticks (for spider legs) whole or broken in half
    • extra crackers for serving

    Equipment

    • Mixing bowl
    • Rubber spatula
    • Plastic wrap
    • Serving platter

    Method
     

    1. In a large mixing bowl, combine softened cream cheese, shredded cheddar, chopped green onions, Worcestershire sauce, and garlic powder. Mix with a rubber spatula until the mixture is smooth, creamy, and well blended.
    2. Use your hands or a spatula to shape the mixture into a round ball, pressing gently to compact it. Wrap the cheese ball tightly in plastic wrap and refrigerate for at least 30 minutes to firm up.
    3. Unwrap the chilled cheese ball and place it on a serving platter. Pour crushed crackers or pretzels over the surface to give it a crunchy, crumb-coated exterior. Gently press the coating onto the surface if needed.
    4. Arrange pretzel sticks evenly around the cheese ball’s perimeter to resemble spider legs, inserting them gently into the surface. You can break some pretzel sticks in half for shorter legs if desired.
    5. Optionally, add small food-safe decorations or extra crackers to enhance the spooky look. Chill the entire assembly for an additional 15 minutes to set the pretzel legs.
    6. Serve the Spider Cheese Ball with crackers or sliced bread on a festive platter. Bring it out as a fun, spooky centerpiece for your Halloween party.

    Notes

    Ensure the cheese mixture is well chilled before shaping and decorating for easier handling. Use sturdy pretzels for spider legs to prevent breaking when inserting.
    Whether you’re throwing a last-minute party or want a fun twist to your usual cheese platter, this Spider Cheese Ball adds that perfect spooky touch. It’s a showstopper that’s easy to assemble, yet creates big wow moments.

    This recipe celebrates the magic of Halloween—when playful creativity gets to shine. It’s an edible decoration that makes everyone smile and brings a bit of spooky whimsy to your table. And honestly, it’s the kind of dish that makes you look forward to every haunting season.