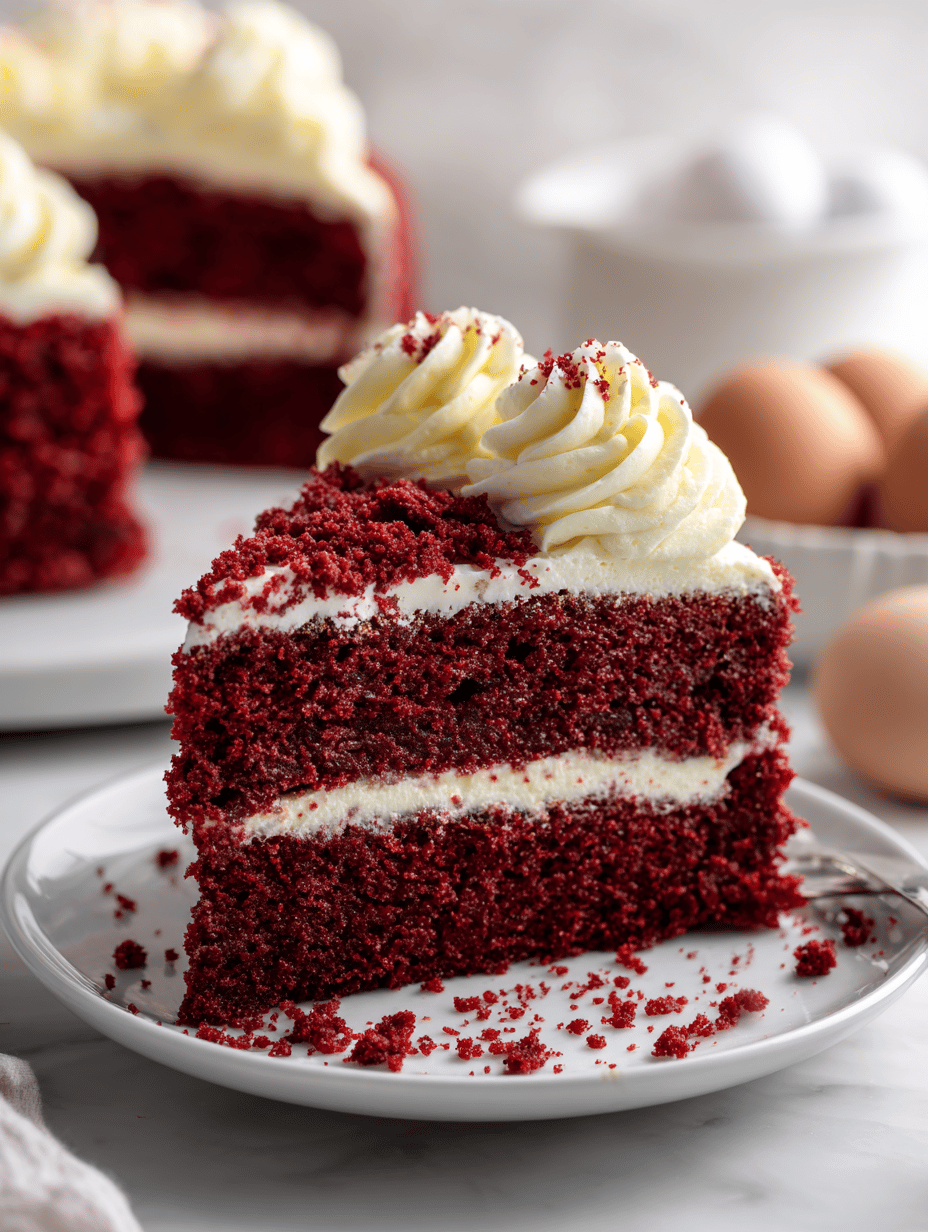
Author: HarperEvans

  • Spooky Sips: The Haunted Halloween Monster Mash Punch

    Spooky Sips: The Haunted Halloween Monster Mash Punch

    As October’s chill settles in, I love the thrill of creating drinks that turn the ordinary into the extraordinary. This Halloween Monster Mash Punch is more than just a beverage—it’s a bubbling cauldron of chaos, color, and nostalgia. The scent of fruity syrups blends with a whisper of mint, beckoning guests to dive into its goblin-green depths.

    What makes this punch stand out is its playful chaos. Each sip unleashes a cascade of flavors that feel like a monster waking from its slumber, ready to spook and delight. It’s perfect for those who love their Halloween to be a little wild and wonderfully weird.

    Halloween Monster Mash Punch

    This vibrant green punch combines fruity syrups, citrus sodas, and fresh mint for a visually striking beverage. The mixture is blended until smooth and bubbly, resulting in a thick, frothy drink with a playful appearance that resembles a bubbling cauldron of chaos.
    Prep Time 15 minutes
    Total Time 15 minutes
    Servings: 8
    Course: Main Course
    Cuisine: Halloween
    Calories: 150

    Ingredients
      

    • 2 cups fruit punch syrup preferably green or lime flavor
    • 1 cup lemon-lime soda chilled for fizz
    • 1 cup pineapple juice adds sweetness and tropical flavor
    • few leaves fresh mint for flavor and garnish
    • crushed ice ice to chill the drink

    Equipment

    • Large mixing bowl
    • Blender
    • Measuring cups and spoons
    • Ladle
    • Serving pitcher

    Method
     

    1. Add the fruit punch syrup, pineapple juice, and a handful of crushed ice into the blender. Blend on high until the mixture is smooth and frothy, about 30 seconds. You should see bubbles forming and the color turning vibrant green.
    2. Pour the bubbly mixture into a large serving pitcher, allowing some foam to spill over for a wild, chaotic look. Then, gently stir in the chilled lemon-lime soda to add fizz and lighten the texture.
    3. Tear the fresh mint leaves into smaller pieces and add them to the punch. Stir gently to release their aroma and a hint of minty freshness throughout the drink.
    4. Once mixed, ladle the Monster Mash Punch into individual glasses. Garnish each with a sprig of mint and maybe a spooky straw or glow stick for extra fun.
    5. Serve immediately and enjoy the bubbling, wild chaos of this festive Halloween drink!

    Carousel through your party with a punch that screams Halloween without saying a word. It’s easy to make, visually stunning, and brings a spark of chaos to any gathering. Plus, it’s a fun way to get everyone into the spooky spirit—even the ones who refuse to wear masks!

    As the night deepens and the shadows grow longer, this punch will keep the energy lively and the spirits high. It’s not just a drink—it’s a celebration in a cup, capturing the magic and mayhem of a Halloween night.

  • Enchanted Evil: The Spooky Charm of the Halloween Poison Apple Martini

    Enchanted Evil: The Spooky Charm of the Halloween Poison Apple Martini

    Every fall, haunted house lights flicker on the corner, and pumpkin spice fills the air. But this year, I wanted to craft something that’s not just a visual stunt but a drink that whispers secrets from the dark. The Halloween Poison Apple Martini does exactly that, with a sinister twist and a tempting shimmer.

    The moment I first poured the vibrant green apple liqueur, it reminded me of how childhood candies metamorphose into adult thrillers. The scent of crisp apples layered with a dash of dangerous-looking shimmer made my kitchen smell like a haunted orchard. It’s a cocktail that offers more than just festivity—it’s an intoxicating ritual of the season.

    Halloween Poison Apple Martini

    The Halloween Poison Apple Martini is a vibrant, green cocktail that combines apple liqueur and vodka, enhanced with a shimmering, spooky finish. It features a smooth, chilled texture with an eye-catching luminous appearance, perfect for seasonal festivities. The drink is shaken until well mixed and poured into a glass, garnished as desired for a devilishly good presentation.
    Prep Time 5 minutes
    Total Time 5 minutes
    Servings: 1
    Course: Main Course
    Calories: 200

    Ingredients
      

    • 2 ounces green apple liqueur choose a vibrant, bright green variety
    • 1 ounce vodka
    • 1 teaspoon edible shimmer powder for a glowing, spooky effect
    • 0.5 ounce fresh lemon juice to balance sweetness
    • ice cubes as needed ice

    Equipment

    • Cocktail shaker
    • Martini glass
    • Strainer

    Method
     

    1. Fill the cocktail shaker halfway with ice cubes to chill the mixture.
    2. Add the green apple liqueur, vodka, fresh lemon juice, and edible shimmer powder to the shaker.
    3. Secure the lid on the shaker and shake vigorously for about 15 seconds until the mixture is well chilled and slightly frothy.
    4. Remove the lid and strain the mixture into a chilled martini glass, allowing the shimmering liquid to flow smoothly.
    5. Garnish with a small slice of green apple or a spooky garnish as desired.
    6. Serve immediately and enjoy the luminous, refreshing sip with a haunting twist.
    As the night deepens and shadows dance, this Poison Apple Martini keeps the spirits alive with its hypnotic glow. It’s perfect for setting a mischievous tone at your Halloween gathering or a spooky solo toast to the season.

    So, embrace the eerie elegance of this cocktail, letting its glossy allure and tantalizing flavor become your signature sip of October. It’s a reminder that sometimes, the most playful horrors are the sweetest.

  • Spooky Chic: Halloween Mummy Hot Dogs for a Ghoulish Feast

    Spooky Chic: Halloween Mummy Hot Dogs for a Ghoulish Feast

    As the leaves turn vibrant and the air feels crisp, Halloween invites us to embrace playful scares and deliciously themed treats. But this year, I wanted to elevate the classic hot dog into a costume party on a plate — turning ordinary into extraordinary with a mummy twist. The magic lies in the little details: the shredded puff pastry wrapping, the tiny eyes peeking out, all coming together as a delightful centerpiece.

    This recipe isn’t just about Halloween aesthetics; it’s a nostalgic nod to childhood picnics but with a sophisticated spin. The aroma of baked dough mingling with grilled hot dogs fills my kitchen with a warm, slightly smoky scent that’s perfect for spooky season. It’s quick, cute, and just a little chaotic — ideal for busy nights or unexpected guests.

    ## WHY I LOVE THIS RECIPE?
    – It brings out my inner kid with its playful, spooky look.
    – The smell of baked pastry and hot dogs is irresistibly nostalgic.
    – It’s a fun activity to do with kids, blending chaos with creativity.
    – I love how it sparks conversations at any Halloween table.

    Mummy Hot Dogs in Puff Pastry

    This dish features hot dogs wrapped in shredded puff pastry to resemble mummies, then baked until golden and crispy. The final result is a fun, spooky appetizer with a flaky exterior and playful, googly eyes peeking out, perfect for Halloween celebrations.
    Prep Time 15 minutes
    Cook Time 20 minutes
    Total Time 35 minutes
    Servings: 4
    Course: Main Course
    Cuisine: Halloween
    Calories: 250

    Ingredients
      

    • 4 pieces hot dogs any variety you like
    • 1 package shredded puff pastry thawed if frozen
    • 1 egg egg wash beaten
    • small googly eyes small edible candy eyes
    • to taste salt and pepper for seasoning the hot dogs

    Equipment

    • Baking sheet
    • Parchment paper
    • Knife
    • Fork
    • Small Bowls

    Method
     

    1. Preheat the oven to 400°F (200°C) and line a baking sheet with parchment paper for easy cleanup.
    2. Place each hot dog on a plate and season lightly with salt and pepper to enhance flavor.
    3. Unroll the shredded puff pastry and gently separate it into thin strands or shreds, using your fingers or a fork to create a shaggy, mummy-like texture.
    4. Wrap the hot dogs with the shredded pastry, spiraling and layering the strands to resemble a mummy’s wrappings, leaving small gaps for the eyes.
    5. Brush the wrapped hot dogs gently with the beaten egg wash; this will give them a shiny, golden appearance when baked.
    6. Using a small spoon or tweezers, carefully place two edible googly eyes on the front of each mummy, positioning them near the gaps for a spooky effect.
    7. Arrange the wrapped hot dogs on the prepared baking sheet, spacing them slightly apart to allow for puffing and expansion.
    8. Bake in the preheated oven for about 15-20 minutes, or until the pastry is golden brown and crispy, and the hot dogs are heated through.
    9. Remove from the oven and let the mummies cool slightly on the baking sheet, which helps the pastry set and become crispy.
    10. Serve these fun mummies warm, perfect as a spooky appetizer or party snack during Halloween festivities.

    Notes

    For extra spooky details, use thin strips of black olives or strips of bell peppers to create scars or bandages around the mummies.
    These mummy hot dogs are just the kind of fun, easy-to-make dish that adds a touch of whimsy to any Halloween gathering. They’re perfect for parties, or even a spooky movie night with friends. The best part? They come together quickly, leaving you more time to enjoy the costumes and candy.

    As the night falls and the candles flicker, these little mummies will stand out as a beloved treat—fun, a little spooky, and utterly delicious. Plus, they’re a clever way to get everyone to eat their hot dogs, even the pickiest goblins and ghouls. Remember, a little messy chaos can lead to the tastiest memories.

  • Revive Your Winter Days with a Classic Chicken Noodle Soup Twist

    Revive Your Winter Days with a Classic Chicken Noodle Soup Twist

    As the chilly days settle in, I find myself craving something familiar yet new—something that warms both stomach and soul. Chicken noodle soup is a timeless comfort, but today I add a twist: a hint of toasted garlic and fresh herbs that elevate the simple broth. It’s the aroma of garlic sizzling that pulls everyone to the kitchen, ready for a bowl.

    This recipe isn’t just for cold nights; it’s a celebration of homey chaos. I love how gooey the noodles get when they soak up all that savory broth, a little messy but absolutely worth it. It’s my go-to when I want to fuss less but still serve something hearty and satisfying.

    Chicken Noodle Soup with Toasted Garlic and Fresh Herbs

    This chicken noodle soup is made by simmering chicken, vegetables, and herbs in a savory broth, then adding cooked noodles and toasted garlic for extra flavor. The dish has a comforting, hearty texture with tender chicken and slightly chewy noodles, finished with aromatic herbs and crispy garlic topping.
    Prep Time 15 minutes
    Cook Time 30 minutes
    Total Time 45 minutes
    Servings: 4
    Course: Main Course
    Cuisine: comfort food
    Calories: 320

    Ingredients
      

    • 1 lb boneless, skinless chicken breasts cut into bite-sized pieces
    • 2 carrots carrots peeled and sliced
    • 2 celery stalks celery stalks sliced
    • 4 cloves garlic minced
    • 1 large onion chopped
    • 8 cups chicken broth
    • 2 cups egg noodles uncooked
    • 2 tablespoons olive oil
    • 1 teaspoon dried thyme
    • 1/4 cup fresh parsley chopped
    • 3 cloves garlic sliced thin for toasting

    Equipment

    • Large pot
    • Skillet
    • Knife
    • Cutting board
    • Ladle

    Method
     

    1. Heat olive oil in a large pot over medium heat. Add the chopped onion, carrots, and celery, and cook until vegetables are tender and the onion is translucent, about 5 minutes.
    2. Add the minced garlic and dried thyme to the pot, cooking for another minute until fragrant. Stir constantly to prevent burning.
    3. Pour in the chicken broth and bring the mixture to a boil. Once boiling, add the chicken pieces and reduce heat to a gentle simmer. Cook until chicken is cooked through, about 10 minutes.
    4. Add the uncooked egg noodles to the broth and cook until tender, about 8 minutes. Stir occasionally to prevent sticking.
    5. Meanwhile, heat a small skillet over medium-low heat. Add sliced garlic and toast until golden brown and crispy, about 2-3 minutes. Remove from heat to prevent burning.
    6. Once the noodles are cooked and the chicken is tender, stir in chopped parsley and check the seasoning. Adjust salt and pepper if needed.
    7. Serve the soup hot, garnished with the crispy toasted garlic on top for extra flavor and texture.

    Notes

    For extra flavor, sauté vegetables longer or add a squeeze of lemon before serving.

    In the end, this chicken noodle soup reminds me that comfort food doesn’t have to be boring. It’s a dish that embraces imperfections and celebrates flavors that tell a story. Each spoonful brings a wave of warmth that’s perfect for sharing or savoring quietly on a busy day.

    As the season shifts, I find myself returning to this recipe more often. It’s a reminder that some classics gain new life when you bring your own favorite twists to the table. And honestly, it’s the little smells—garlic, chicken, fresh herbs—that make every pot feel like a cozy retreat.

  • Spooky Glee: Halloween Eyeball Pasta with Meatball “Eyeballs”

    Spooky Glee: Halloween Eyeball Pasta with Meatball “Eyeballs”

    Halloween is the one night when chaos and creativity blend into the perfect excuse for some culinary mischief. This Eyeball Pasta isn’t just a feast for the taste buds, but a visual nightmare (in the best way). Combining savory meatballs with a grotesque, eyeball-like appearance makes dinner both a conversation starter and a journey into fun.

    As a food blogger with a soft spot for the spooky season, I sought a dish that satisfies my love for theatrical eats and nostalgic flavors. The mix of familiar spaghetti or pasta and the chilling twist of ‘eyeball’ meatballs turns a simple meal into an event. Plus, the smell of bubbling marinara coupled with the sight of googly eyes always sparks joy at the dinner table.

    WHY I LOVE THIS RECIPE?

    • The chaotic charm turns any dinner into a party, especially for kids or the Halloween host.
    • Crafting tiny meatballs as eyeballs adds a playful, hands-on element to cooking.
    • The mixture of tangy tomato sauce and savory meat is addictive and comforting.
    • The visual gore makes spooky storytelling more immersive while eating.
    • It’s a delightful way to indulge in seasonal fun without too much fuss.

    AVOID MY DISASTER (You’re Welcome)

    • FORGOT to chill the meatball mixture—ended with sticky hands and misshapen eyeballs. Chill for 30 minutes!
    • DUMPED too much mozzarella—ended with a greasy mess that overwhelmed the dish. Use sparingly!
    • OVER‑TORCHED the eye centers—got burnt edges; bake at 375°F instead of broiling.
    • MISSED the googly eye mount—meatball slipped off. Use a toothpick to stabilize.

    QUICK FIXES THAT SAVE YOUR DAY

    • When eyes fall apart, splash on extra sauce and hit with fresh basil for extra flavor.
    • Patch a cracked meatball by gently pressing the sides with a damp spoon.
    • Shield the eyeballs from over-browning by tenting with foil midway through baking.
    • If spaghetti is too dry, stir in a splash of pasta water for a silky coat.
    • When in doubt, add a pinch of smoked paprika for depth and a spooky shimmer.

    Eyeball Pasta

    Eyeball Pasta features small, meatball-like spheres with a creepy, eyeball appearance nestled in a bed of tomato sauce and pasta. The dish combines baked or pan-fried meatballs with a vibrant marinara, topped with googly eyes for a spooky effect, resulting in a fun and visually striking meal with a tender, saucy texture.
    Prep Time 20 minutes
    Cook Time 30 minutes
    Total Time 50 minutes
    Servings: 4
    Course: Main Course
    Cuisine: Halloween
    Calories: 450

    Ingredients
      

    • 1 pound ground beef or turkey or chicken
    • 1 cup breadcrumbs plain or Italian seasoned
    • 1 egg egg
    • 2 cloves garlic minced
    • 1 cup marinara sauce preferably homemade or high-quality jarred
    • 1 cup mozzarella cheese shredded, use sparingly
    • 24 pieces googly eyes food-safe, small-sized
    • to taste salt and pepper
    • 1 tablespoon olive oil for browning

    Equipment

    • Mixing bowl
    • Baking sheet
    • Large pot
    • Skillet
    • Spoon

    Method
     

    1. Preheat your oven to 375°F (190°C). In a large mixing bowl, combine ground beef, breadcrumbs, egg, minced garlic, salt, and pepper. Mix everything together until well incorporated, then chill the mixture for about 10-15 minutes to make shaping easier.
    2. Once chilled, shape the meat mixture into small, round balls about the size of a golf ball—these will be your eyeballs. Place them on a baking sheet lined with parchment paper.
    3. Bake the meatballs in the preheated oven for 15-20 minutes, or until they are cooked through and lightly golden on the outside. While they bake, heat a tablespoon of olive oil in a skillet over medium heat and lightly brown the meatballs for added flavor, if desired.
    4. Meanwhile, warm the marinara sauce in a large pot until bubbling gently. Once ready, add the cooked (browned or baked) meatballs to the sauce, spooning some sauce over them to infuse flavor.
    5. Cook the pasta of your choice in boiling salted water according to package instructions. Drain and set aside. Toss the pasta with a bit of the warm marinara sauce to coat evenly.
    6. Arrange the sauced pasta on a serving plate or bowl. Place each meatball on top of the pasta, spacing them out evenly. This creates a spooky, eyeball-like effect.
    7. Top each meatball with a small amount of shredded mozzarella, and carefully press a googly eye into the center of each meatball to mimic an eyeball. If needed, stabilize the eyes with a toothpick.
    8. Optional: Tuck some fresh basil or sprinkle extra herbs around the dish for added contrast and flavor. Serve immediately so the eyes stay in place and the dish remains warm.

    Notes

    Chill the meat mixture before shaping to prevent sticking. Be careful not to overuse mozzarella to avoid greasiness. Use a toothpick to secure googly eyes for a more stable presentation.

    There’s something wildly satisfying about creating a dish that is both playful and tasty, especially when it honors the festive spirit of Halloween. This eyeball pasta isn’t just a meal—it’s a mini horror show turned culinary delight, perfect for seasonal gatherings.

    Every time I make it, I’m reminded how food can transform an ordinary night into a memorable event. The mix of a little chaos, a pinch of nostalgia, and a lot of fun makes this dish a seasonal staple. As the scent of marinara and roasted meatballs fills the air, I know that Halloween has officially arrived at the dinner table.

  • Spooky Stitches: Halloween Spider Web Cake

    Spooky Stitches: Halloween Spider Web Cake

    Every October, I find myself chasing a different kind of adrenaline—crafting a Halloween dessert that doubles as art. The Spider Web Cake is no ordinary treat; it’s a chaotic, joyful experiment with texture and design, inspired by childhood days of trick-or-treating and spooky stories. The aroma of vanilla and cocoa swirling together is a cozy yet eerie invitation.

    This year, I decided to elevate the concept by weaving edible webbing over a dark, moist chocolate sponge. The process involves a little mess, a lot of laughter, and a pinch of bravery—an adventure for any baking enthusiast craving something both fun and sinister. The moment you pull back the plastic wrap to reveal the web, it feels like unveiling a tiny haunted house of confectionery dreams.

    Spider Web Cake

    The Spider Web Cake consists of a moist chocolate sponge topped with intricate edible webbing made from sugary icing. The cake features a dark, rich surface with a detailed web pattern that sits visually striking and slightly textured. It combines a smooth, fudgy base with delicate, web-like decorations for a festive Halloween presentation.
    Prep Time 30 minutes
    Cook Time 35 minutes
    Total Time 1 hour 5 minutes
    Servings: 8
    Course: Main Course
    Cuisine: American
    Calories: 420

    Ingredients
      

    • 1 3/4 cups all-purpose flour sifted
    • 2 cups granulated sugar
    • 3/4 cup unsweetened cocoa powder preferably Dutch-processed
    • 1 1/2 teaspoons baking powder
    • 1/2 teaspoon baking soda
    • 1/2 teaspoon salt
    • 2 large eggs at room temperature
    • 1 cup whole milk room temperature
    • 1/2 cup vegetable oil
    • 2 teaspoons vanilla extract
    • 1 cup boiling water hot, for thinning batter
    • 2 cups powdered sugar for web icing
    • 2 tablespoons corn syrup helps with stretchiness
    • 1 teaspoon vanilla extract for icing
    • few drops food coloring black gel food coloring to color web icing

    Equipment

    • Mixing bowls
    • Hand mixer or whisk

    Method
     

    1. Preheat your oven to 350°F (175°C). Grease and flour two 8-inch round cake pans to prepare for baking.
    2. In a large bowl, whisk together the sifted flour, cocoa powder, baking powder, baking soda, salt, and sugar for an even dry mixture.
    3. Add eggs, milk, vegetable oil, and vanilla extract to the dry ingredients. Use a hand mixer or whisk to blend until smooth and combined, about 2-3 minutes.
    4. Slowly pour in the boiling water while mixing on low speed. Continue mixing until the batter is thin and has a glossy appearance, about 1 minute.
    5. Divide the batter evenly between the prepared pans and smooth the tops with a spatula.
    6. Bake in the preheated oven for 30-35 minutes, or until a toothpick inserted into the center comes out clean. Let the cakes cool in pans for 10 minutes, then transfer to a wire rack to cool completely.
    7. While the cakes cool, prepare the web icing by mixing powdered sugar, corn syrup, vanilla extract, and a few drops of black food coloring in a bowl. Stir until smooth and thick enough to pipe but still pliable.
    8. Once the cakes are completely cooled, place one layer on your serving plate. Spread a thin, even layer of frosting or buttercream over the top, then gently place the second cake layer on top.
    9. Using a piping bag fitted with a small round tip, pipe concentric circles of black web icing over the top of the cake to create the spider web pattern.
    10. Starting from the center, draw lines outward from the middle to mimic the spokes of a spider web, using a toothpick or skewer to drag the icing into the web design for a more authentic look.
    11. Finish by adding some decorative spiders or additional web details if desired. Chill the cake for at least 30 minutes to let the web set.

    This Spider Web Cake makes a haunting centerpiece that’s sure to spark conversations and nostalgic giggles at any Halloween gathering. Its spooky charm isn’t just in looks—it’s in the rich cocoa flavor and the crisp web contrast that shatters with each bite. The best part? It’s a celebration of chaos, creativity, and sweet tradition all rolled into one.

    As the candles flicker and costumes swirl, this cake reminds me that baking is just as much about storytelling as it is about flavors. Every spider’s web and midnight hue captures a moment of seasonal magic and childhood wonder. No matter how you decorate yours, it’ll always be a delicious reminder to embrace the spooky and the silly.

  • The Secret Chill: Mango Slushie with a Twist

    The Secret Chill: Mango Slushie with a Twist

    As a food blogger obsessed with ingredient pairings, I recently stumbled upon an unusual twist for classic mango slushies. Instead of relying solely on ripe mangoes, I started adding a hint of fresh basil and a splash of coconut water. This combo creates a refreshing burst that transports you straight to a tropical breeze with each sip.

    The process is surprisingly simple but yields a complex flavor profile that elevates your typical icy drink. It’s perfect for those hot days when you want something more than just sweet—it’s a celebration of freshness and creativity in your glass. Plus, sneaking in a bit of that herbal aroma makes it feel like a spa moment at home.

    Mango Basil Coconut Slushie

    This mango basil coconut slushie is a frozen beverage made by blending ripe mangoes, fresh basil leaves, and coconut water until smooth and icy. The final drink has a vibrant, slushy texture with a refreshing and aromatic flavor profile, showcasing bright tropical fruit complemented by herbal notes.
    Prep Time 10 minutes
    Total Time 10 minutes
    Servings: 2
    Course: Main Course
    Cuisine: Tropical
    Calories: 120

    Ingredients
      

    • 2 cups ripe mango chunks frozen or fresh, peeled and diced
    • 4 fresh basil leaves basil leaves preferably fragrant and fresh
    • 1 cup coconut water chilled
    • 1 cup ice cubes

    Equipment

    • Blender
    • Measuring Cups
    • Knife
    • Cutting board

    Method
     

    1. Gather all ingredients: mango chunks, basil leaves, coconut water, and ice cubes.
    2. Place the frozen mango chunks into the blender, setting the stage for a thick, icy base.
    3. Add fresh basil leaves to the blender to infuse a fragrant herbal aroma into the mixture.
    4. Pour in the chilled coconut water, which will help blend everything smoothly and add tropical flavor.
    5. Add the ice cubes to ensure the slushie is cold and has a refreshing, icy texture.
    6. Bend the lid securely on the blender and blend on high speed until the mixture is smooth, thick, and frosty, about 30-45 seconds.
    7. Stop the blender and check the consistency—if it’s still too thick, add a splash more coconut water and blend briefly again.
    8. Pour the vibrant mango basil coconut slushie into glasses, allowing its frosty texture to fill the cups.
    9. Garnish with a few basil leaves or a slice of mango for an inviting presentation.
    10. Serve immediately and enjoy the refreshing, fragrant burst of tropical and herbal flavors.

    Notes

    For a creamier texture, add a dollop of Greek yogurt or a splash of coconut milk before blending.
    This mango slushie recipe is a wonderful way to enjoy ripe, juicy mangoes during their peak season. It’s also a versatile base where you can experiment with different herbs or add a splash of lime for extra zing. Whether you serve it at brunch or as a cooling treat after a long day, it always feels just right.

    Enjoy watching this icy drink melt slowly, releasing those rich, fruity scents. A perfect balance of sweet and herbal makes it stand out from everyday smoothies. Sometimes, the simplest ingredients combined thoughtfully can transform your day into a mini tropical escape.

  • Enchanted Night: The Black Magic Margarita for Halloween

    Enchanted Night: The Black Magic Margarita for Halloween

    Every October, as the air grows crisp and the moon rises higher, Halloween transforms into a night of mystique and allure. I find myself craving more than just candy; I want a drink that captures the spirit of the season—dark, daring, and a little mysterious. This year, I decided to craft a cocktail that embodies the haunting charm of Halloween: the Black Magic Margarita.

    What makes this drink truly captivating is its deep, inky hue, achieved with an unexpected twist of activated charcoal and black food coloring. The smoky notes blend seamlessly with the tangy lime and a hint of agave, giving it an otherworldly flavor. It’s perfect for spooky gatherings or a solo night of witching hours, making every sip feel like a spell cast in a glass.

    Black Magic Margarita

    The Black Magic Margarita is a vibrant cocktail that features a deep, inky hue created with activated charcoal and black food coloring. It combines smoky, tangy, and slightly sweet flavors from tequila, lime juice, and agave nectar, resulting in a smooth, visually striking drink with a luminous appearance.
    Prep Time 5 minutes
    Total Time 5 minutes
    Servings: 1
    Course: Main Course
    Cuisine: Mixed Drinks
    Calories: 180

    Ingredients
      

    • 2 oz blanco tequila good quality tequila recommended
    • 1 oz fresh lime juice preferably freshly squeezed
    • 0.75 oz agave nectar adjust to taste
    • 1 gram activated charcoal powder use food-grade activated charcoal
    • ice as needed ice cubes

    Equipment

    • Cocktail shaker
    • Measuring jigger
    • Strainer
    • Rimming plate or small dish
    • Lime wedge for garnish

    Method
     

    1. Begin by preparing your cocktail glass: run a lime wedge along the rim and dip it into a plate of coarse salt or colored sugar for a festive touch.
    2. Fill a cocktail shaker halfway with ice cubes to chill the ingredients properly.
    3. Add the tequila, freshly squeezed lime juice, and agave nectar into the shaker. These form the base of your margarita, balancing smoky and tangy flavors.
    4. Sprinkle the activated charcoal powder into the shaker, then add the black food coloring drops. This will give the cocktail its signature inky color and smoky depth.
    5. Secure the lid on the shaker and shake vigorously for about 15 seconds until the mixture is well combined and slightly frothy.
    6. Strain the mixture into the prepared glass, ensuring a smooth pour that leaves behind any ice shards or sediment.
    7. Garnish with a lime wedge for a pop of color and additional citrus aroma. Serve immediately to enjoy the striking appearance and balanced flavors.

    Notes

    Use food-grade activated charcoal and consume responsibly. Adjust sweetness and intensity based on your taste preferences.

    As the evening winds down, the lingering scent of citrus and the cool touch of this dark elixir leave a haunting impression. It’s a reminder that Halloween isn’t just for children but also for grown-up witches and warlocks eager to indulge in a bit of magical mischief. This recipe makes your celebration a little more enchanting, a little more mysterious—and endlessly fun to share.

    So, next time the moon is full and the night is thick with fog, pour yourself a Black Magic Margarita. Let its eerie glow and bewitching flavors set the perfect tone for a night of mischief, memories, and maybe a little magic. Cheers to a magically delicious Halloween!

    }**/}#}

  • Tropical Twist: The Surprising Charm of Pineapple Slushie

    Tropical Twist: The Surprising Charm of Pineapple Slushie

    Imagine a hot summer day and the sudden craving for something both refreshing and vibrant. Pineapple slushie isn’t just a cool drink, it’s an adventure in a glass, bursting with unexpected bursts of tangy sweetness that instantly lift your mood. This recipe turns the simple pineapple into a flavor playground, blending icy chill with tropical sunshine.

    What sets this slushie apart is its ability to evoke childhood fun while still feeling totally sophisticated. It’s perfect for lazy afternoons or spontaneous gatherings where everyone craves that lively, tart punch. The best part? It’s so easy to make, you’ll find yourself whipping up batch after batch, each one more delightful than the last.

    WHY I LOVE THIS RECIPE?

    • Pure burst of tropical joy in every sip — it feels like a beach vacation.
    • Bright, tangy flavor that cheers up even the gloomiest days.
    • Flexible ingredients; adapt it with coconut or mint for extra flair.
    • Reminds me of childhood summers filled with icy treats and laughter.
    • So quick to whip up that I always keep frozen pineapple on hand.

    AVOID MY DISASTER (You’re Welcome)

    • FORGOT to freeze the pineapple solids? It turned into a watery mess. Freeze chunks overnight!
    • DUMPED in hot water instead of ice? Your slushie loses that thick consistency. Use cold liquids!
    • OVER‑TORCHED the sugar syrup? Caramelized bits ruin the smooth flavor. Cook gently, then chill.
    • FAILED to blend thoroughly? Lumpy slush gives a weird texture. Blend longer, enjoy the silky finish.

    QUICK FIXES THAT SAVE YOUR DAY

    • When the slushie is too thick, splash in a little cold water and pulse again.
    • Patch up sourness with a dash of honey or agave syrup.
    • Shield from melting with a pre-chilled glass, keeps the chill longer.
    • If it’s too sweet, add a squeeze of fresh lime juice.
    • Crack open a can of coconut milk for an instant tropical twist.

    Made with simple ingredients yet packed with flavor, this pineapple slushie is a testament to how good a frozen treat can be. It’s also a reminder of the joy that comes with creating something that sparks momentary escape, even in a glass.

    This recipe feels especially timely now, as everyone searches for easy, uplifting comforts. It pairs perfectly with warm days and cool evenings alike, a little bit of sunshine on demand. In every slushie, I see a small reminder to savor simple, joyful moments.

    Pineapple Slushie

    A pineapple slushie is a cold, icy beverage that combines frozen pineapple chunks blended into a smooth, thick consistency. The main ingredients—frozen pineapple, ice, and optional sweeteners—create a vibrant, tangy drink with a refreshing texture and a bright, tropical appearance. The final product is a slushy, icy beverage perfect for hot days or casual gatherings.
    Prep Time 10 minutes
    Total Time 10 minutes
    Servings: 2
    Course: Main Course
    Cuisine: Tropical
    Calories: 120

    Ingredients
      

    • 2 cups frozen pineapple chunks preferably pre-frozen for best slush texture
    • 1 cup ice cubes optional, for extra chill and thickness
    • 1/4 cup honey or agave syrup adjust sweetness to taste
    • 1 tablespoon lime juice adds brightness and tang

    Equipment

    • Blender
    • Measuring Cups

    Method
     

    1. Add the frozen pineapple chunks to your blender, ensuring they are well frozen for achieving a thick, icy texture.
    2. Pour in the cup of ice cubes, which will help make the slushie extra chilled and give it a more viscous consistency.
    3. Drizzle the honey or agave syrup over the pineapple and ice, adjusting amount for your preferred sweetness level.
    4. Squeeze in the lime juice to add a tangy contrast that enhances the tropical flavor.
    5. Secure the lid on your blender and blend on high speed. Listen for the mixture to become smooth and thick, with a slushy, icy texture, usually about 30-60 seconds.
    6. Stop blending once the ingredients are fully combined, and the mixture is velvety, with nothing chunky remaining.
    7. Pour the vibrant yellow slushie into chilled glasses. The drink should look frosty and inviting, with a thick, icy consistency.
    8. Garnish with a small wedge of lime or a fresh pineapple slice if desired for that extra tropical flair.
    9. Serve immediately with a straw or spoon, sipping or scooping the refreshing, icy goodness.

    Whenever you need a moment of tropical bliss, this pineapple slushie is ready to serve. It’s simple enough to become a go-to, yet versatile enough to keep experimenting with. The essence of the recipe is its carefree spirit and that burst of fresh pineapple magic.

    So, go ahead — blend, sip, and enjoy the fleeting taste of summer. These slushies aren’t just drinks; they’re a little celebration in a cup on any day of the year.

  • Velvety Butternut Squash & Ginger Soup with a Twist

    Velvety Butternut Squash & Ginger Soup with a Twist

    Imagine a cozy evening, the air tinged with the sweet aroma of roasted butternut squash mingling with a zing of fresh ginger. This soup is more than just comfort food; it’s a playful dance of flavors that awakens your palate. I love how the caramelized edges of the squash bring a depth that’s often missing in everyday soups.

    Unlike typical recipes, I add a splash of apple cider to lend a subtle sweetness, balancing the spicy ginger heat. This dish is my secret weapon for chilly nights when I want something both nourishing and unexpectedly bright. It’s a vibrant, velvety bowl that lifts spirits and sparks joy in the kitchen.

    Roasted Butternut Squash and Ginger Soup

    This soup features roasted butternut squash blended into a smooth, velvety purée, flavored with fresh ginger and a splash of apple cider. It has a rich, slightly sweet and spicy flavor profile with a creamy, bright orange appearance. The dish combines oven roasting and blending techniques to create a warming, textured soup.
    Prep Time 15 minutes
    Cook Time 40 minutes
    Total Time 55 minutes
    Servings: 4
    Course: Main Course
    Cuisine: comfort food
    Calories: 180

    Ingredients
      

    • 1 medium butternut squash peeled, seeded, and cut into chunks
    • 2 tablespoons olive oil for roasting
    • 1 inch fresh ginger peeled and grated
    • 1 cup apple cider adds subtle sweetness
    • 4 cups vegetable or chicken stock for blending
    • to taste salt and pepper for seasoning

    Equipment

    • Baking sheet
    • Blender
    • Large pot
    • Knife
    • Cutting board
    • Cooking spoon

    Method
     

    1. Preheat your oven to 400°F (200°C). Spread the butternut squash chunks on a baking sheet, drizzle with olive oil, and toss to coat evenly. Roast in the oven for about 25-30 minutes until soft and slightly caramelized around the edges.
    2. While the squash roasts, peel and grate the fresh ginger until you have about 1 inch of grated ginger and set aside.
    3. Once the squash is done roasting, transfer the tender pieces to a blender along with the grated ginger, apple cider, and vegetable stock. Blend until smooth and creamy, stopping to scrape down the sides as needed.
    4. Pour the blended soup into a large pot and bring to a gentle simmer over medium heat. Taste and season with salt and pepper as desired.
    5. Allow the soup to simmer for about 10 minutes, stirring occasionally, to let the flavors meld and the soup thicken slightly.
    6. Serve the soup hot, garnished with a swirl of cream or a sprinkle of fresh herbs if desired. Enjoy the vibrant color and rich, velvety texture in each spoonful.

    Notes

    For an extra depth of flavor, try topping with toasted pumpkin seeds or a drizzle of olive oil before serving.

    This soup has become a fall staple in my home, thanks to its warm glow and the instant sense of nostalgia it stirs. Every spoonful reminds me of brisk walks through pumpkin patches, carrying the cozy promise of winter ahead. It’s simple to make yet feels luxurious enough for a special occasion.

    Next time your pantry whispers for a quick fix, reach for butternut squash and ginger. This recipe invites you to savor not just the flavors but the memories they evoke—comfort that’s rooted in fresh, bold ingredients. It’s a bowl that celebrates seasonal abundance and culinary creativity in every warm sip.