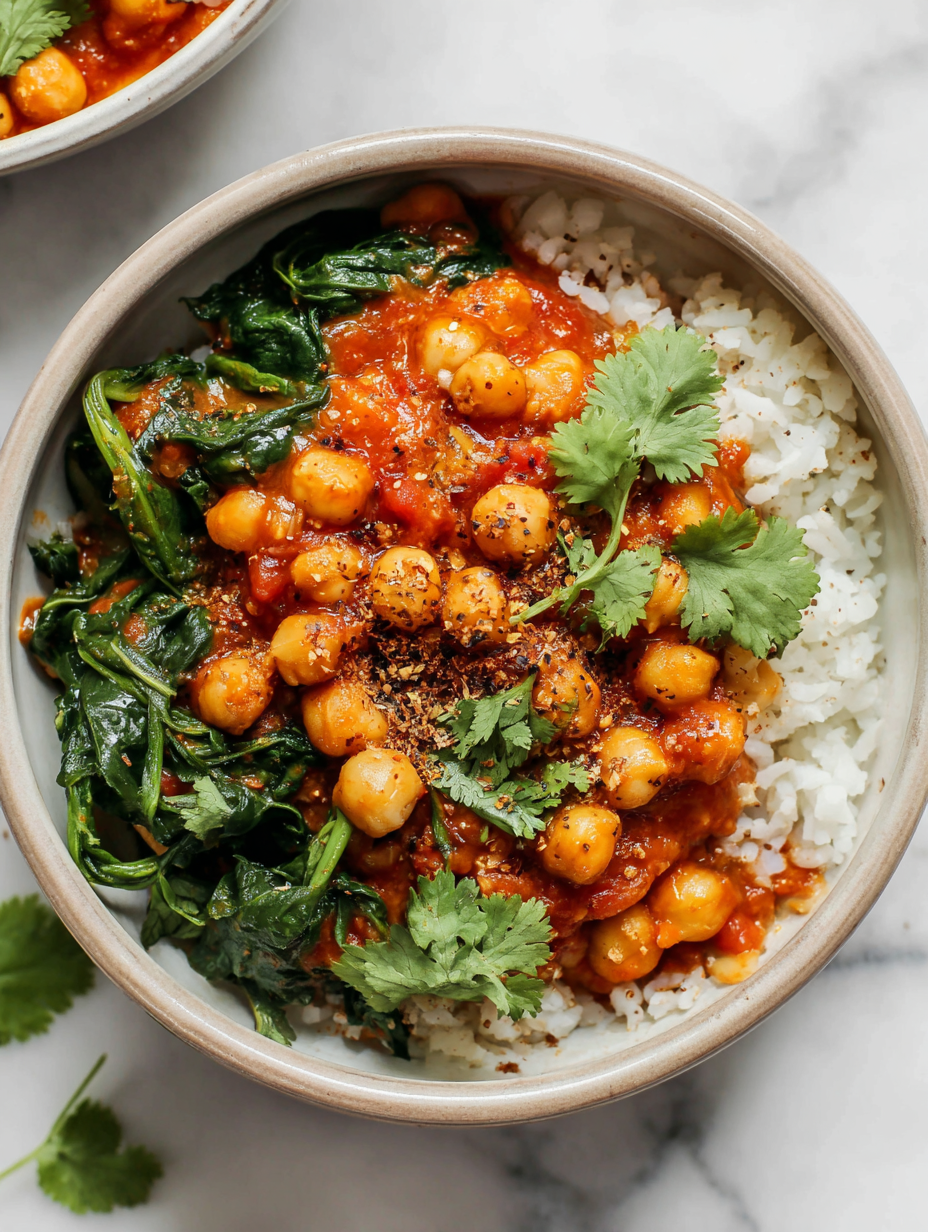
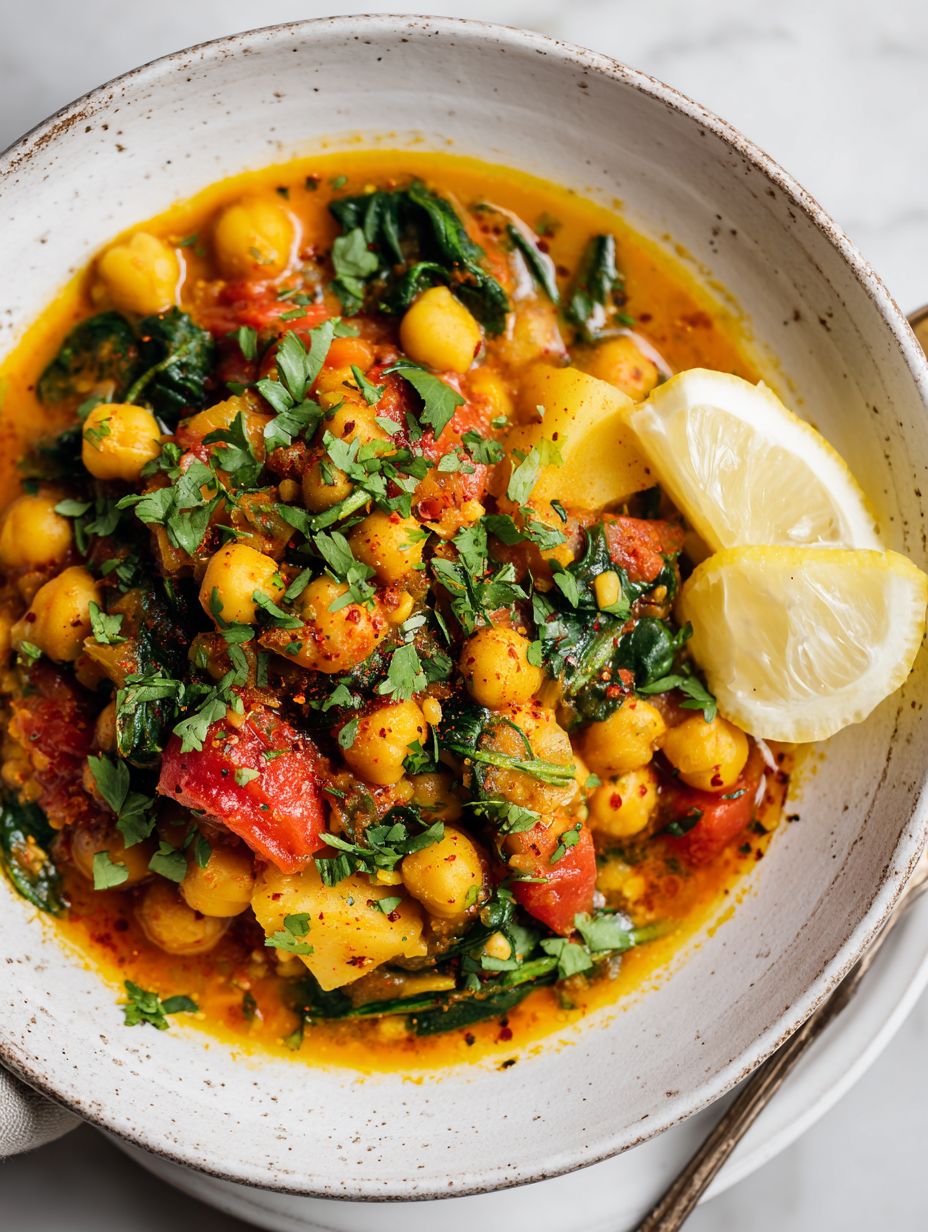
Author: HarperEvans

  • Unveiling the Cozy Charm of Vegan Pumpkin Soup with a Twist

    Unveiling the Cozy Charm of Vegan Pumpkin Soup with a Twist

    As the leaves turn and there’s a crispness in the air, I find myself craving more than just pumpkin spice lattes. I’ve recently stumbled upon a way to transform humble pumpkin into a silky, flavor-packed soup that surprises even the most seasoned plant-based eaters. It’s not your average fall dish; it’s a celebration of seasonal produce with a hint of unexpected spice.

    This vegan pumpkin soup isn’t just warming; it’s a journey through my nostalgic fondness for autumn flavors, mixed with a zest for trying something a little different. I’ve infused it with nuances of smoked paprika and a touch of coconut milk to add depth and creaminess without sacrificing that bright, pumpkin essence.

    Vegan Pumpkin Soup with Smoked Paprika and Coconut Milk

    This vegan pumpkin soup is a smooth, creamy dish made by blending roasted pumpkin with fragrant spices and coconut milk. It features a velvety texture with a vibrant orange color and a hint of smokiness from paprika, perfect for warm autumn days.
    Prep Time 15 minutes
    Cook Time 30 minutes
    Total Time 45 minutes
    Servings: 4
    Course: Main Course
    Cuisine: American
    Calories: 180

    Ingredients
      

    • 1 pound sugar pumpkin or butternut squash peeled, seeded, and cubed
    • 2 tablespoons olive oil for roasting
    • 1 medium onion chopped
    • 3 cloves garlic minced
    • 1 teaspoon smoked paprika adds depth and smokiness
    • 1 cup vegetable broth
    • 1 can coconut milk full-fat for creaminess
    • to taste salt and pepper

    Equipment

    • Baking sheet
    • Blender
    • Large pot
    • Wooden spoon

    Method
     

    1. Preheat your oven to 400°F (200°C), then spread the cubed pumpkin on a baking sheet, drizzling with olive oil. Roast until tender and slightly caramelized around the edges, about 25-30 minutes.
    2. Meanwhile, heat a large pot over medium heat and add a dash of olive oil. Sauté the chopped onion until it becomes translucent and fragrant, about 5 minutes.
    3. Add the minced garlic and smoked paprika to the pot, stirring constantly until the garlic is fragrant, about 1 minute. This releases the spices’ aroma and infuses the onion with smoky notes.
    4. Once the pumpkin is roasted and cool enough to handle, add it to the pot with the sautéed aromatics. Pour in the vegetable broth and bring the mixture to a gentle simmer.
    5. Use an immersion blender or transfer the mixture to a blender to puree until silky smooth. Be careful when blending hot liquids—blend in batches if necessary.
    6. Return the blended soup to the pot (if using a blender). Stir in the coconut milk until well combined and creamy. Simmer gently for another 5 minutes, adjusting seasoning with salt and pepper as needed.
    7. Remove from heat and ladle the soup into bowls. Garnish with extra smoked paprika or fresh herbs if desired, and serve hot.
    This soup is perfect for chilly evenings when comfort food feels like the only answer. Its velvety texture and warm, spicy aroma make it a standout on any table, especially when you want something nourishing yet vibrant. Plus, it’s a breeze to whip up — even on the busiest days.

    There’s something satisfying about blending seasonal ingredients into a dish that honors both your palate and the earth. As the pumpkin’s natural sweetness mingles with subtle smoky notes, it reminds me why I love cooking seasonally. Sometimes, all it takes is a pot of this soup to turn a simple meal into a cozy celebration.

  • Chill Out with a Caramel Slushie!

    Chill Out with a Caramel Slushie!

    Imagine the sultry days of summer, but with an unexpected twist—an indulgent caramel twist to your frozen treat. This caramel slushie isn’t just refreshing; it wields a transformer’s power to elevate a simple cold beverage into a sweet, salty, creamy escape. Plus, it’s surprisingly easy to whip up in a blender, perfect for spontaneous cravings.

    Buttoned-up for the season of iced delights, this recipe recasts a childhood favorite into a sophisticated swirl of caramel goodness. The rich aroma of caramel, mixed with icy chill, makes each sip a nostalgic reverie with a modern twist. It’s the kind of treat that demands a quirky straw and a moment to savor.

    Caramel Slushie

    This caramel slushie is a frozen beverage made by blending sweetened caramel with ice and milk to create a smooth, icy texture. The mixture results in a creamy, frosty drink with a rich caramel flavor and a slightly salty, indulgent finish, topped with a whipped or garnished presentation.
    Prep Time 10 minutes
    Total Time 10 minutes
    Servings: 2
    Course: Main Course
    Cuisine: American
    Calories: 210

    Ingredients
      

    • 1/2 cup caramel sauce store-bought or homemade
    • 2 cups milk cold, whole or your preferred milk
    • 2 cups ice cubes preferably crushed or in small pieces
    • 1/2 teaspoon salt to enhance caramel flavor

    Equipment

    • Blender
    • Measuring cups and spoons
    • Ice cube tray

    Method
     

    1. Measure out the caramel sauce and set aside for blending.
    2. Add the cold milk to the blender, followed by the caramel sauce and salt.
    3. Drop the ice cubes into the blender over the liquid ingredients.
    4. Secure the lid and blend on high speed until the mixture is thickened and smooth, about 30-45 seconds.
    5. Stop the blender and check the consistency — it should feel icy yet creamy when scooped.
    6. Pour the slushie mixture into chilled glasses, using a spoon to help fill if needed.
    7. If desired, garnish with whipped cream, a drizzle of caramel, or a sprinkle of sea salt for extra flair.
    8. Serve immediately with a quirky straw to enjoy the frosty, caramel delight.

    Notes

    For a creamier texture, use full-fat milk. Adjust the amount of caramel to taste for a sweeter or more intense flavor.

    This caramel slushie makes for an ideal cooling treat when the temperatures rise. It’s great for game day, lazy afternoons, or just because you want a sweet little escape. The rich, silky flavor lingers just long enough to keep your mind off the heat.

    Offer this slushie at your next gathering and watch it disappear in a flash. No matter the season, a cool caramel fix always feels like a small celebration. Keep the ingredients handy, and you’ll be ready for those spontaneous cold cravings with a divine glass of icy caramel delight.

  • Haunted Kitchen: Spook-tacular Halloween Deviled Egg Eyeballs

    Haunted Kitchen: Spook-tacular Halloween Deviled Egg Eyeballs

    Every October, my kitchen transforms into a playground of eerie delights. This year, I decided to craft a creepy twist on the classic deviled eggs, turning them into unsettling eyeballs for our Halloween feast. The moment I cracked open the eggs and saw the vibrant green centers, I knew these would steal the show.

    These eyeball deviled eggs aren’t just creepy—they’re irresistibly creamy with a pop of briny flavor from the olives, making each bite an unsettlingly satisfying experience. I love how their spooky appearance sparks giggles and gasps around the table, especially when everyone’s too excited to notice how delicious they are.

    Creepy Eyeball Deviled Eggs

    This dish features classic deviled eggs with a spooky twist, where the creamy yolk filling is topped with green-colored centers resembling unsettling eyeballs. The eggs are boiled, halved, and filled with a mayonnaise-based mixture, then decorated to create an eerie Halloween presentation with olive pupils and a vibrant green center, resulting in a smooth, creamy texture and a striking appearance.
    Prep Time 20 minutes
    Cook Time 10 minutes
    Total Time 30 minutes
    Servings: 12
    Course: Main Course
    Cuisine: Halloween
    Calories: 80

    Ingredients
      

    • 6 large eggs fresh large eggs
    • 3 tablespoons mayonnaise
    • 1 teaspoon yellow mustard
    • to taste salt and pepper
    • 1 small olive pitted, sliced into discs
    • 1 drop green food coloring for the yolk centers

    Equipment

    • Kitchen knife
    • Boiling pot
    • Mixing bowl
    • Piping bag or spoon
    • Small knife or toothpick

    Method
     

    1. Place the eggs in a boiling pot and cover with water. Bring to a boil over medium-high heat, then cook for 9-10 minutes until fully set. Transfer eggs to ice water to cool completely, which helps the shells peel easily.
    2. Gently tap each egg on the counter to crack the shell, then peel carefully to reveal smooth, white eggs. Slice each egg in half lengthwise with a sharp knife, and carefully remove the yolks into a mixing bowl. Place the egg whites on a serving platter.
    3. Mash the yolks with a fork until crumbly, then add mayonnaise, mustard, salt, and pepper. Mix until the filling is smooth and creamy, resembling a thick paste.
    4. Divide the yolk mixture evenly and spoon or pipe it back into the hollowed egg whites, creating a smooth, filled appearance.
    5. Prepare the green centers by adding a tiny drop of green food coloring to a small portion of the yolk mixture, and mix well to create a vivid green hue. Using a small spoon or piping bag, add a small dollop of this green mixture into the center of each filled egg, pressing lightly to ensure it stays in place.
    6. Cut the olive into tiny discs to resemble pupils. Place a single olive slice in the green center of each egg to mimic an unsettling eyeball, pressing gently to secure.
    7. Arrange the decorated eggs on a serving platter. For a more creepy effect, you can slightly tilt or position some eggs at an angle for added visual interest.
    8. Serve immediately or refrigerate until ready to display at your Halloween feast. Enjoy these eerie yet delicious deviled eggs, which combine creamy texture with a spooky appearance.

    Notes

    Feel free to experiment with different colored centers or pupil sizes for varied spooky effects.

    As the night winds down, these eyeball eggs remain a fun centerpiece—an easy yet memorable recipe for any Halloween gathering. They bring a little chaos and a lot of flavor, perfect for breaking the ice or wrapping up a spooky feast.

    Making these eyeballs gave me a chance to embrace the holiday’s playful darkness. Plus, they remind me that a little bit of creepy can be cozy and fun, especially when shared with good friends or family.

  • Chill Out with a Sparkling Rosé Slushie: A Secret Summer Escape

    Chill Out with a Sparkling Rosé Slushie: A Secret Summer Escape

    When the heat turns relentless and the city feels like a sauna, I reach for my freezer stash of rosé. But not just to sip—I’m talking about transforming it into a frosty, tangle of juicy bliss. This isn’t your average frozen wine; it’s part nostalgia, part rebel, and all summer magic.

    Thanks to an unexpected dash of citrus and a handful of frozen berries, this slushie becomes a soothing, shimmering escape. The best part? It’s ridiculously easy, with no fancy equipment needed. Just a few quick steps and you’re transported to that first cool sip on a scorching afternoon.

    Frozen Rosé Berry Slushie

    This frozen rosé berry slushie is a refreshing semi-frozen beverage made by blending rosé wine with frozen berries and citrus. It has a slushy, icy texture with vibrant fruit pieces, perfect for hot summer days. The dish requires minimal equipment and offers a cool, juicy escape in every spoonful.
    Prep Time 5 minutes
    Total Time 5 minutes
    Servings: 2
    Course: Main Course
    Cuisine: Various
    Calories: 150

    Ingredients
      

    • 1 bottle rosé wine chilled
    • 1 cup frozen mixed berries strawberries, blueberries, blackberries
    • 1 citrus lemon or lime juice freshly squeezed

    Equipment

    • Blender

    Method
     

    1. Pour the chilled rosé wine into the blender.
    2. Add the frozen mixed berries to the blender, distributing them evenly over the liquid.
    3. Squeeze fresh lemon or lime juice into the mixture for a bright citrus note.
    4. Secure the lid on the blender and pulse a few times to start breaking down the berries.
    5. Blend on high until the mixture is thick, slushy, and well combined—about 30-45 seconds.
    6. Check the texture—if it’s too thick, add a splash more rosé and blend briefly to loosen.
    7. Pour the slushie into chilled glasses, allowing the vibrant colors and icy texture to shine.
    8. Garnish with extra berries or a citrus wedge for a colorful finishing touch.
    9. Serve immediately with a straw or spoon for a cooling, juicy treat.

    This rosé slushie isn’t just a drink; it’s a small rebellion against the relentless heat and busy days. It’s perfect for lazy weekends or spontaneous backyard parties—anything that calls for a burst of cool, fruity joy. Once you try it, you’ll keep it as your secret weapon for summer survival.

    As the season shifts and the evenings grow longer, this simple frozen treat reminds me to slow down and savor the little moments. Sometimes, all it takes is a glass of rosé turned icy to make any day feel just a little more special. Cheers to those fleeting, shimmering summer nights.

  • Kool Aid Slushie: Nostalgic Chill with a Twist

    Kool Aid Slushie: Nostalgic Chill with a Twist

    Imagine a summer day when your favorite childhood drink gets an icy upgrade. The Kool Aid slushie isn’t just a treat; it’s a blast from the past with a refreshing twist. This recipe transforms a simple powder and water into a vibrant, frosty delight that’s perfect for hot afternoons.

    What makes this slushie stand out is its nostalgic charm paired with modern simplicity. It’s a playful way to indulge in a cool, sweet snack that everyone will love. Plus, it’s so easy you can whip it up in minutes, making it a go-to for spontaneous gatherings or just a solo cool-down.

    Kool Aid Slushie

    This Kool Aid slushie is a cold, frosty beverage made by blending flavored powdered drink mix with crushed ice. It has a vibrant color and a icy, slushy texture that is both refreshing and visually appealing, perfect for hot days. The recipe involves dissolving the powder with water and then chilling it until it reaches a frosty consistency.
    Prep Time 5 minutes
    Total Time 5 minutes
    Servings: 2
    Course: Main Course
    Cuisine: International
    Calories: 50

    Ingredients
      

    • 1 packet Kool Aid powdered drink mix your favorite flavor
    • 1 cup water
    • 1 1/2 cups crushed ice more or less depending on desired consistency

    Equipment

    • Measuring Cups
    • Blender

    Method
     

    1. Measure out a packet of Kool Aid powder and pour it into a mixing cup.
    2. Add one cup of cold water to the Kool Aid powder and stir vigorously until the powder is fully dissolved and the mixture is colored evenly.
    3. Place crushed ice into a blender, then pour the Kool Aid liquid over the ice.
    4. Blend on high for about 30 seconds until the mixture is slushy and ice is finely crushed.
    5. Check the texture; if it’s too thick, add a splash more water and briefly blend again for a smoother consistency.
    6. Pour the vibrant Kool Aid slushie into glasses, revealing its icy, colorful appearance.
    7. Serve immediately with a straw or spoon and enjoy the refreshing, icy treat.
    As the sun beats down, a Kool Aid slushie can turn any ordinary day into a small celebration. Its bright colors and sweet aroma lift spirits instantly. This recipe reminds us that sometimes, the simplest pleasures are the most satisfying, especially when they come frozen just right.

    Enjoy the process of blending up this cool treat. No matter the season, it’s a cheerful reminder that a little sweetness and a splash of color can brighten even the gloomiest days.

  • Chill Out with an Unusual Lemonade Slushie Twist

    Chill Out with an Unusual Lemonade Slushie Twist

    As summer’s whispers turn into loud, scorching days, finding a refreshing escape becomes essential. This lemonade slushie isn’t just your average cool-down—it’s a surprising spin on nostalgia, incorporating a hint of mint and a splash of elderflower for an unexpected floral burst. Making it feels like a mini vacation, right in your kitchen.

    What sets this recipe apart is its ability to convert simple lemonade into an icy, aromatic treat that’s both playful and elegant. Perfect for spontaneous gatherings or those lazy weekends when the heat demands something more than just cold drinks. It’s a small, delicious rebellion against the ordinary.

    Elderflower Mint Lemonade Slushie

    This lemonade slushie combines freshly squeezed lemon juice with a hint of mint and elderflower syrup, blended into a smooth, icy treat. The texture is icy and refreshing, with aromatic floral notes and a vibrant yellow hue, perfect for hot weather drinks.
    Prep Time 10 minutes
    Total Time 10 minutes
    Servings: 4
    Course: Main Course
    Cuisine: beverage
    Calories: 80

    Ingredients
      

    • 1 cup fresh lemon juice about 4-5 lemons
    • 1/4 cup elderflower syrup adjust to taste
    • 1/2 cup fresh mint leaves roughly torn
    • 3 cups cold water
    • 2 cups ice cubes

    Equipment

    • Blender
    • Measuring cups and spoons
    • Citrus juicer

    Method
     

    1. Juice the lemons using a citrus juicer until you have about one cup of fresh lemon juice, then pour it into the blender.
    2. Add elderflower syrup to the lemon juice, measuring it carefully to balance floral sweetness with tartness.
    3. Tear fresh mint leaves roughly with your fingers to release their aromatic oils, then add them to the blender.
    4. Pour cold water into the blender to help the mixture blend smoothly and to dilute slightly for a refreshing taste.
    5. Add ice cubes to the blender, filling it up to the top, to create a chilled, slushy texture.
    6. Secure the lid on the blender and blend on high until the mixture is smooth, icy, and well combined, about 30-45 seconds.
    7. Pour the slushie into glasses, ensuring each has plenty of crushed ice and bright flavor.
    8. Garnish with extra mint leaves or a lemon wedge if desired for an attractive presentation.

    Refreshing and vibrant, this lemonade slushie is a keeper for the warmer months. Its icy texture and subtle floral notes make every sip an adventure, awakening your senses with each gulp.

    Plus, it’s incredibly easy to whip up, even when the sun’s blazing bright. A quick blend transforms basic ingredients into a lively, cooling sensation that’s perfect for any occasion. Keep this recipe in your back pocket for those ‘just because’ moments or spontaneous summer celebrations.

  • Harvest Festival Fall Turkey Chili with Sweet Potatoes

    Harvest Festival Fall Turkey Chili with Sweet Potatoes

    As the leaves turn vibrant shades of amber and crimson, I find myself craving dishes that echo the season’s cozy charm. This Fall Turkey Chili with Sweet Potatoes is a celebration of autumn’s bounty and the comfort it promises. The aroma of cumin, garlic, and roasted sweet potatoes fills the kitchen, instantly evoking memories of harvest festivals and crisp autumn walks.

    What makes this chili stand out is its unexpected sweetness paired with savory turkey. It’s perfect for those chilly evenings when you need something hearty yet bright with seasonal flavors. Plus, it’s a one-pot wonder that simplifies meal prep without sacrificing depth or richness.

    Fall Turkey Chili with Sweet Potatoes

    This hearty chili combines ground turkey and roasted sweet potatoes simmered with warm spices like cumin and garlic. The dish develops a thick, chunky texture with a rich, savory flavor complemented by subtle sweetness, finished with a vibrant, garnished appearance.
    Prep Time 15 minutes
    Cook Time 45 minutes
    Total Time 1 hour
    Servings: 4
    Course: Main Course
    Cuisine: American
    Calories: 350

    Ingredients
      

    • 2 large sweet potatoes peeled and chopped into chunks
    • 1 lb ground turkey lean
    • 1 medium onion diced
    • 3 cloves garlic minced
    • 1 tablespoon cumin ground
    • 1 can (14 oz) diced tomatoes with juice
    • 1 cup chicken or vegetable broth
    • 1 can (15 oz) black beans drained and rinsed
    • 1 teaspoon salt
    • 1/2 teaspoon black pepper
    • 2 tablespoons olive oil

    Equipment

    • Baking sheet
    • Large pot or Dutch oven
    • Knife
    • Cutting board
    • Wooden spoon or spatula

    Method
     

    1. Preheat your oven to 400°F (200°C). Spread the chopped sweet potatoes on a baking sheet, drizzle with a tablespoon of olive oil, and toss to coat. Roast for about 25-30 minutes until tender and caramelized around the edges.
      2 large sweet potatoes
    2. While the sweet potatoes roast, heat the remaining tablespoon of olive oil in a large pot over medium heat. Add the diced onion and cook, stirring occasionally, until it becomes translucent and fragrant, about 5 minutes.
      2 large sweet potatoes
    3. Stir in the minced garlic and ground cumin; cook for another minute until the garlic is fragrant, filling the kitchen with a warm aroma.
      2 large sweet potatoes
    4. Add the ground turkey to the pot, breaking it apart with a spoon. Cook until it’s browned and no longer pink, about 7-8 minutes.
      2 large sweet potatoes
    5. Pour in the diced tomatoes with their juice, along with the broth. Stir everything together and bring to a gentle simmer.
      2 large sweet potatoes
    6. Drain and rinse the black beans, then stir them into the chili mixture. Season with salt and black pepper, and allow the chili to simmer uncovered for 15-20 minutes, stirring occasionally, until thickened.
      2 large sweet potatoes
    7. Once the sweet potatoes are roasted and tender, gently fold them into the chili, making sure they’re evenly distributed. Let it cook for another 5 minutes to meld the flavors.
      2 large sweet potatoes
    8. Check the seasoning and adjust salt or pepper if needed. The chili should be thick, hearty, and slightly chunky, with the sweet potatoes providing a inviting pop of color and texture.
    9. Spoon the steaming chili into bowls, garnish as desired, and enjoy a comforting, flavorful dish perfect for autumn evenings.
    This recipe hits the table just when you need it most — during the rush of seasonal transitions and busy weeks. The warmth from the spices, combined with the natural sweetness of the potatoes, makes every spoonful feel like a small celebration.

    Enjoy the comforting flavors and know that this dish can be a staple in your fall cooking arsenal. It’s a versatile, nourishing meal that invites lingering at the table and savoring the season’s best ingredients.

  • Spooky Season Delight: The Ultimate Pumpkin Cheesecake

    Spooky Season Delight: The Ultimate Pumpkin Cheesecake

    As autumn leaves swirl outside, I crave more than just the usual pumpkin spice. This pumpkin cheesecake combines the velvety richness of classic cheesecake with a spiced pumpkin twist that whispers fall in every bite.

    What makes this recipe truly special is the secret layer of gingersnap crust that adds a crunch and a spicy kick. It’s a story of textures and flavors that brings back memories of family dinners and cozy evenings by the fire.

    There’s a certain magic in how the warm cinnamon and nutmeg mingle with the sweet pumpkin, making it impossible to resist. This dessert isn’t just for holidays; it’s the centerpiece of a chilly evening with friends or a quiet Sunday after carving pumpkins.

    WHY I LOVE THIS RECIPE?

    • The aroma of spices fills my home, instantly warming the heart.
    • Perfect blend of creamy cheesecake and spicy pumpkin—textural harmony.
    • It brings a nostalgic touch to autumn gatherings, reminding me of childhood.
    • Layered with textures, it offers a satisfying crunch and velvety smoothness.
    • It’s a baking project that feels indulgent yet manageable.

    AVOID MY DISASTER (You’re Welcome)

    • FORGOT to chill the crust—crumbly slices resulted. Freeze before filling for crispness.
    • DUMPED the batter—spoiled the seamless blend. Mix gently to keep it airy.
    • OVER‑TORCHED the edges—burnt smell, ruined crust. Use a baking shield or check oven frequently.
    • FORGOT to tap out bubbles—wrinkles on top. Gently tap and smooth before baking.

    QUICK FIXES THAT SAVE YOUR DAY

    • When filling is too runny, splash in a little extra cream cheese and chill.
    • Patch cracked top with whipped cream or cream cheese frosting.
    • Shield edges with foil if browning too fast, prevent burning with a sunflower or vanilla aroma.
    • When crust is soggy, tap out excess moisture and re-bake for crispiness.
    • When baking smells burnt, turn down the oven and add a slice of bread to absorb excess heat.

    {

    Pumpkin Cheesecake with Gingersnap Crust

    This pumpkin cheesecake features a smooth, creamy filling infused with warm spices and layered over a crunchy gingersnap crust. The dessert has a velvety texture with a spicy, crispy base, and is topped with additional spice and whipped cream for an elegant finish.
    Prep Time 30 minutes
    Cook Time 1 hour
    Total Time 1 hour 30 minutes
    Servings: 8
    Course: Main Course
    Cuisine: American
    Calories: 480

    Ingredients
      

    • 1 1/2 cups gingersnap cookies for crust
    • 6 tablespoons unsalted butter melted
    • 24 oz cream cheese softened
    • 1 cup granulated sugar
    • 1 cup canned pumpkin pure pumpkin puree
    • 3 large eggs
    • 1 1/2 teaspoons ground cinnamon
    • 1/2 teaspoon ground nutmeg
    • 1/4 teaspoon ground ginger
    • 1/4 teaspoon ground cloves
    • 1/2 teaspoon salt
    • 1 cup sour cream
    • 1 teaspoon vanilla extract

    Equipment

    • Springform pan
    • Mixing bowls
    • Electric mixer
    • Rubber spatula
    • Food processor or blender
    • Measuring cups and spoons
    • Baking sheet

    Method
     

    1. Place gingersnap cookies in a food processor and pulse until finely ground. Mix in melted butter until the crumbs are evenly coated, then press this mixture firmly into the bottom of a springform pan to create an even crust. Bake at 350°F (175°C) for 10 minutes to set the crust, then set aside to cool slightly.
    2. In a large mixing bowl, beat softened cream cheese and sugar with an electric mixer on medium speed until smooth and creamy, about 2-3 minutes. Scrape down the sides as needed.
    3. Add canned pumpkin, eggs, cinnamon, nutmeg, ginger, cloves, and salt to the cream cheese mixture. Mix on low speed until well combined and smooth, avoiding overmixing to keep it airy.
    4. Gently fold in sour cream and vanilla extract with a spatula, just until incorporated. The batter will be thick and velvety.
    5. Pour the filling over the cooled crust, spreading evenly with a spatula. Tap the pan lightly on the counter to release any air bubbles and smooth the top.
    6. Bake the cheesecake at 350°F (175°C) for about 50-60 minutes, or until the edges are set but the center slightly jiggles when gently shaken. It will firm up as it cools.
    7. Remove from oven and let the cheesecake cool in the pan for at least 1 hour. Then, refrigerate for at least 4 hours or overnight to allow it to set completely.
    8. Once chilled, run a knife around the edge of the pan before carefully removing the springform ring. Slice the cheesecake with a clean, sharp knife and serve topped with whipped cream and a sprinkle of cinnamon if desired.

    Notes

    Ensure the cheesecake is fully cooled before removing the springform ring to prevent cracks. For extra flavor, garnish with toasted pecans or a caramel drizzle.

    This pumpkin cheesecake stands out because it captures the essence of fall with a touch of elegance. Its rich, spiced flavor makes it a perfect ending to any chilly evening or festive gathering.

    Taking the time to prepare this dessert is a way to slow down and enjoy moments of comfort and warmth. The aroma alone is worth every patience-filled minute in the kitchen. It’s not just a dessert—it’s a celebration of the season in every bite.

  • Peach Crumble: Heritage Sweetness in Every Bite

    Peach Crumble: Heritage Sweetness in Every Bite

    Spring’s arrival often feels like a gentle nod from nature to indulge in fresh, vibrant fruits. But what if I told you that a humble peach, with its blush and aroma, can whisper stories of family kitchens and childhood summers? This recipe for Peach Crumble is my homage to those lazy, sun-drenched afternoons where everything felt simple and sweet.

    What makes this crumble unique isn’t just the ripe peaches but the way the topping crackles and shatters, revealing a warm, fragrant interior. It’s a perfect seasonal treat that bridges nostalgia with a touch of chaos—think sticky caramel peeling away from a crunchy topping. All you need is a few ripe peaches and a handful of pantry staples to create a dish that feels both rustic and indulgent.

    Peach Crumble

    Peach Crumble is a dessert featuring fresh, ripe peaches topped with a crumbly mixture of flour, butter, and sugar. It is baked until the topping is golden brown and the peaches are bubbling, resulting in a warm, fragrant interior with a crunchy, shattering top layer.
    Prep Time 15 minutes
    Cook Time 40 minutes
    Total Time 55 minutes
    Servings: 4
    Course: Main Course
    Cuisine: American
    Calories: 250

    Ingredients
      

    • 4-5 large ripe peaches peeled, pitted, and sliced
    • 1/2 cup granulated sugar for tossing peaches
    • 1 cup all-purpose flour for the crumble topping
    • 1/2 cup rolled oats optional, adds texture
    • 1/2 cup brown sugar for sweetness in the topping
    • 1/2 cup unsalted butter cold and cubed
    • 1/4 teaspoon salt

    Equipment

    • Bakeware (9-inch baking dish)
    • Mixing bowls
    • Pastry cutter or forks
    • Measuring cups and spoons
    • Peeler or knife for peeling peaches

    Method
     

    1. Preheat your oven to 375°F (190°C). Peel, pit, and slice the peaches, then toss them with granulated sugar in a mixing bowl to enhance their natural sweetness.
    2. Spread the sweetened peach slices evenly in the bottom of your baking dish, creating a smooth layer that will bake into a juicy filling.
    3. In another bowl, combine the flour, oats (if using), brown sugar, and salt. Mix these dry ingredients together for the crumble topping.
    4. Add the cold, cubed butter to the dry mixture. Use a pastry cutter or forks to cut in the butter until the mixture resembles coarse crumbs with some pea-sized pieces.
    5. Sprinkle the crumble mixture evenly over the peaches, covering them completely to create a thick, layered topping.
    6. Bake in the preheated oven for about 40 minutes, or until the topping is golden brown and the filling is bubbling around the edges.
    7. Remove the crumble from the oven and let it cool slightly before serving. The topping will be crunchy and shatter easily, while the peaches inside stay warm and juicy.

    As the seasons shift, having a straightforward yet stunning dessert like this Peach Crumble feels essential. It’s a reminder that comfort and simplicity can go hand in hand, especially with the bright tang of fruit and the satisfying crunch of streusel. Every spoonful sparks a moment of pause and sweetness amidst busy days.

    Enjoy this dish as a spontaneous weekend treat or a comforting end to a week. It’s a versatile dessert that pairs beautifully with a final splash of cream or a scoop of vanilla ice cream. Whatever your moment, this crumble offers a piece of heritage wrapped in seasonal joy.

  • Autumn’s Surprise: The Cozy Fall Chicken Casserole You Never Saw Coming

    Autumn’s Surprise: The Cozy Fall Chicken Casserole You Never Saw Coming

    As the leaves turn fiery shades and a crispness fills the air, I find myself craving dishes that celebrate the season’s bounty with a twist. This isn’t your ordinary chicken casserole; it’s an unexpected homage to fall’s hidden flavors, blending sweet butternut squash with hearty herbs, all in a creamy, cheesy embrace. It’s the kind of dish that makes you pause, breathe in that warm, cinnamon-scented air, then eagerly dig in.

    I started experimenting with fall ingredients outside their usual role. The result? A comforting yet lively casserole with layers of texture and flavor that surprise the palate. It’s perfect for a busy weekday or a casual gathering, where everyone will love the storytelling in every bite. The best part? It smells like autumn mornings long gone but forever cherished.

    Fall Butternut Squash Chicken Casserole

    This casserole combines tender chunks of chicken with roasted butternut squash, layered with herbs and a creamy cheese sauce. It bakes to a golden-brown top with a bubbling, velvety interior that highlights autumn-inspired flavors and textures.
    Prep Time 15 minutes
    Cook Time 40 minutes
    Total Time 55 minutes
    Servings: 4
    Course: Main Course
    Cuisine: American
    Calories: 450

    Ingredients
      

    • 1 pound boneless, skinless chicken breasts cut into bite-sized pieces
    • 1 medium butternut squash peeled, seeded, and cubed
    • 2 tablespoons olive oil divided
    • 1 teaspoon ground cinnamon
    • 1 teaspoon dried thyme
    • 1/2 teaspoon salt
    • 1/4 teaspoon black pepper
    • 2 cloves garlic minced
    • 2 cups chicken broth
    • 1 cup milk
    • 3 tablespoons unsalted butter
    • 3 tablespoons all-purpose flour
    • 1 cup shredded cheddar cheese
    • 1/2 cup parmesan cheese

    Equipment

    • Chef’s knife
    • Cutting board
    • Large mixing bowl
    • Baking Dish
    • Saucepan
    • Whisk
    • Rubber spatula

    Method
     

    1. Preheat your oven to 400°F (200°C). Toss the cubed butternut squash with one tablespoon of olive oil, cinnamon, half of the thyme, salt, and pepper. Spread evenly on a baking sheet and roast for about 25 minutes until tender and caramelized.
    2. Meanwhile, season the chicken pieces with remaining thyme, salt, and pepper. Heat the remaining olive oil in a large skillet over medium heat, then add the chicken. Cook until browned and cooked through, about 6–8 minutes. Remove from heat and set aside.
    3. In the same skillet, add butter and minced garlic; cook until fragrant, about 1 minute. Whisk in the flour and cook for another minute to form a roux, stirring constantly.
    4. Gradually pour in the chicken broth and milk, whisking continuously to prevent lumps. Bring the mixture to a gentle simmer and cook until it thickens slightly, about 3–5 minutes.
    5. Stir in shredded cheddar and Parmesan cheeses until melted and smooth. Adjust seasoning if necessary.
    6. In a large mixing bowl, combine the roasted butternut squash, cooked chicken, and cheese sauce. Gently fold everything together until evenly coated.
    7. Transfer the mixture to a greased baking dish, spreading it out into an even layer. Place in the oven and bake for about 15 minutes, until the top is bubbly and golden.
    8. Remove from oven and let it rest for a few minutes. Serve hot, garnished with additional herbs if desired.

    Notes

    For extra flavor, sprinkle chopped fresh parsley or thyme on top before serving. To streamline prep, roast the squash and cook the chicken separately ahead of time.

    In the rush of the season, this casserole offers a moment of warm unpredictability. Each spoonful carries the nostalgic aroma of fall, paired with a lively, comforting texture that keeps everyone coming back for more. It’s not just a meal—it’s an experience wrapped in cozy layers.

    Crafted for those who cherish seasonal flavors but love a touch of novelty, this dish adds a splash of culinary creativity to your table. Plus, it’s surprisingly forgiving—good for any kitchen chaos the season might throw your way. Warm, simple, and utterly rewarding, it’s a quiet celebration of everything autumn has to offer.